


September 24, 2017
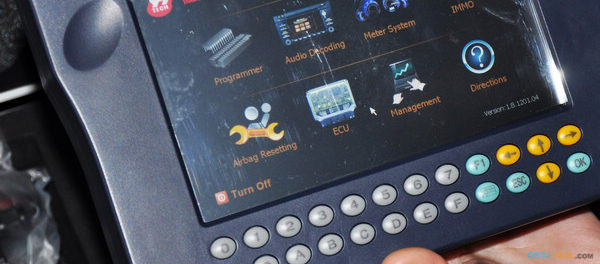
Here is show how to update skp1000 key programmer
Take out the TF card and insert it into the card reader
plug into the computer USB port
go to My Computer/local disk (H![]()
"Format†disk H:
Tip: Tick on the "Quick format†and click on"Startâ€
format completes
go to the official site to download the update file
then copy and paste the file into the TF card
plug the TF card into the machine
power on the machine to the main interface

click on "Firmware updateâ€

choose "System firmware updateâ€, press "Yesâ€

Update successfully

Press "No†to back.

goto †Adapter firmware updateâ€
after finish, reboot the machine foruse

Done
http://cheapobd2.com/2017/09/14/how-to-update-skp1000-key-programmer/
Posted by: Emily white at
01:14 PM
| No Comments
| Add Comment
Post contains 117 words, total size 2 kb.
Here a list ofYanhua Digimaster 3 mileage correction Feedback on what works and what does not work.
1.DIGIMASTER 3 What works.
1) For Mercedes Benz
-Benz E63 2010 W204 EZS – Cluster OBD ok
-Digimaster is hit or miss on everything. I’ve been using the Digimaster 3 for several years now.
I got the DSPIII and use that for almost everything now.
– Benz 2004 C180 W203 Dash Ezs – OBD no good.
Dash Ezs – programmed manually – good
-Benz 2004 C180 Compressor W203 – OBD no good.
Dash Ezs – programmed manually – good.
-Done Mercedes E270 2005 W211 by obd, and it was ok.
-CLK 230 2004 W209 EZS-CLUSTER OBD-NO GOOD
EZS-CLUSTER MANUALY-GOOD
-CLK 230 2004 W209 EZS-CLUSTER OBD-NO GOOD
EZS-CLUSTER MANUALY-GOOD
2) For BMW:
– BMW X6 2009 CAS-DASH OK
– 2009 1 series E88 CAS-DASH OK
-BMW & MERCEDES ecu cloning 29f800 good
-BMW F10 CAS4 + Dash Ok
3) For VW
-2012 vw polo obd ok
-Digimaster3 on 2011 Audi A5 – DASH – OBD2 – OK!
– volvo s80 2003 wires direct – good
– I did programme a 1999 s500 key with it
– I use it for toyota corolla
-i started withMileage Correction digimaster 3 about three years back, could not do many cars it claims to do. so customers go to someone else and never come back. it does however have other functions like key programming of some cars and immo/airbag clear.
DIGIMASTER 3 Does not work?
1) 01-06-2014 update:
Mercedes E270 2005 W211 by OBD no good !
EZS Manually no good ! (no connection ) Any ideas anyone ?????118
Cluster Plug no good ! Cluster eeprom Good !
Cas BDM Adaptor faulty ! Tried another bdm adaptor and worked.
2) Ford Fiesta 2009 obd-No Good Obp-No Good
3) mb a class a170 wires direct – Not good
http://yanhuadigimaster3.blogspot.com/2017/09/digimaster-3-connector-instruction.html
Posted by: Emily white at
02:47 AM
| No Comments
| Add Comment
Post contains 323 words, total size 3 kb.
September 15, 2017
This is a how-to guide ofwiTech MicroPod 2 Chrysler diagnostic tool setup.
If your dealership purchased a new microPOD and you would like to convert your existing microPOD for using with wiTECH 2.0 System, you need to download and install the microPOD Setup Utility to configure/setup your microPOD for wiTECH 2.0.
NOTE: microPODs with a serial number beginning with "WFP†should NOT be used with this utility.
PROCEDURE
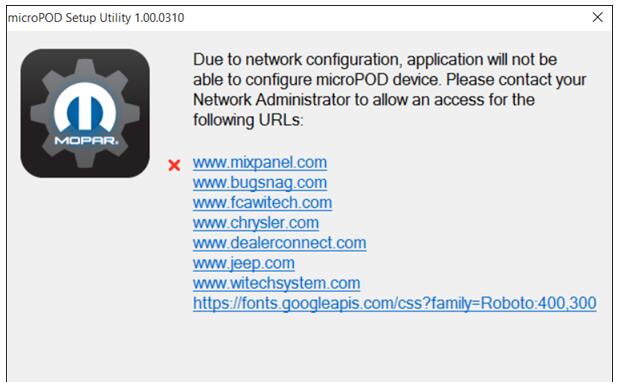
If you have a restricted network, you must first make sure that all sites listed below are enabled to be able to successfully use microPOD Setup Utility and the wiTECH 2.0 System from Obd2tool.com.
mixpanel.com
bugsnag.com
fcawitech.com
chrysler.com
dealerconnect.com
jeep.com
witechsystem.com
Note: Please disable any Anti-Virus software that you have on your computer in order to allow the microPOD Setup Utility to install and run properly.
How to download and install the microPOD Setup Utility
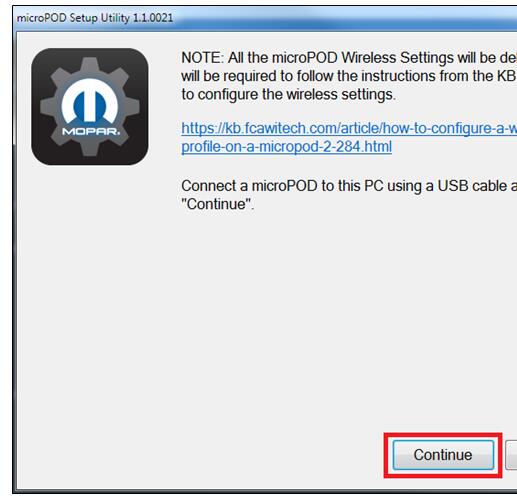
IMPORTANT: Once the microPOD is configured using the microPOD Setup Utility, all the microPOD Wireless Settings will be deleted. You will be required to follow the instructions from the KB link titled "How to configure a Wireless Profile on a microPOD IIâ€.
To download the application, please login to DealerCONNECT > Service > wiTECH Information > microPod Setup Utility
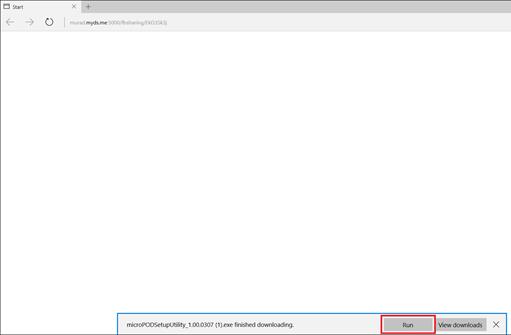
Step 1
Click on "Run†to begin the downloading process of microPOD Setup Utility.
Step 2
The install wizard will appear to install the wiTECH Driver x64 onto your computer if your PC has not been installed with wiTECH 1.0 application.
If the PC has been installed with wiTECH 1.0 App, you will not see the screen below and proceed to Step 6. Otherwise, click "Next†to proceed.
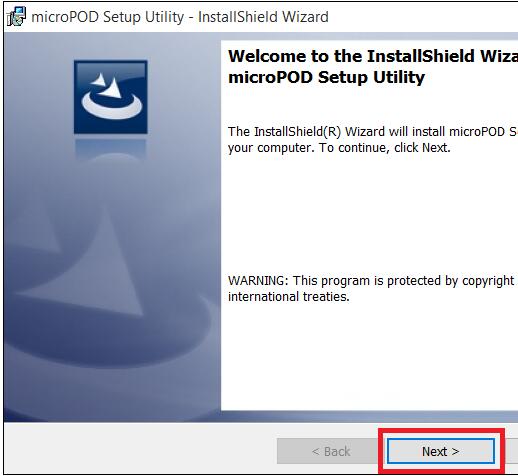
Step 3
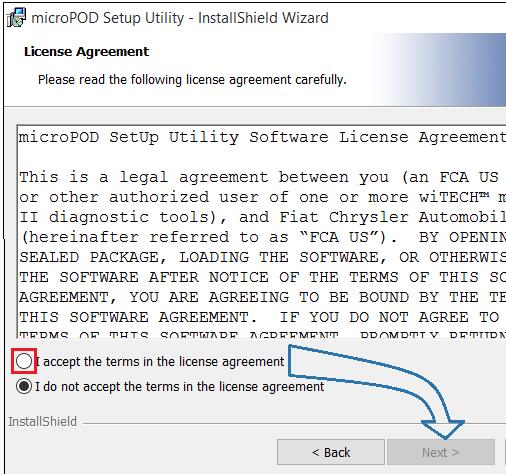
Read the License Agreement carefully, and accept the terms in the license agreement. Then, click "Next†to continue.
Step 4
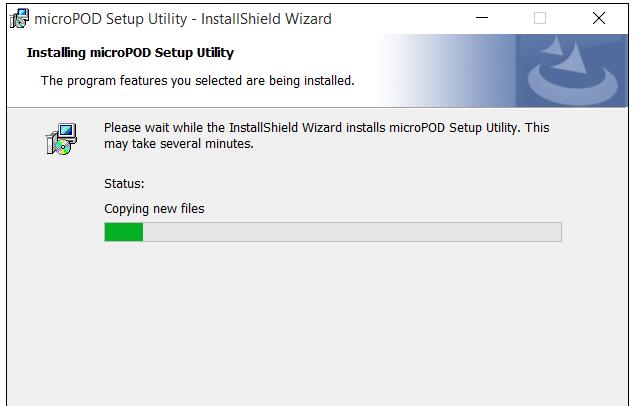
You are now ready to start the actual installation of the driver. You now need to click on "Install†for it to start.

Step 5
This will now install theAuto Scanner Tool wiTECH Driver x64. Once complete, the program will automatically proceed to the next step.
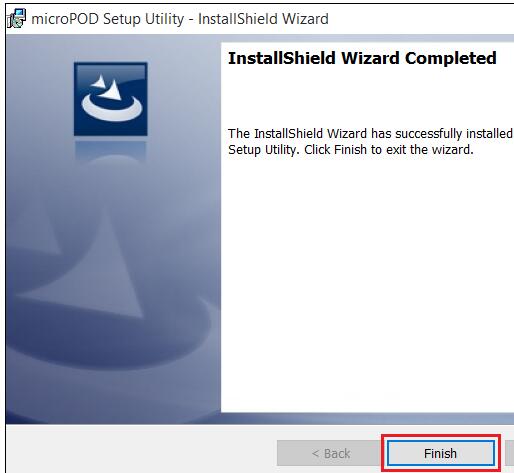
Step 6
Once the installation has completed, click "Finishâ€. Proceed to the following section, "Using the microPOD Setup Utilityâ€.
Using the microPOD Setup Utility
NOTE: Please make sure that your computer is connected to the internet and the microPOD is connected to the computer via USB before starting this process. This application will help you configure your microPOD for wiTECH 2.0.
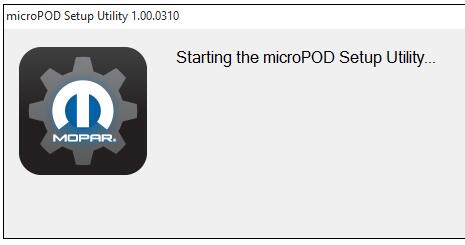
Step 1
Start microPOD Setup Utility by clicking the icon on the desktop:
If the microPOD Setup Utility that is installed is out of date, you will be forced to update to the newer version of the application.
Step 2
Please make sure your microPOD is connected to the PC via USB.
Step 2a
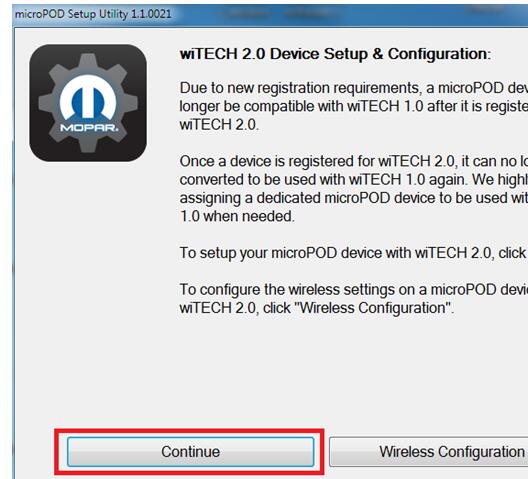
If you see the following screen you may not be connected to the internet, or have a firewall that blocks 1 or more of these websites.
Select "Continue†on the next screen for wiTECH 2.0 Device Setup and Configuration.
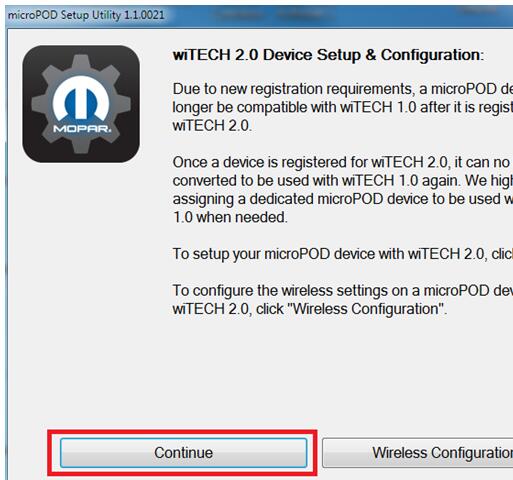
NOTE: If you only want to configure the wireless setting on a microPod device to use with wiTECH 2.0, click "Wireless Configuration†and follow instructions.
Select "Continue†on the next screen to begin attempting to connect to the microPOD device.
Step 3
Once your microPOD II is recognized by the utility, select "Continue†to proceed with the configuration.
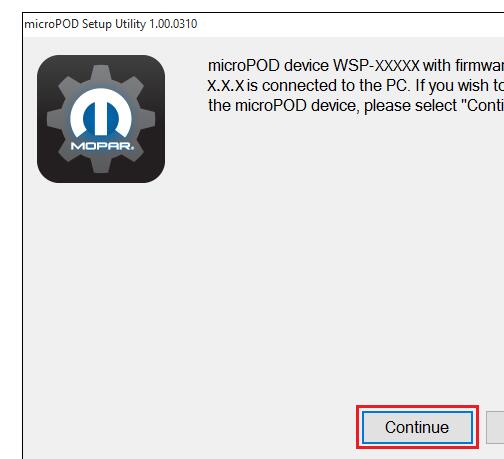
NOTE: microPODs with a serial number beginning with "WFP†should NOT be used with this utility.
Step 3a
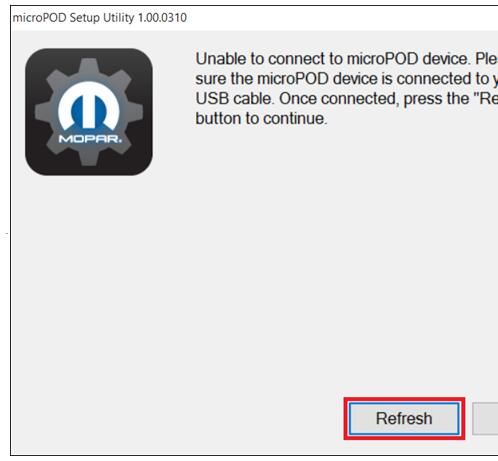
If the utility does not find the microPOD device, please assure that the microPOD is connected via USB and click "Refreshâ€
Step 4
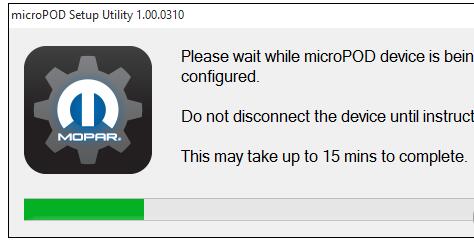
The following screen will appear for up to 15 minutes while the microPOD device is being configured.
Step 5
The following screen will appear when the utility completed the configuration of microPOD for wiTECH 2.0 Application.
Note: After microPOD Setup Utility is ran, all existing wireless networks will be removed from the microPOD.
Important! Leave the microPod Setup Utility window running as you will be required to complete software updates to the microPod device before configuring the wireless.
Step 5
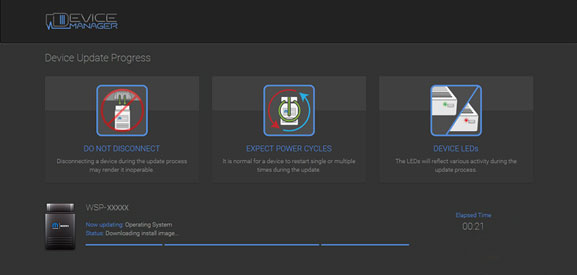
Login into wiTECH 2.0. The microPOD II that was just configured using the microPOD Setup Utility should appear in the wiTECH 2.0 discovery. You will need to update the operating system of your microPOD II before it can be used with wiTECH 2.0. Click "Continueâ€, and your web browser will redirect you to the page to download and install the operating system update as seen in the following step.
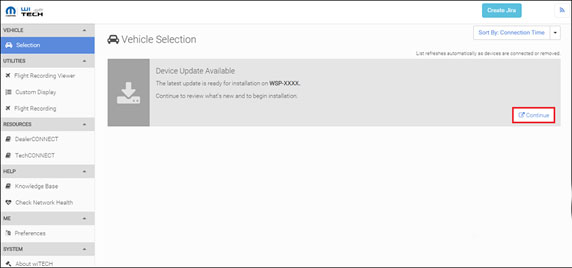
*NOTE: If microPOD II does not show up in discovery after a couple of minutes please power cycle your microPOD II by unplugging it and plugging it back in.
Step 6
Click "Update Now†and your microPOD II should continue to the update screen. Once updating, do not interrupt your microPOD II at any point until the update is complete.
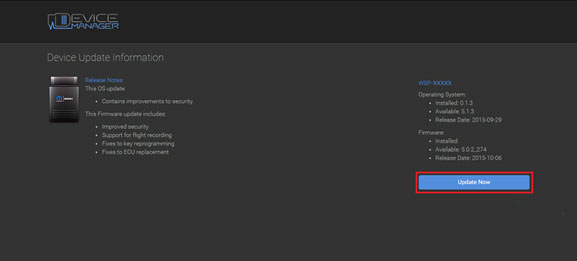
*NOTE: This can take upwards of 9 minutes. It is normal activity for the microPOD II to reboot.
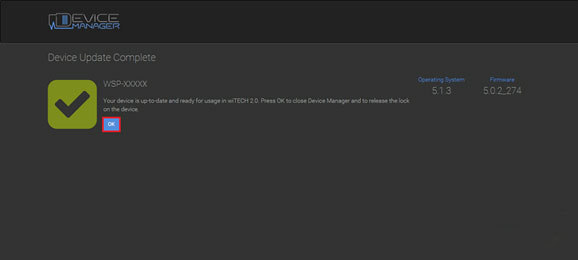
Step 7
Click "OK†and you will be navigated back to the wiTECH 2.0 discovery page. Your microPOD II should appear updated and ready for use.
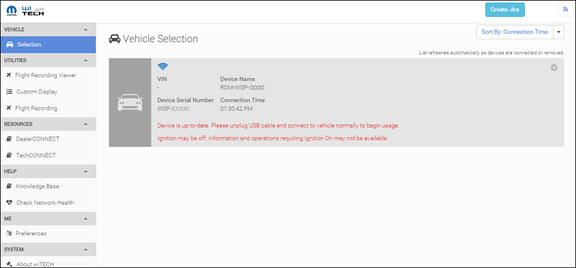
Step 8
With the microPod Setup Utility still running, configure wireless on the wiTECH microPod II device.
Enjoy!
http://cheapobd2.com/2017/09/13/how-to-set-up-witech-micropod-2-chrysler-diagnostic-tool/
Posted by: Emily white at
09:34 AM
| No Comments
| Add Comment
Post contains 873 words, total size 10 kb.
September 13, 2017
As a professional mechanic, I have done a lot of research on ECU programmer, I was impressed on two products KTAG and KESS V2 from Obd2tool.com. Here I will Share my understanding of them.
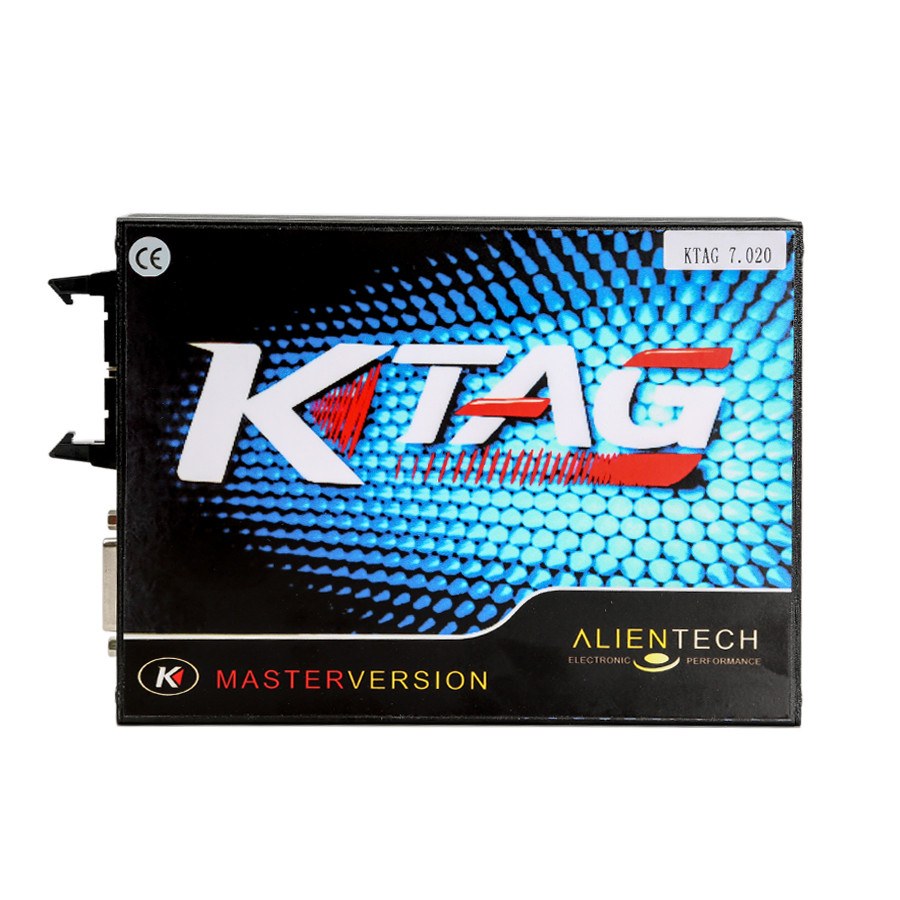
KTAG ECU Programming Tool
KTAG V7.020introduces another brand new novelty to Alientech world: J-Tag communication for Asian vehicles.
The main difference between KTAG is the hardware version, the software can be arbitrarily matched, but my advice is using lower version of the software which may support more models than higher version.
Why? I think the hardware cannot keep up with a higher version of the software and will lead to a lot of gray buttons mean some function cannot be used.
Well, some friends asked me that will KTAG easily burn the ECU out? The answer is never. FGTECH may get ECU damage if the power supply is reversed, but KTAG will never damage ECU. But you should notice that disconnect Internet while using KTAG, otherwise It Will Get Damaged. As for the operate system, it is better to Use Win XP3.
KTM100
KTM100 clone features the same as KTAG
You should notice Never use the original software, it may damage the device. With their software, even is safe if connect to the network. I download the original software to use with and get My KTM100 damaged, its buttons are all gray, nothing can be used, finally back to factory for repair cost me much money.
Although it is much more expensive than ktag, but KTM100 has no-replaced highlights:
1.KTM100
can read encrypted ECU, for example: someone wants to read BOSCH
MEV1746BMW (P171) this is encrypted ECU, then he can use the KTM100 to
read.
2.Can read BMW N55 N20, BENZ and other encrypted computers
3.KTM100 and KTAG can be used to do CHECKSUM, KESS V2 cannot. If you
want to do power upgrade, read data using KTAG or KTM100, you need to
change the data, and then do KTAG or KTM100 checksum, and write the ECU
computer. If CHECKSUM error, usually the user’s data problems. KTAG and
KTM100 can be used to verify those errors.
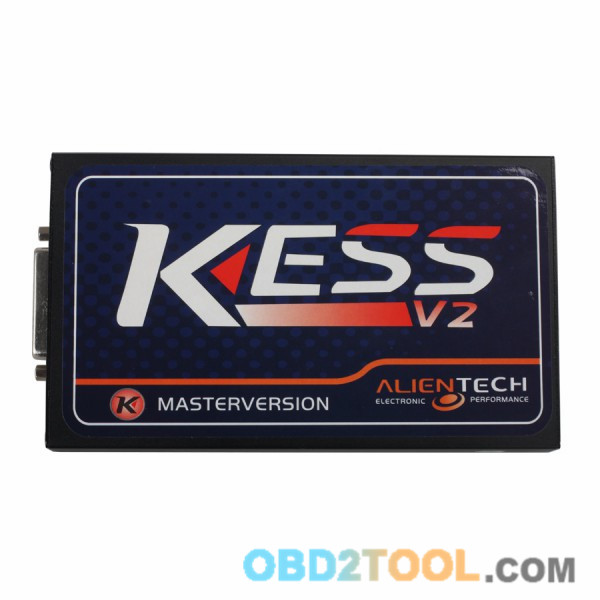
The main difference between KESS V2 is also the hardware version. Some use the old hardware version V3.099, they just come from different manufacturers, so the price is different. And some use the new hardware version, V4.036.
The big KESS family has a version supports for more trucks, and we call it truck version, that is really a big highlight.
I am here simply to talk with you about the attention points of these three products. I have bought a ktag and aECU Chip Tuning kess v2 for personal use, someone wants the different version can get them here:
https://www.kiwibox.com/obd2lily/blog/entry/141460853/notes-on-using-ktag-k-tag-ecu-programming-tool
Posted by: Emily white at
03:27 PM
| No Comments
| Add Comment
Post contains 461 words, total size 4 kb.
September 10, 2017

Autel MaxiDAS DS808Kwith Full Connector Kit Table Auto Diagnostic Tool Support Injector Coding and Key Coding Upgrade Version of DS808 DS708 Light Package
1.Full Kit Autel MaxiDAS DS808K including OBD1 connector and adapters, is upgrade version of Autel DS708, based on Android operating system
2.MaxiDAS DS808K support Injector coding and key coding, TPMS Basic Function,Battery Register/Battery Maintenance and Electronic Throttle Position Reset/Learn
3.Autel DS808 support protocols including ISO9141-2, ISO14230-2,ISO15765, K/L-Line, Flashing Code, SAE-J1850 VPW, SAE-J1850 PWM, ISO11898(Highspeed, Middlespeed, Lowspeed and Singlewire CAN, fault-tolerant CAN), SAE J2610,GM UART,UART Echo Byte Protocol, Honda Diag-H Protocol, TP2.0, TP1.6
4.Language: English, if you need other language like Spanish or French, need pay additional 120usd. DS808 support one year free update online, after one year update cost about 349.5usd/year
5.Autel MaxiDAS DS808K FROMobd2tool.com is equipped with a fast quad-core processor and a 7-inch LCD touchscreen (1024X600 quality), and offers maximum convenience and efficiency for your diagnosis; This is light packaging set, easy to carry, additionally we provide free gift with purchase of MaxiDAS DS808K
Based on the Android operating system and with 7-inch LCD touch screen (1024*600 resolution), MaxiDAS DS808K (With Conkit) full set is featured with an extensive coverage of OE-level diagnostics. Installed with a fast quad-core processor, DS808 (With Conkit) offers maximum convenience and efficiency for your diagnosis and analysis.
MaxiDAS DS808 (With Conkit) Features:
Extensive vehicle coverage for more than 80 US, Asian and European vehicle makes
Exceptional OE-Level system coverage for all electronic systems
Complete capabilities for codes, live data, active test, ECU information, adaptation, matching, etc.
Smart AutoVIN technology for identifying vehicles easily
Automatic system and software updates with real-time push message notifications via Wi-Fi
Instant remote control tech support anytime, anywhere
Cloud-based MaxiFix online community provides a vast database of diagnostic and repair tips and proven filed fixes
Interactive Data Logging sessions enable direct contact with Autel
Technical Support for first-hand troubleshooting of diagnostic bugs and
errors
One-stop multitasking designed for ideal management of workshop
operations to keep all data files, customer info, and vehicle records
well organized
Convenient data management system for managing internal program applications and reviewing data
Super Durable Material and Poweful Hardware
MaxiDAS DS808K (With Conkit) Specifications:
Operating System:Android 4.4.4
Processor:Cortex-A9 processor (1.5 GHz)
Memory :32GB
Display:7-inch LCD capacitive touchscreen with 1024×600 resolution
Connectivity: Mini USB 2.0 USB 2.0 Wi-Fi Micro SD card (supports up to 32GB)
Sensors:Ambient light sensor for brightness auto changing
Audio Input/Output: Input: N/A Output: buzzer
Power and Battery:3.7 V/3200 mAh lithium-polymer battery Charges via 5 VDC power supply
Tested Battery Life:Around 4.5 hours of continuous use
Battery Charging Input:5 V/1.5 A
Power Consumption:500 mA (LCD on with default brightness, Wi-Fi on) @3.7 V
Operating Temp:-10 to 60°C(14 to 140°F)
Storage Temp:-20 to 70°C (-4 to 158°F)
Operating Humidity:5% – 95% non-condensing
Dimensions (W x H x D):237.8 mm (9.4â€) x 148.6 mm (5.9â€) x 35.5 mm (1.4â€)
Net Weight:788 g (2.42 lb.)
Full kit including OBD1 connectors and cables
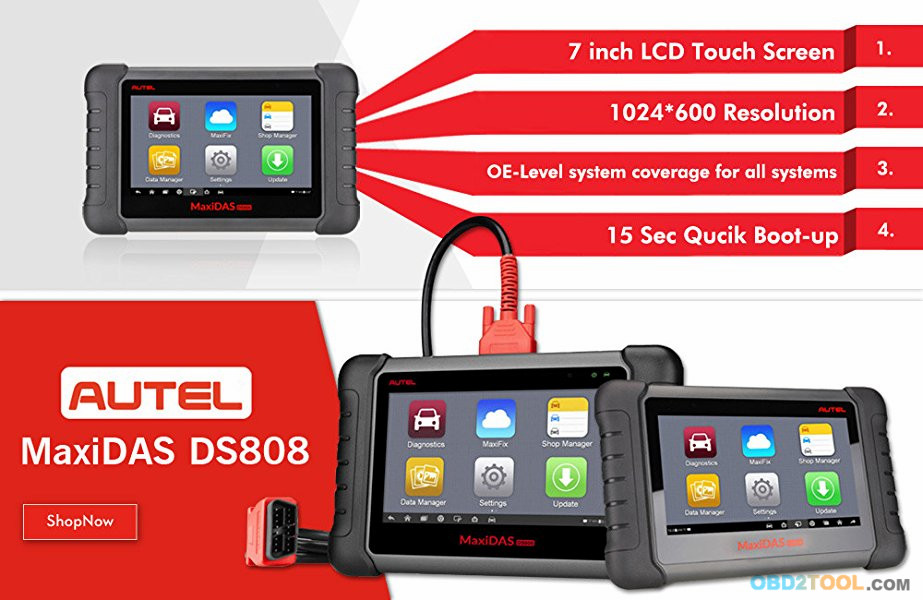
Auto Scanner Tool Full
kit MaxiDAS DS808 package contain not only DS808 main unit and OBD2
cable, but also contain OBD1 connector and cables for old vehicles.
Posted by: Emily white at
02:49 AM
| No Comments
| Add Comment
Post contains 519 words, total size 5 kb.
September 02, 2017
Problem:
Feedback from some KESS V2 user: Car ECU Programmer KESS V2 not works with some k-line or does not work well.
Solution:
The 9613 chip is Chinese standard, not international standard, so the
technical parameter is not compatible, and neither is the chip from
Malaysia Thailand and Taiwan. Advice users buy the America-made 9613
chip to replace it.
In the near future, Chinese factory will use Chinese 9637 to replace 9613, and this error will gradually disappear.
In the near future, Chinese factory will use Chinese 9637 to replace 9613, and this error will gradually disappear.
If you have more problem about KESS V2 pls read:FAQs aboutV2.23 Kess V2 OBD2 Tuning Kit
Hope it can help you solve you problems.
Our customers feedback some problem about kess v2 at Obd2tool.com,we sovled it and have written below,if you have same problems,it will help you.
http://obd2tools.microblr.com/post/85860/How_to_solve_KESS_V2_Wake_up_error
Posted by: Emily white at
03:21 PM
| No Comments
| Add Comment
Post contains 156 words, total size 2 kb.
Share the easiest way to obtain FSC code for BMW cars, with no need ofBMW ICOM A2 to get 1B file, but only with ENET cable.
Models supported:
all F models and latest E models
Tools:
DIY an ENET cable
or buy it online at obd2tool.com
NOTE: this car diagnostic scanner has been confirmed working by many BMW friends. I wouldn’t recommend other sites, although they may work, problem is that they have not been confirmed working yet. Functions of enet cable at obd2 has been tested for years (many discussion in forums).
Only four wires are connected and there is no need to ground anything.
For those models without TX and RX on OBD plug, you will have to make
your own connection on the 10 pin plug, in the back of your CIC/CCC
unit.
Setup your laptop network card TCP/IPV4 to:
IP: 169.254.199.98
subnet: 255.255.255.0
gateway: 169.254.199.99
DNS does not matter.
You can set your IPV4: control panel / network and sharing center than chose you connection and click properties.
Connect BMW ENET cable to your pc and to your car and turn on ignition (ACC).
Use internet explorer and go to ftp://169.254.199.99.
password is asked:
user: root
Password : cic0803 or Hm83stN
go to root
click on directory HBpersistence
click on directory normal
click on file generalPersistencyData_DiagnosticSWTController and save it.
Download a Hex editor (for instance HXD) and install.
Open the file you have downloaded from CIC with HxD and set HxD to HEX mode.
Seach on file for 01 01 00 1B
Highlight and delete eveything prior to 01 01 00 1B
On line 130 delete last block (last 2 entries) and everything after it.
Save file as "a.hexâ€. You will get an exactly 319 bytes file.
Downlods FSC tools. The only thing required is FSC.EXE and FSC.BAT.
Edit fsc.bat file in order to input your map region and year.
Map region and year are obtained from map info on last install usb. Use Hxd to read it.
For WEST Europe you will see 0028 0008 on 2016-1 premium map.
0028 is west europe followed by year (0008 is 2016, 0007 is 2015,….).
You can generate a FSC code using on your fcs.bat file 0x28 0x08 (2016-1 premium west europe map)
If you want to generate a lifetime code, use:
0x28 0XFF and change this on fsc.bat.
Your FSC.BAT will look like this:
ECHO OFF
CLS
IF NOT EXIST fsc.exe ECHO File fsc.exe NOT FOUND !
IF NOT EXIST a.hex ECHO a.hex does NOT EXIST !
fsc a.hex 0x28 0xFF > code.txt
IF %ERRORLEVEL% EQU 0 ECHO File code.txt was created successfuly!
PAUSE
Other regions are obtained from map info.
0xFF generates a lifetime code.
Make sure that fcs.bat, fcs.exe and a.hex are together and run fcs.bat.
If everything is in order, you will get a code.txt. file with your code.
ENET coding cable + E-sys do well in FSC codes generation
http://obd2diag.ivoire-blog.com/archive/2017/09/02/bmw-f25-auto-start-and-stop-coding-with-e-sys-interface-472081.html
Posted by: Emily white at
08:12 AM
| No Comments
| Add Comment
Post contains 495 words, total size 4 kb.
32 queries taking 0.0318 seconds, 170 records returned.
Powered by Minx 1.1.6c-pink.

