


April 18, 2019
1. Super Capable Diagnostics and Very Ruggedly Built
I did a lot of research on high end scanners/code readers/diagnostic
computers before actually settling on this make/model for the shop. Glad
I did. This unit does everything any auto service shop could ask for
(except tire pressure sensor replacement). Super easy to use as most
functions are intuitive. I have two mechanics that work for me and we
get some really problematic vehicles that have proven very hard to
diagnose the problem (sometimes intermittent). With some smart use of
this tool, it locates the problem quickly and more importantly, you have
complete confidence that you have corrected the issue using the data
logging capability. The blue tooth connected OBDII interface is
absolutely super. Being able to walk around the car/shop while connected
to the car, or just sit in the passenger seat watching live data during
a test drive is awesome.
I know I made the right selection when the mechanics compete over who
gets to use this tool vs the other computer. May have to buy another one
of these to keep these guys happy. One last thing is that this thing
seems pretty tough. It has fallen off of the car onto the floor at least
twice that I’ve witnessed and it hasn’t skipped a beat. If you’re
buying this for a business, rugged toughness is a big reason to buy
whatever you select.
2.A worth while purchase
I have used the scanner for only a short time but I find it easy to use, and a scanner with many options to include many bidirectional controls. The automatic updates (for a year) will keep my tool current for modern cars.
3. Excellent scan tool for the BIG BOYS
This unit works great. The battery life and specs are incredible. It saves me tons of diagnostic time, I tried the 905mini but, the battery life was just not where I needed it to be. This is the best scan tool I’ve ever worked with. The seller ODBPRICE had the best price on this tool I could find.
4. The AUTEL MaxiSYS MS906BT is a POWERFUL tool and was a nice upgrade to my outdated SnapOn Solus Pro
The tool came as described. The seller even contacted me to make sure I had a smooth transaction. I have not had any problems and everything is working perfectly so far. The MS906BT is a POWERFUL tool and was a nice upgrade to my outdated SnapOn Solus Pro.
5. Better then the Honda HDS
Great product and great seller. Good communication. I use this product daily and it never lets me down. This scanner can do everything a factory scanner can do and do it quicker. I worked 25 years for Acura using the Honda scanner and this scanner is way simpler to use and can do every function the factory scanner does. 5 stars!
6. Best tool for price/function
This is an exceptional tool when compared to price and function. I’ve used several big name scanners from Snapon and Mac as well as oem such as Witech. This tool has numerous vehicle coverage and functions. You’re able to perform many bidirectional test as well as reset maintenance options. Also, it reads the majority of PIDS on the vehicle. That in itself is worth the price. Overall I’m very pleased and impressed with this product so far. Autel has done an exceptional job.
Posted by: Emily white at
12:46 PM
| No Comments
| Add Comment
Post contains 574 words, total size 4 kb.
April 14, 2019
What you can find here:
1. SCN coding compatible hardware MB SD Connect C4
2. How to use SCN connect c4 to do SCN coding
3. SCN coding importance
1. Question: can clone MB SD C4 support Mercedes online SCN coding?
The answer is yes. Newest MB SD C4 2019.03V / 2018.12 can perform online
SCN coding perfectly as long as you have online software account or buy
one-time SCN coding service.
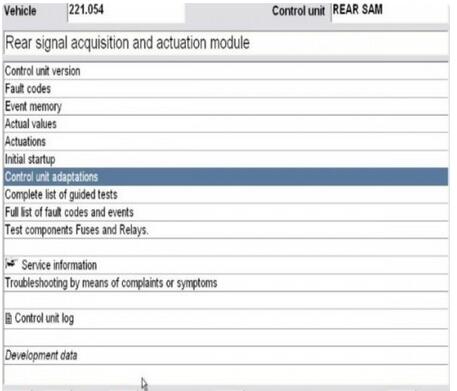
Image: MB SD C4

Image:Xentry 2019.03V
Source of SCN coding account:
Source 1: MB Online SCN Coding / Online programming 1 Year Account
Source 2:
1.) After ordering this service, prepare mb sd c4, car, laptop and teamviewer.
2.) Send Teamviewer ID and Password to customer service
3.) The engineer will access to your laptop to authorize SCN coding function.
4.) After finish, the system will display "The SCN coding sequence has been completed successfullyâ€.
2. SCN coding importance
The move to SCN coding was *very* important. There are too many
configuration items in every ECU now to have someone set options by hand
whenever an ECU is changed, or to understand how changes on one device
have to be done on other devices. These cars are really very very
complex, and unlike your laptop, if something goes wrong can result in
fatalities.
There are software dependancies between different ECUs, and actually loading software into ECUs is now needed regularly – and thus so is up-to-date diagnosis equipment and up-to-date firmware disks too. A simple example is the Audio system. If you update the firmware in the COMAND unit the firmware in every other MOST device needs also to be compatible (if you want it to work reliably) and thus they all need firmware updates. If you change one component then all components need to be updated to be properly compatible.
The latest equipment even now uses ethernet to load firmware into some ECUs (so it takes 20 minutes not 20 hours).
Without SCN coding it would take considerably longer to change any control unit, would result in mistaken configurations, and thus the cost of repair (or re-repair) would go up and up as systems got more complicated. SCN coding basically allows the correct configuration to be loaded into the car.
Imagine what could/would happen if you had to "hand code†the airbag controller after replacing it ? Would you trust all of your airbags to work after the local mechanic had to set all the options correctly ? I certainly would not.
Your comment that "The capital cost of the latest version, plus the monthly subscription, means it is beyond the reach of many smaller independent garages†is just wrong.
If your garage has the skills to deal with the technology (and i’d argue that if they don’t they shouldn’t be doing complex things with the newest vehicles), then it is completely affordable.
If you want to work on older cars, then most independents seem to use a clone machine and use it for limited things.
The EU competition commissioner has previously taken a good look at this market and enforced rules that mean diagnosis equipment (for newer vehicles) is available at sensible prices. This is not true in the rest of the world. Mercedes diagnosis systems in USA are more expensive, and in the far east (and I think Australia) are not available at all to independents.
Sorry to be so contradictory, and in summary, but without SCN coding there would be mis-configurations and un-reliability – possibly dangerous to life – occurring quite regularly. And if you are going to need to work on newer cars, there are very affordable Xentry diagnostics systems – you just need to talk to Mercedes.
Posted by: Emily white at
01:17 PM
| No Comments
| Add Comment
Post contains 624 words, total size 5 kb.
April 08, 2019
Here Obd2tool.com share the procedures to read Freescale MC68HC908GR16(0M76Z) by XPROG-M.
Preparations:
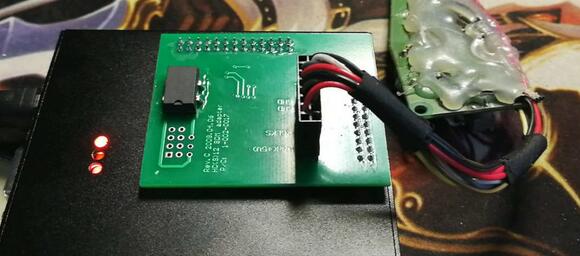
XPROG-Mv5.84 Programmer Interface4
How to Install XProg-M V5.84 Software on Win7
Procedures:
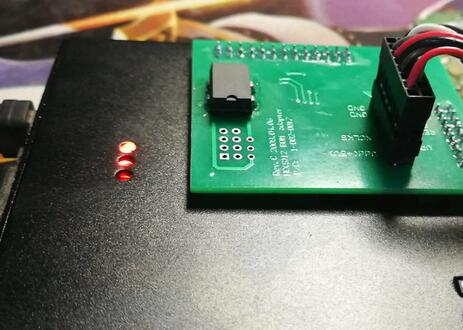
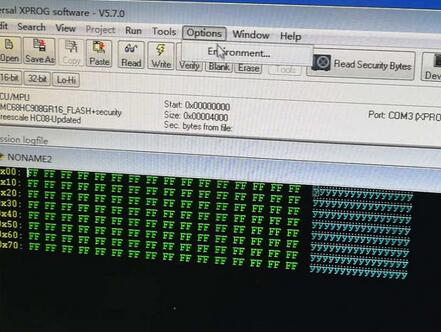
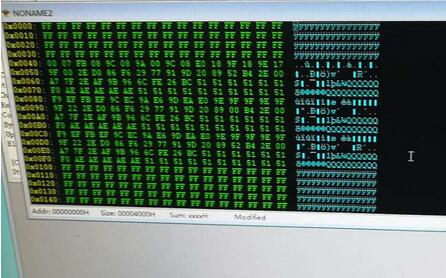
Open Xprog software (5.70, 5.74, 5.84) , click on "Read Security Bytesâ€.
You can see the indicator flashes during the process.

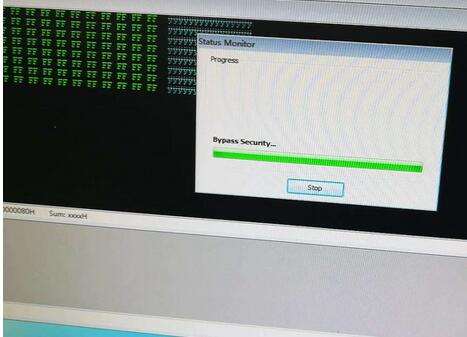
No need to enter any "Security Bytes Nameâ€, just click on "OKâ€.
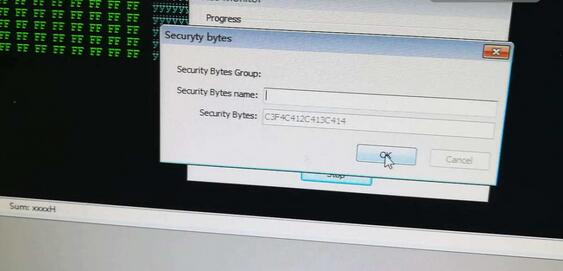
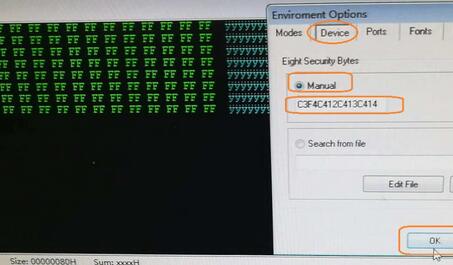
Click on "Optionsâ€, then "Environmentâ€.
Select "Deviceâ€, then "Manual†and then input "C3F4C412C413C414â€, then "OKâ€.
Click on "Readâ€.
Brand: Freescale.
Type: MCU
Device: MC68HC908GR16(0M76Z)
Security bytes: C3G4C412C413C414 – ok

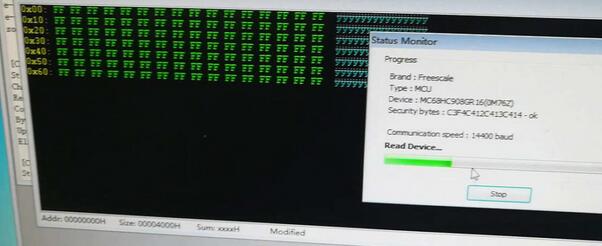

Done.
Posted by: Emily white at
06:33 AM
| No Comments
| Add Comment
Post contains 95 words, total size 4 kb.
April 06, 2019
Here Obd2tool.com share the procedures to read Freescale MC68HC908GR16(0M76Z) by XPROG-M.
Preparations:
XPROG-Mv5.84 Programmer Interface4
How to Install XProg-M V5.84 Software on Win7
Procedures:
Open Xprog software (5.70, 5.74, 5.84) , click on "Read Security Bytesâ€.
You can see the indicator flashes during the process.
No need to enter any "Security Bytes Nameâ€, just click on "OKâ€.
Click on "Optionsâ€, then "Environmentâ€.
Select "Deviceâ€, then "Manual†and then input "C3F4C412C413C414â€, then "OKâ€.
Click on "Readâ€.
Brand: Freescale.
Type: MCU
Device: MC68HC908GR16(0M76Z)
Security bytes: C3G4C412C413C414 – ok
Done.
Posted by: Emily white at
12:00 PM
| No Comments
| Add Comment
Post contains 95 words, total size 4 kb.
April 01, 2019
Look here: what you should know if you have a Micropod II for Chrysler diagnostics and programming?
wiTECH installation tips:
1.Install AdobeAIRInstaller.exe
2. Install jre-6u45-windows-i586.exe
3. Install wiTECH_Install_17.04.27.exe
4. Restart the computer
Warning:
1.The computer on the day of the date.
2. The computer must be connected to the Internet.
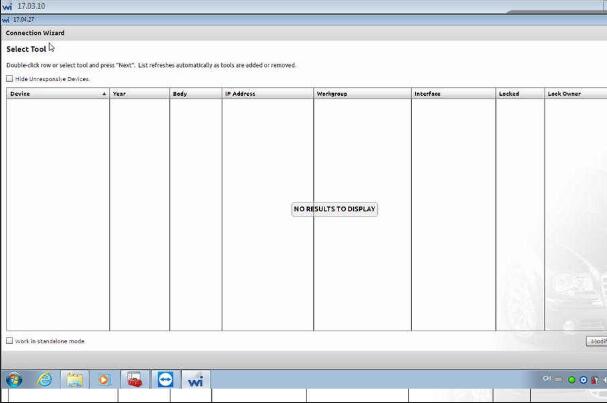
3.Connect the interface with laptop via USB Cable (Automatically install the USB Driver), open the software.
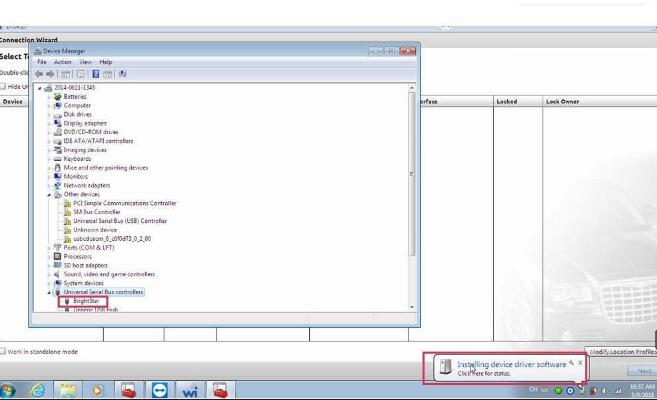
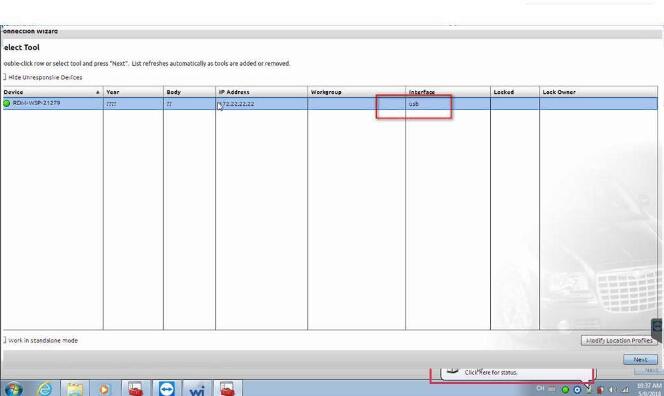
4.Tip registration, Turn off the software and turn it on Repeat several times , then you can use it normally .
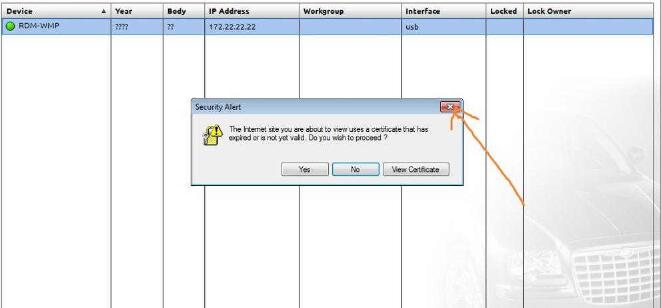
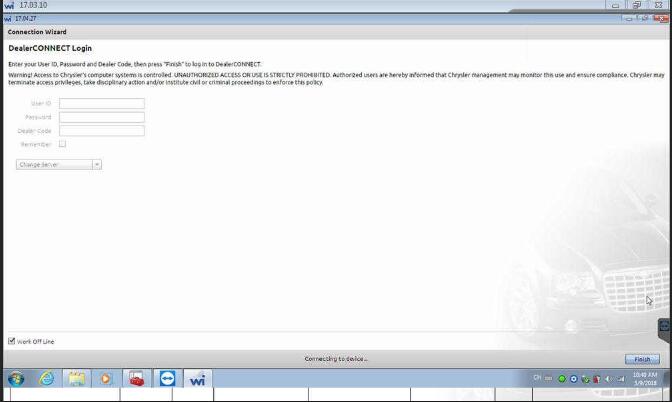
?5.If the software shows †Security Alert †like the follow picture, please click "x†to close it .
6.On the following interface, please choose †work offlineâ€
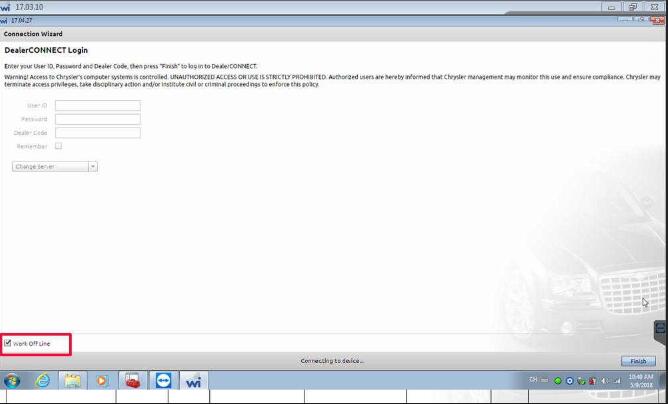
Good to know: wiTECH software confirmed to work without any issue on Windows 7 32bit with Micropod 2 for Chrysler diagnostics and programming
Posted by: Emily white at
03:46 AM
| No Comments
| Add Comment
Post contains 148 words, total size 3 kb.
March 20, 2019
JMD Handy Baby 1 & 2 Updates: (released on 04-03-2019)
Handy baby 1 the latest version is 9.0.4
Handy baby 2 the latest version is 2.30
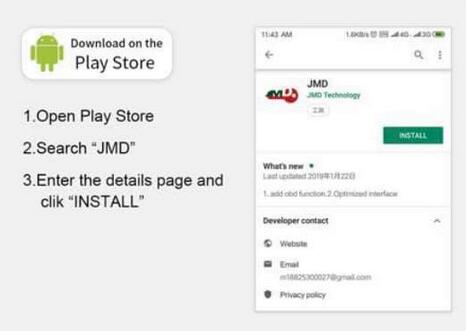
Or Use App only for JMD Handy Baby II
Handy Baby II APP IOS + Android
IOS App
https://itunes.apple.com/gb/app/jmd-handy-baby/id1410179154…
Android App
http://oss.handy-baby.net/…/AndroidJmd-v1.3.2.1-20190221.apk


Posted by: Emily white at
09:44 AM
| No Comments
| Add Comment
Post contains 58 words, total size 2 kb.
March 14, 2019
CGDI MB reviews:
Have collected CGDI programmers feedback of tests on Mercedes.
Credits to all contributors off digital-kaos.co.uk
w164:
i did it today (EIS on bench)
w164
eis A1645451508 new type
pulling dump took 80 minutes
calculating pass online 4 min.
key programmed !!!
w164:
W164 need gateway
w164 2006:
Just did some minutes ago ML350 W164 2006
Read EZS, add key, write BE key all done in 17mn.
Really fast and i’m happy with the first try on car.
Use late software 2.0.0.0
w164 2009:
2009 W164 ML450
Key add work
Cgdi 15min
Very good speed!!
x164 gl 2012:
I did key x164 GL 2012.
All OK.
All done in 10-12 mn.
w164 2009-:
w164 after 2009
I did for testing 2 types of programming _ have got EZS with both
programmed keys because customer claimed somethimes EIS works sometimes
doesn’t – I have found that connector for immo aerial was desoldered
from PCB so when I fixed it – EIS became fully working again – and then I
started testing CGDI and made 2 types of programming (all programming
on bench – EZS + GATEWAY EMULATOR)
1) programming in case one key is available and adding spare key – ALL OK!
2) programming in case of ALL KEYS LOST – ALL OK!
spare key programming was pretty fast
AKL scenario takes circa 80minutes to get data from EIS and You have to
plug in and out emulator key every 5 seconds – I have bought VVDI POWER
ADAPTER to pass all hassle on to adapter so You don’t have to watch
whole process and move key in and out manually – but it doesn’t work
with CGDI – seems adapter works only with VVDI MB and software drives it
by adressed pin to switch connection off and on between ezs and key
emulator – maybe CGDI TEAM could write a code to their SW and make VVDI
POWER ADAPTER useful for all their customers.
w203:
W203 with W209 EZS all key lost, done in the car about 70mn: Succesful.
w203 2004:
W203 2004 spare key making:
Total time about 13 minute when begining to programming new key. Read pass NEC key by IR and calculate PSW
Key still working after get PSW.
Done in car.
w203 2005:
Class C W203 2005 adding key on car.
Spare key made in under 10 minutes.
w203 G500:
Just done a Benz G500 imported from Dubai
EZS 203, data collect is longer, but done in 25mn.
Big problem with BE key, writed 3pcs, only one start engine, remote don’t work.
Finally write Original NEC black key and get bill.
w204 2010:
W204 2010 adding key on bench
w204:
W204 get data: About hour
PSW W204: 11minute all key lost in bench with VVDI cable
He had VVDI and CGDI, said CGDI is faster and no problem to get PSW:
w204:
W204 all key lost on bench
w204/w207:
W204/W207 no problem in bench, use with VVDI cable:
Alessandro silva w204 allkey lost ok 100porcetnto
w207:
I did one W207 on bench and only took about 11 minutes total time
w207 c300 2010:
C300 W207 2010 spare key without problem and in 2 minute
(exiting key is BE, so no need server query PSW)
w209:
Test with my W209 545 31 08 on bench as add key: 15mn all done
Trying all key lost, failed. But a friend do with W209 545 05 08 succes PSW by IR without gayeway
w220:
W220 Read EZS and PW from Key
w211 2010:
Mercedes W221 2010 Facelift S600 V12
w212:
Tested on w212 read ezs but pw Upload dont work
Server down
w212:
Tested today on W212
Read EZS —> OBD work Fine
Calulating PW from EZS —> Work fine Online Server
Key Calculating —> v041 & v051 Work fine online Server
w212 2010 e250:
Mercedes W212 2010 e250 petrol
w212 2012:
tested w212 ALL KEY LOST !!!
Work realy realy good!
Member say:
W212 is from 2012
Read ezs About 30mins
Upload data
Querry
Password given
–
Read eis info
Paste key password
Save
Then key calculation
w210 w164:
W210 added key on bench
W164 added key on car by OBD 10mn.
Another W164 add key with BE key, 3mn
w211 2008:
W221 2008 with key v57 from Japan:
Add key success after 30mn, get PSW in the 2è upload.
VVDI or Diagspeed need usual 1 or 2H for that.
w216 2014 w219 2008:
W246 2014 FSB3: Add key successful in 15mn
W219 2008: Add key also 15mn OK
Car from Japan
w221 2007:
2007 w221 from Japan: Add key on bench
First try i use vvdi
But 2 time upload also failed cannot get pass
So i was change device Cgdi from vvdi
1 time upload successful
Good and very fast 10min got pass
w212 2010:
I add Key on W212 2010 and the System is the same on W204!
All work without problem!
W463 2012:
password calculation,
resetting and recording EZS,
to change the mileage
successfully.
w906 2010:
Adding key success on Sprinter W906 2010 with BGA key
On car and by OBD.
w906 w230 2006:
CGDI work not on all by OBD
W906 Sprinter dont work
W230 SL55 AMG 2006 dont work
Posted by: Emily white at
06:21 AM
| No Comments
| Add Comment
Post contains 876 words, total size 6 kb.
March 05, 2019
Solution to vxdiag Benz xentry error "No access authorization, You must contact the User Help Desk.
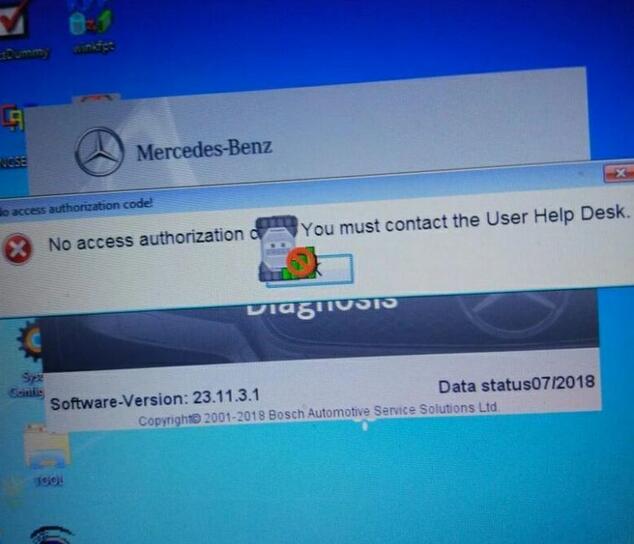
Reason:
Means the License errors, need register again.
How to register Xentry?
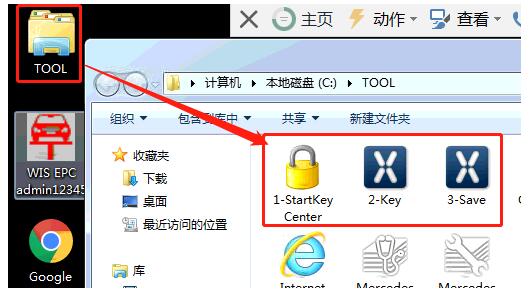
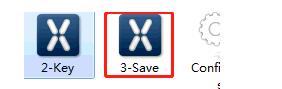
If you use the hard disk in the package, you will find a TOOL folder on the desktop, click it and then "1 – StartKeyCenterâ€.
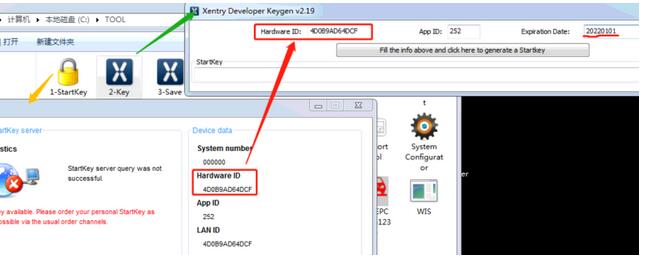
First open "1-StartKeyCenter†and "2-Keyâ€, enter ID and date, finally press the rectangle button to gain registration code.
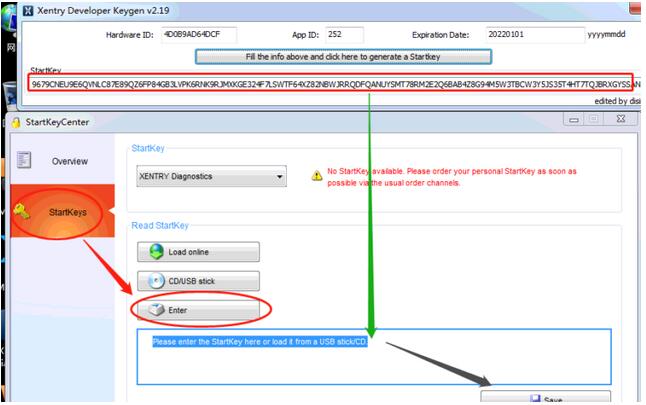
Copy and paste the registration code into the StartKey box, press "Save†button.
Get message "StartKey saved successfully.†means the registration succeed.
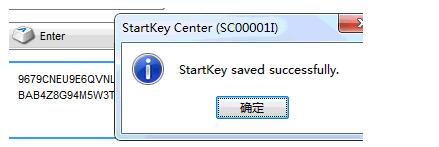
PS: The final step is to save the registration info, this step is important which can’t be neglected, just Runâ€3 -Saveâ€.
The solution is applied to the popular V2018.12Benz C6 OEM DOIP Xentry
As well as sdconnect C4
Posted by: Emily white at
10:12 AM
| No Comments
| Add Comment
Post contains 137 words, total size 3 kb.
February 25, 2019

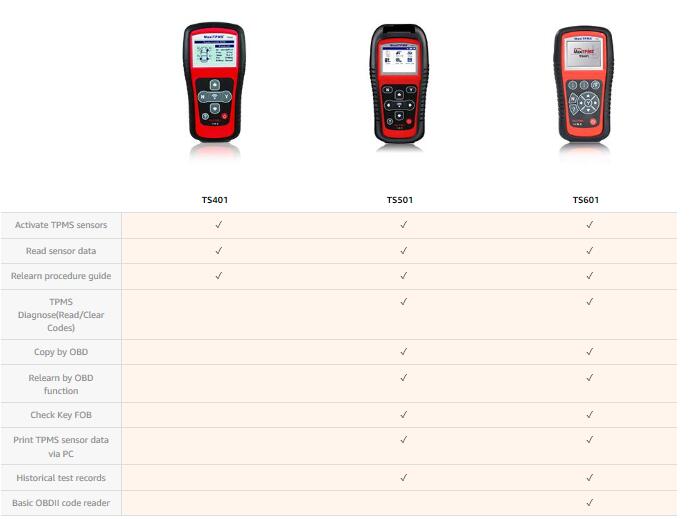
Autel is the market leading provider of automotive diagnostic tools that empowers the world’s mechanics and experienced amateurs to help them achieve their professional vehicle maintenance and repair goals. And to provide users with unparalleled experience in the automotive diagnosis, we especially develop different products with riches of functions and features to meet customer needs.
Autel TS601, a TPMS tool plus OBDII code reader, is specially designed to work on TPMS and provide users with direct access to the vehicle’s OBD system, thus allowing users to program the sensor (Autel MX-sensor), retrieve/clear TPMS DTCs, read live data and perform special functions, helping technicians to quickly find out faulty TPMS and turn off the warning light.

Professional TPMS Diagnosis and Programming
The easy-to-useAutel TPMS Tool Autel TS601 provides users with unparalleled experience of efficiency and accuracy for complete TPMS diagnosis. Instead of simply checking the sensor data, sensor ID, tire pressure/temperature, battery condition, sensor position and diagnosing the TPMS to read/write sensor ID, read/clear TPMS codes (turn off TPMS warning light), retrieve TPMS ECU information, and perform actuation test, this TPMS tool allows user programming the sensor data to MX-sensor and replacing faulty sensor that is with low battery life or is not functioning.
Fast Access to Accurate OBDII Diagnosis
Autel TS601 is the first one to integrate the TPMS tool with OBDII code reader. Except professional diagnosis to the TPMS, you can also perform the exceptional diagnosis to vehicle engine running conditions and the operating status of the exhaust after-treatment, which is called OBDII diagnosis.
With OBDII diagnostic functions, you can quickly check the vehicle self-inspection condition, accurately locate the fault that caused the Check Engine Light, and easily turn off the check engine light after the maintenance and repair.
Easy and Fast MX-Sensor Programming
The TPMS sensor programming can and will only work with the Autel
MX-sensor. There are 4 options available for you to complete MX-sensor
programming, and they each have their own advantages and
characteristics:
Auto Create – applying random ID for the tested vehicle
Manual Create – manually input the random ID or the original sensor ID
Copy by OBD – read sensor ID with Relearn function, and write it to MX-sensor
Copy by Activation – automatically write in the retrieved original
sensor data to MX-sensor in the case of original sensor is triggered
Posted by: Emily white at
01:10 AM
| No Comments
| Add Comment
Post contains 396 words, total size 4 kb.
February 16, 2019
Background information:
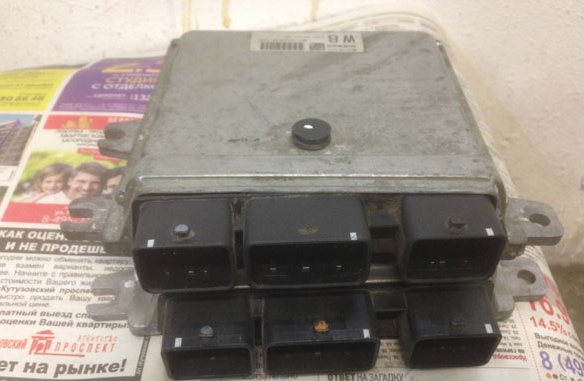
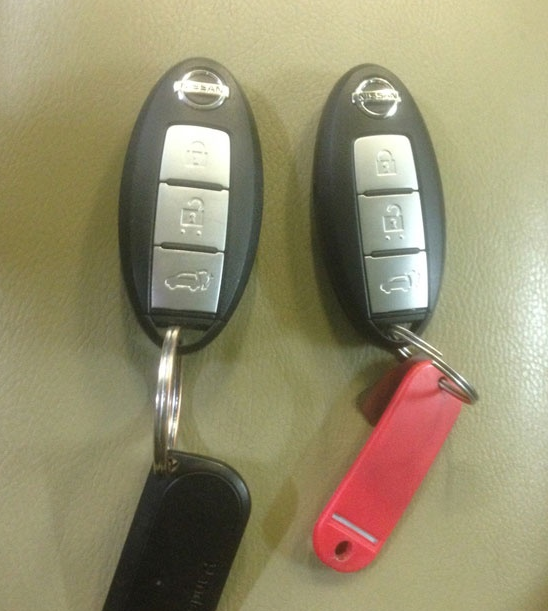
A Nissan Murano Z51 3.5L CVT 2012Y had an accident. The lower part of the connectors of the original engine control unit moved by 7-8mm inside the board, half of the pins are broken off, one heating channel of the upper lambda does not work, although the field effect transistor is jerky. Got and most lambda, but it has already changed.
Bought a new ECM, there were no problems with snapping, software is different. The old module stands still, the new Nissan Consult III Plus lies on top:

Disclaimer: The tutorial was translated from Russian. Credit to Car-Buster. You are at your risk.
Marking the old ECM module: 23710-1AA4B
Marking the new ECM module: 23710-1TJ0A

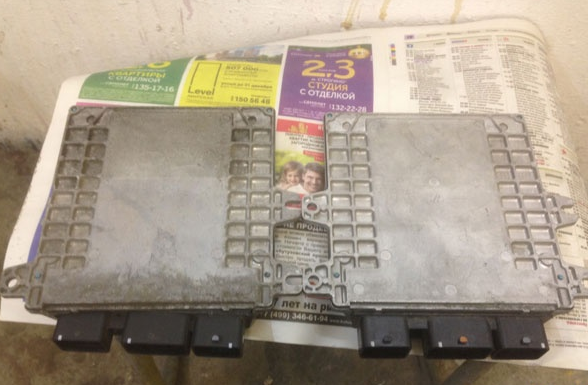
Well visible recessed connectors:
Back of the control modules
During this procedure, all previously programmed keys are erased, so it is strongly recommended to register all keys at a time:
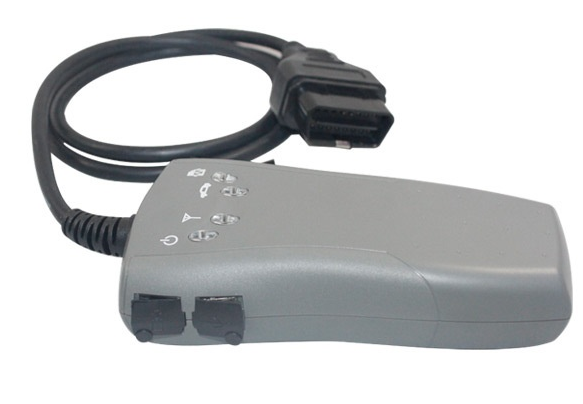
Device used: original Consult-III diagnostic without the Immo card , and with the correct software:
If you using the clones, better go for Consult III Plus, Nissan Consult 3
Plus adds ECU programming function without working with immobiliser
card since software version v65.12.
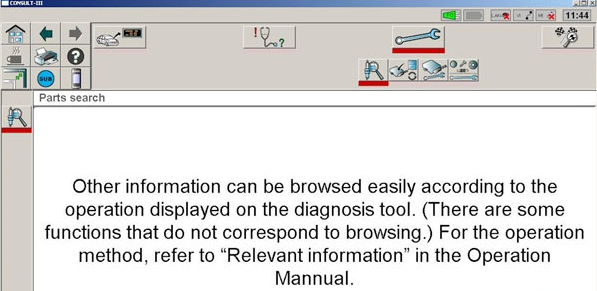
There are many step-by-step screenshots, so I’ll lay out the most basic.
After installing a new unit, the car naturally won’t start, there will
be an active error due to mismatch of ID keys recorded in the ECM and
Immo , in short, there is no sync P1611 ID DISCORD IMMU-ECM :
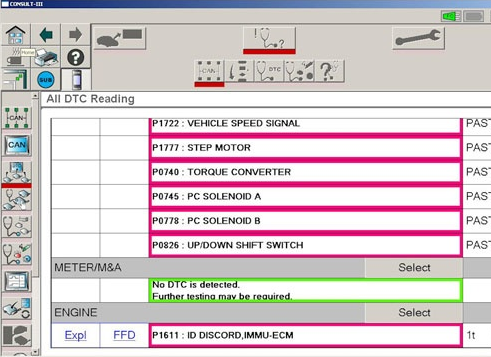
Yes, the ignition turns on, the starter turns but the car no start
Let’s go.
Turn off the ignition, turn on the emergency light, connect to the car,
choose vehicle model Murano Z51 after 2010.v. and press the Select
button :

Confirm the choice with the Confirm button , but now select Repair :
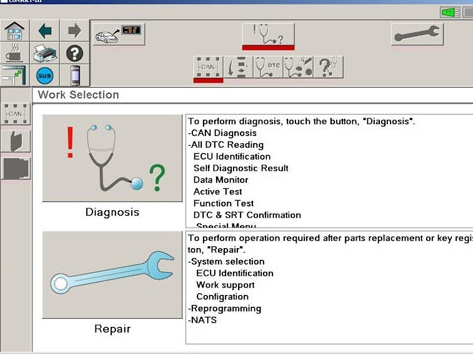
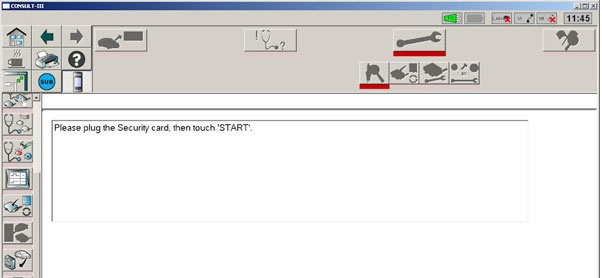
Click on the tablet (top left):
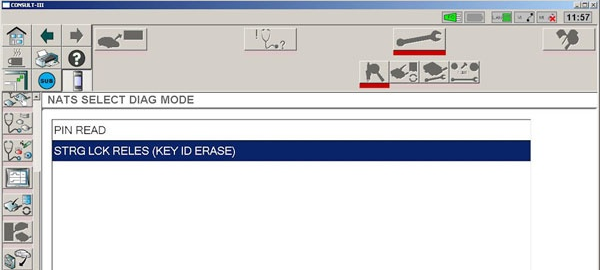
We drop down the list and select NATS :

Click Start :
In the menu that appears, click Pin Read and Next :
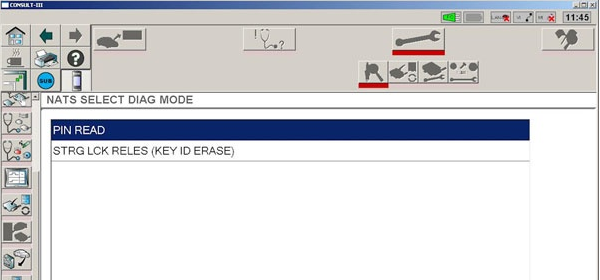
We get the PIN 14A06 , press END :
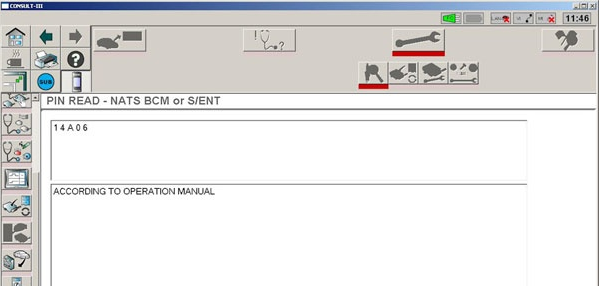
You also need the generic code Immo , in our case variant is 1211 :
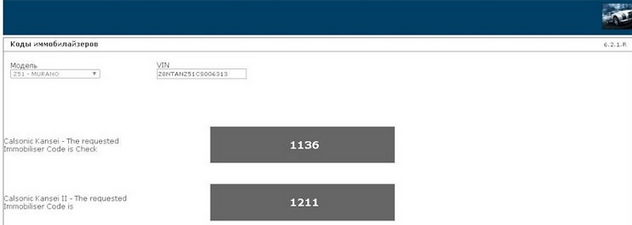
After this, select STRG LCK RELES (KEY ID ERASE) , this procedure will erase the keys and pre-lock the steering column latch:
Enter the Immo code, 1211, and run the procedure:
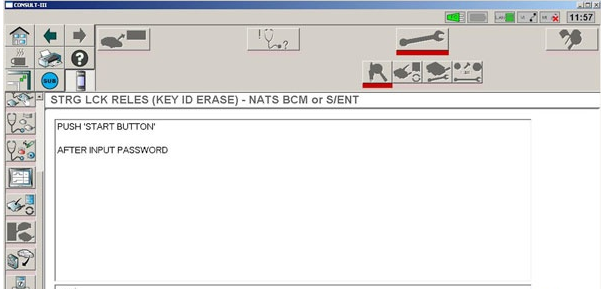
Everything is carried out with the ignition off and with the
emergency lights on. We hear how the steering column is unlocked, and
the ignition is now turned on only when something (key) is inserted into
the emergency key slot. And one more thing, the ACC mode disappears ,
this is normal, that is, immediately switch ignition OFF-ON and not like
people OFF-ACC-ON :

The next step, turn on the ignition with any key, and in the NATS menu we already choose C/U Initialization :

Enter the immo code 1211, and go to the last screen, claiming that initialization is completed:

Turn off the ignition, take out the key (it has not yet been registered,
but served only to start the procedure). Now we insert the first key
into the slot, turn on the ignition, turn off the ignition, pull out the
key, the immo indicator flashes 5 times. Repeat this procedure for keys
2-5.
In my case, only 2 keys. Turn off the ignition, check the operation of
the radio channel from each key. Works. Now remove the first key away
from the car, and leave the second inside, start the engine – with a
half kick. For the second key is similar.
As a result, there is no error in heating one of the upper lambda, and
in the current data adequate readings. Engine speeds develop adequately
without kicks. New engine control module was replaced successfully.
Posted by: Emily white at
07:06 AM
| No Comments
| Add Comment
Post contains 629 words, total size 10 kb.
February 08, 2019
This poster offers solution to MB SD Connect C4 got blue screen on Dell laptop.
Dear Mr. or Mrs,
thank you for the fast shipment. The package has arrived but when inserting the MB SD Hard drive into my Dell laptop I wasn’t able to boot.
I got a blue screen and after the restart I got a message to try a windows recovery but this didn’t work either ??
Do you have a torrent or FTP so I can download and install everything manually, or would it be possible to get a replacement hard drive?
Thank you
Solution offered by www.obd2tool.com engineer:
Change another computer, switch achi mode for your Dell laptop.
BTW, there is no torrent or FTP for you to download and setup manually.
Good luck!!!

Finally, mb sdconnect c4 was got working with achi mode.![]()

Posted by: Emily white at
01:50 PM
| No Comments
| Add Comment
Post contains 150 words, total size 2 kb.
February 04, 2019
Here OBD2TOOL share the guide on how to use JMD Handy Baby II to decode and add new keys for BMW 525 ID46 Keys.
What You Need?
Handy Baby II 2 Programmer
S-JMD Red Chip or K-JMD Chip
Procedures:
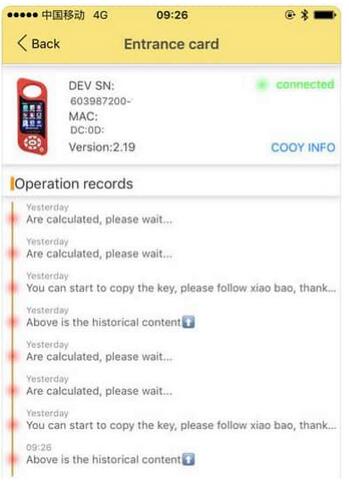
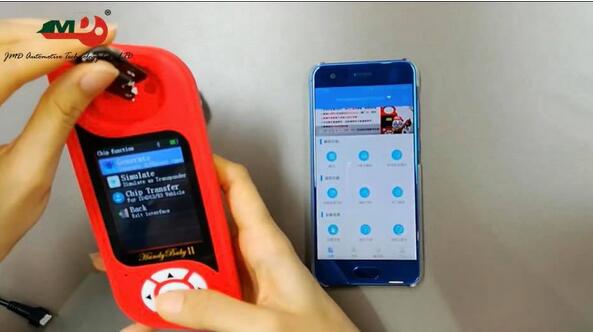
Build connection between Handy Baby 2 and you mobile JMD APP

Insert the original key into the coil to read key information
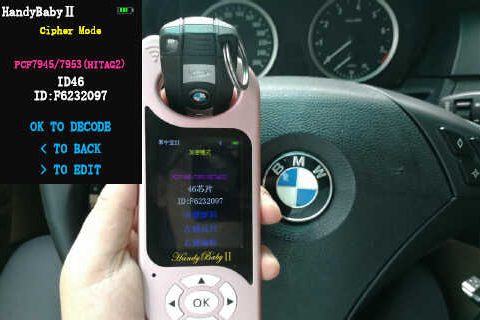
Choose "Handy Baby 1â€
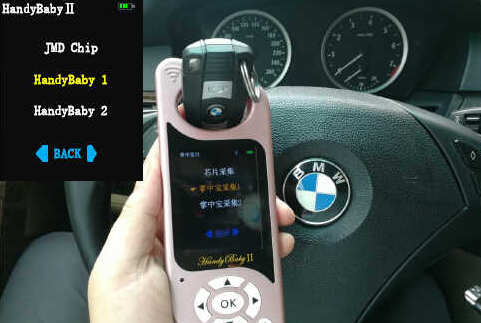
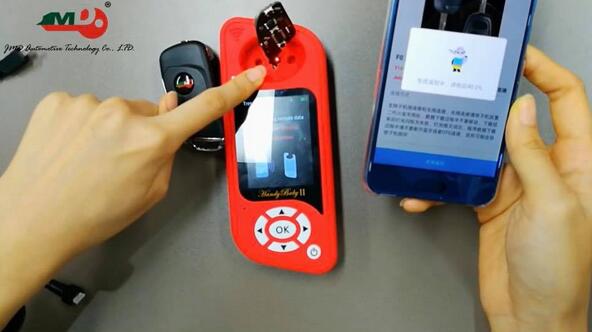
The collect antenna of the Handy Baby II is close to
Close Handy Baby II collection antenna to BMW 525 car slot (ignition switch)
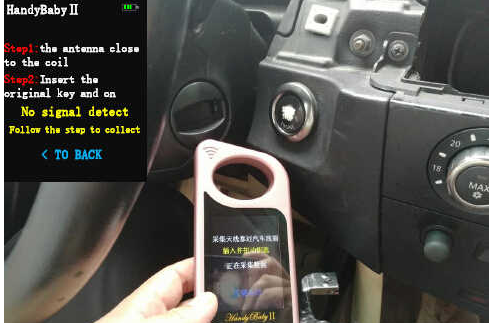
Insert the original car key into the card slot,lit up dashboard and wait connection complete.
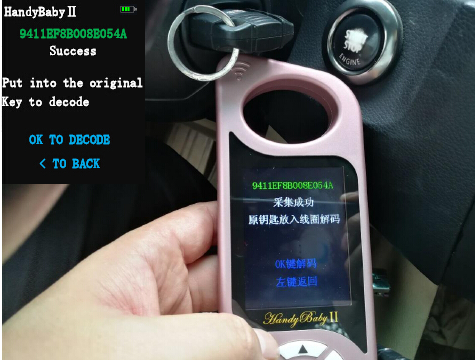
Select "On-line(APP)â€

Calculating…Don’t move the key
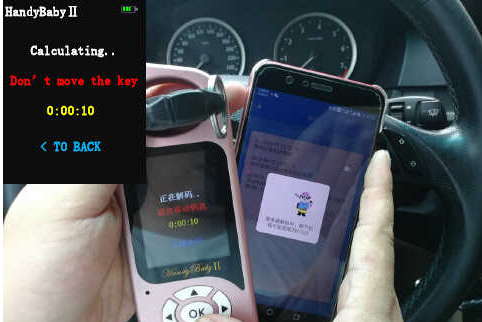
Decode successful.Used JMD S-Chip/K-Chip/ID46 to copy.
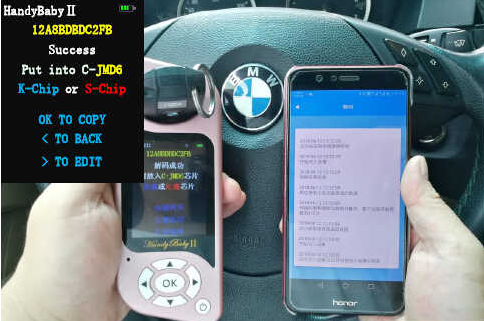
Copy successfully,and if you want to copy next key click "OK†to continue.
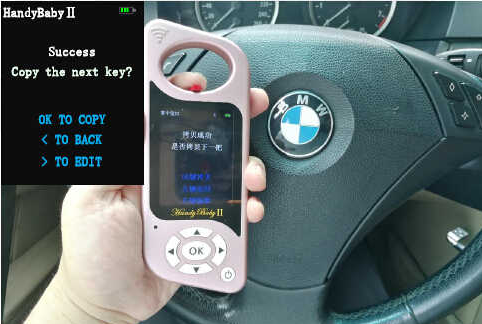
Done!
Posted by: Emily white at
09:37 AM
| No Comments
| Add Comment
Post contains 143 words, total size 4 kb.
January 29, 2019
Discussion: DRB3 compatibility with Micropod II and VCI Pod.
Car: 2004 Chrysler 300M
Software: DRB3
Firmware: wiTech MicroPOD 2 and VCI Pod
It is said that the MicroPOD II can run the enhanced DRB III emulator with WiTech App v16.04.12. However this app version might require to run online, connected to TechAuthority. If it does you’re screwed because it will be banned based on its ID.
I have a Micropod II V17.04.27 Type C…. But I can not use it, because
it can not find the ECU. can only display battery voltage. I can only
select cars between 2017 and 2004. I have a 2004 300M, but no chance. I
think only real CANbus can be used.
the extended DRBIII Emulator can not work, it needs an update, but this would make the adapter useless I think.
So, I think, only witech VCI Pod can help.
This is what I’ve tested:
Alarm: tried to force activation but I’m missing a sensor in the trunk, so it won’t activate.
EVIC/ATC: screens autodiagnostics
Memory seats: enabled the glide feature (easy exit) on a 1999 and 2000 Ms!
ECU tests: Fuel injector #1 (it fires the fuel pump and opens the
injector, I guess you need to have the injector off the car to really
see what’s going on).
BCM tests: Lights tests (it flashes all lights or a specific one you choose so you can see if the bulb/wiring/bcm are ok).
TCM tests: I don’t remember but I think the engine has to be running for
the tests to complete (you are supposed to look at the RPMs while the
TCM triggers the solenoids).
RKE: tested the keys (it tells you which button is pressed on the fob)
And there are so much values you can read… Basically you can read all sensors of course, but you can get the interior light dimmer switch output, sun sensor value, heated seats temperature IIRC… It’s a great tool but IMO it doesn’t worth that much considering you cannot flash modules.
Flashing was a failure for the TCM. However it looks like I could flash the EVIC if a flash was available. I used a flash for another model, made some changes to the flash file descriptor (basically it’s an XML file describing the flash, what part number it replaces, what old part numbers are flashable, etc…) but I didn’t press the button as it would have break the EVIC.
Fyi, flash files are available from TechAuthority website but you
need a subscription. A 1 or 3 days subscription is enough. The flash
application packaged with WiTech software 13.x is old, so you should use
the one from TechAuthority. The thing is, it also downloads a newer
driver and WiTech server program, and they won’t work with WiTech 13.x
or 14.x. For this reason I used my corporate laptop and/or a virtual
machine, dedicated to the flashing app.
Once you have selected a flash on TechAuthority website, it downloads a
few files in your computer temporary folder. You can save these files
(basically I copy-pasted the files in a new folder named after the flash
part number) and reuse them latter. That way, you don’t need the
TechAuthority subscription anymore. It should also work for real DRBIII
devices. Simply copy-paste the files from where you saved them to your
temp folder. IIRC you have to start the flash application once to get
the required subfolders created in the temp folder.
With the 13.x software version, from the DRBIII emulator, you can run the non-powertrain flash application. And this flash app was able to read the part number from the EVIC on the car, while the powertrain flash app (and also the flash app from TechAuthority) could not read the part number from the TCM. That’s why I’m guessing I should be able to flash the EVIC. Also I talked with a guy on YouTube who was able to flash the EVIC on his Jeep (2002 IIRC).
For most tests, I had the engine not running, key in RUN position.
Want a good reason? lol!
That’s exactly why I waited so long… Well you can talk to the ABS module
and read the codes, which is not possible on the 300M with a cheap
ELM327! You can run the ABS bleeding procedure (not tested yet), read
the Clutch Volume Indexes from the transmission, pair a new
PCM/BCM/SKIMM module (not tested)…
I wouldn’t get the newer dongles, they run a bit cheaper on AliExpress
but I’ve read they don’t work with the TechAuthority web components,
which is the all point of having the new device over the VCI Pod. So
don’t buy one!
Posted by: Emily white at
10:25 AM
| No Comments
| Add Comment
Post contains 785 words, total size 5 kb.
January 24, 2019
This article show a guide on ways to carry out self test for GM Tehc 2 CANdi,hope it aids!
The energy light on the CANdi module doesn’t come on when connected to the Tech two? If that is what you imply mine will not light up either. I think they really should flash when linked to the car’s pc as that indicates the CANdi module is communicating. Bosch guidelines:
Tech two CANdi User’s Guide:

P/N 08002749 03/07 ?2007 Robert Bosch LLC, U.S.A. All rights reserved.
The Controller Region Network Diagnostic Interface (CANdi) is an in-cable module that operates with all the current Tech 2 components which includes the VCI, cables, and adapters.
Installed, the CANdi module is fully backward compatible with current tester functionality. The module powers up inside a way that makes it transparent for the user. Which is, unless the Tech 2 enables characteristics certain towards the CANdi module, all signal lines function as they do without the need of the
CANdi module. This enables the current Tech 2 computer software to be utilized with no adjustments, no matter whether or not the CANdi module is installed.
The main function on the CANdi module is usually to add CAN capability towards the Tech 2 tester. The following list summarizes the fundamental traits on the CANdi module:
Supports simultaneous communications on three CAN buses
Offers higher speed UART communications together with the Tech 2
The Tech two commands the CANdi module operation.
When installed, the CANdi module doesn’t interfere with any diagnostic process at present performed utilizing the Tech 2. The usage of a CANdi module does not demand any physical alterations to the Tech two, its cables, or adapters. The module operates in transparent mode till awakened by the Tech 2. Upon initialization, the CANdi module operates below master control from the Tech two. All functionality is determined by the Tech two application software program which is loaded around the Tech 2’s system card. The CANdi module normally operates in slave mode towards the Tech two, responding in high speed SAE J1708 towards the tester.
Physical Interface and LED CANdi connects to the Tech two by way from the existing Information Hyperlink Connector (DLC) Burndy Connector. The car side connection remains unchanged working with the existing adapter to interface in between the Burndy connector plus the SAE J1962 connector. When functioning adequately, CANdi’s LED flashes. Inside the occasion of a problem, the LED is going to be continually illuminated.
Warranty and Technical Service
Included together with your program is really a Warranty Card that has to be submitted to Vetronix for activation from the two-year warranty. For technical assistance, please make contact with Vetronix Tech Assistance at (800) 321-4889 ext. two.
Very good to understand: The Candi Module need to not plugged into your Professional Diagnostic Tool Tech2 unless your working on a later car or truck ..commonly 2005 plus. Olders car or truck from 96 should really NOT possess the Candi Module attached.
Posted by: Emily white at
08:15 AM
| No Comments
| Add Comment
Post contains 506 words, total size 4 kb.
January 10, 2019
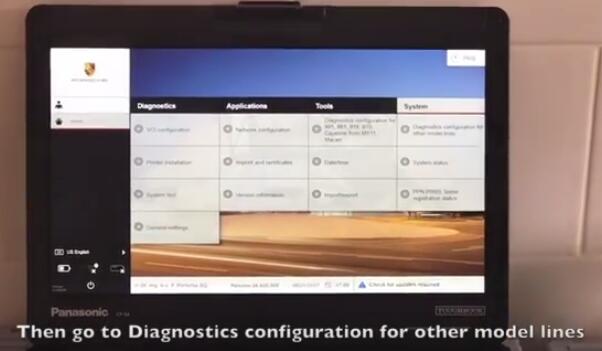
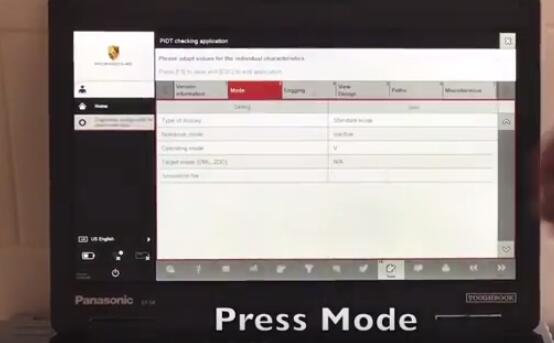
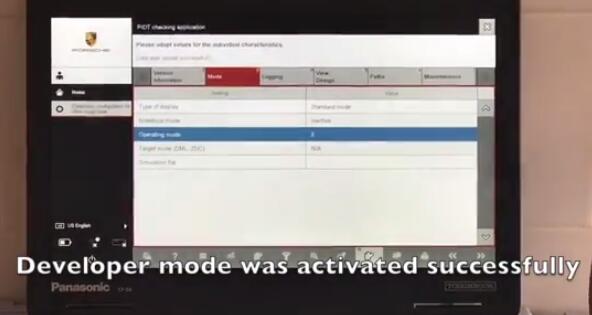
Piwis Tester lll is the latest professional tester for Porshe,the most poweful diagnose and offline programming tool for Porsche,with latest tester for Porsche,powerful functions,full access . We apply every effort to solve hard cases in automotive and we will try our best to deliver you really working solutions.
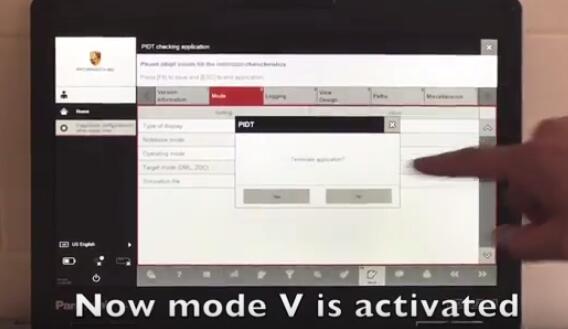
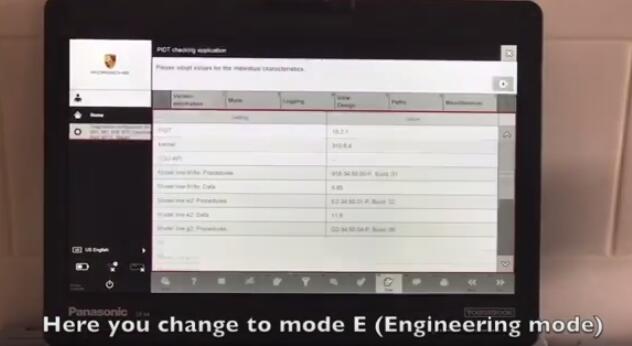
In This article obd2tool.com show you how to run Porsche PIWIS Tester 3 with developer rights.


Posted by: Emily white at
02:20 PM
| No Comments
| Add Comment
Post contains 73 words, total size 2 kb.
December 31, 2018
Xentry Connect C5provides complete diagnosis for newest hybrid W222,with a qualitative improvement in hardware and software by authorization of diagnostic interface to control the software,it will allow you to work on windows xp, win7/8/10 system.
Customer’s problem:
We had purchased one set MB SD connect C5 with internal HDD from obd2tool.com,
We really appreciate the faster shipment, all is well packed dhl week
quickly received. But when we install the HDD to our computer, we have
blue screen and doesn’t access to computer windows. We are wondering if
we get the broken HDD……
Our Answers:
The BMW ICOM ICOM A2 A3 or MB Star C4 C5 drives we assign to our customers are generally AHCI-mode hard drives with SATA port.
If your laptop BIOS is not set to the same hard drive mode (AHCI mode), if you connected to our hard drive to your computer, there will be a blue screen or can not find the hard drive.Please make sure your HDD is set to AHCI in the BIOS.
To check this you turn the laptop on and press F2, it will enter the BIOS. Now go to "ONBOARD DEVICES†or "SYSTEM CONFIGURATION†then go to "SATA OPERATION†press enter and make sure its set to AHCI not ATA or any other option.
Please have a minimum of 2GB of ram/memory in your laptop, a lot of people only have 512mb or 1gb, it is OK but the new system may run slow and its recommend to really have 4GB ram, but 2GB also can be enough.
– We can supply Laptop + Software all ready for you.
– We can supply FULL package C4 SD + Laptop + Software for you. MB Star Diagnostic Tools
– We can carry out some C4 SD repairs.
– Remote installations available (if you supply the correct HDD size and install the correct Windows OS).
– Teamviewer remote support available.
Posted by: Emily white at
01:22 PM
| No Comments
| Add Comment
Post contains 328 words, total size 3 kb.
December 23, 2018
My new gm techii device bought from
https://www.obd2tool.com/goods-1568-GM+Tech2+GM+Scanner+-CANdi++TIS+(Works+for+GMSAABOPELSUZUKIISUZUHolden).html
US$224.00
Here has a lot of folks give 5star,I believe folk’s choice.
It is in perfect working order and has the screen cover.
Also included is the TIS2000 software which you will need to access the security to program keys.
My Tech 2 (clone, works great) for my C5 (99) just for the Automated Bleed so I
could completely flush the brakesystem particularly for the EBCM !!!
Have since used the crap out of it, ECM/PCM re-learn, crank sensor
re-learn etc !!!!
Also use it to exercise my ABS motor every 3 months.
C5 has the built in ability to pull vehicle specific DTC’s right in the
DIC and those can be exceptionally helful in diagnosing and correcting
common C5 issues.
There are a number of functions in addition to diagnostic trouble shooting that can be accomplished with theProfessional Diagnostic Tool Tech II.
and another is the ability to program out unwanted features such as F45 or F55 RPO’s ar program RPO’s into a replacement BCM.
Do recognize that the tool have extremely limited ability to change
settings in either the PCM or BCM. To accomplish change you need a
programming tool such as HP Tuners or EFI Live and they can change only
PCM settings.
they’re very easy to use,just follow the display,and look around till
you get tired,,and try reading â€live data†as much as you can,it speeds
up the learning curve,,and try it on as many GM cars/trucks as you can
too.
Posted by: Emily white at
09:49 AM
| No Comments
| Add Comment
Post contains 261 words, total size 2 kb.
December 16, 2018
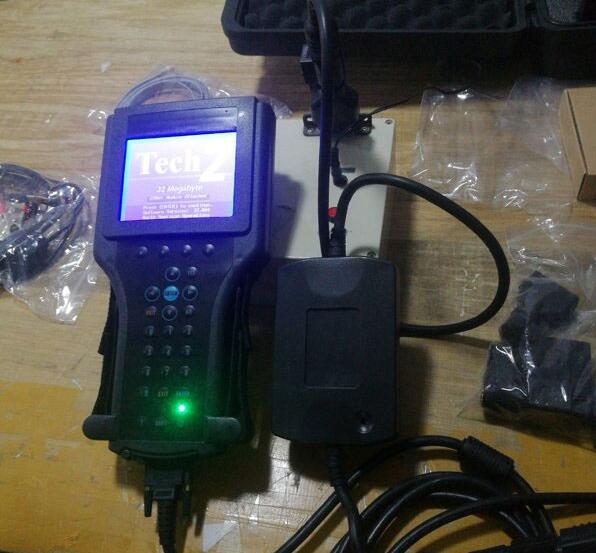
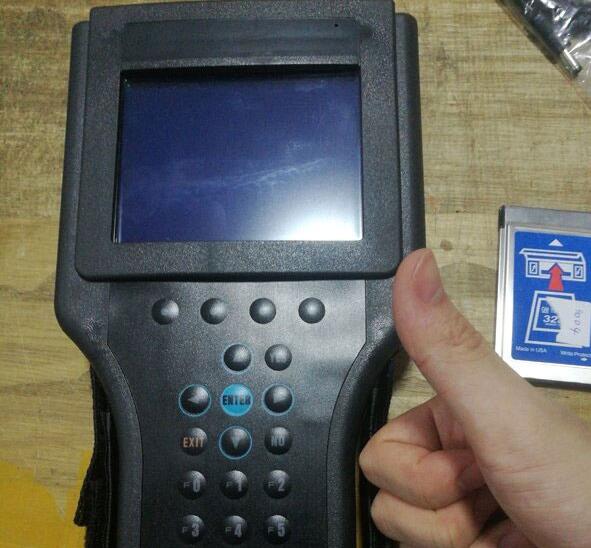
This is the Star Diagnostic tutorial on lower Benz cars, with MB SD Connect C4 diagnostic tool. Here takes W211 as an example.
Model:
MB W211
Tools used:
MB SD C4
Dell d630 with Windows XP system
Tutorial on lowering the car via picture:
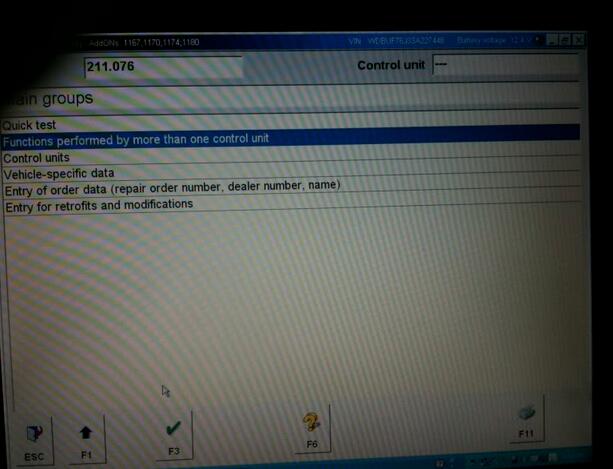
Model series selection: 211
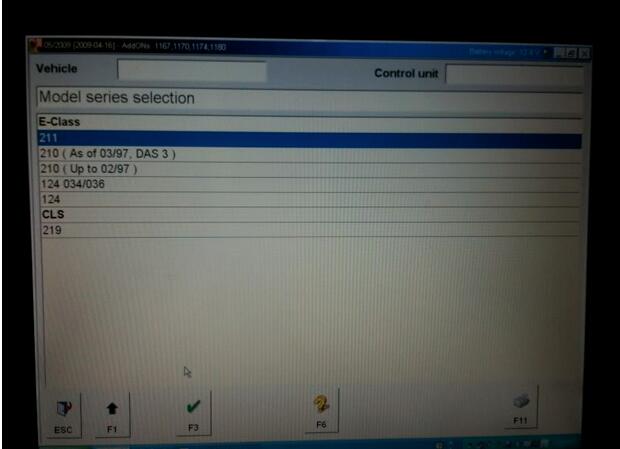
This is the main menu
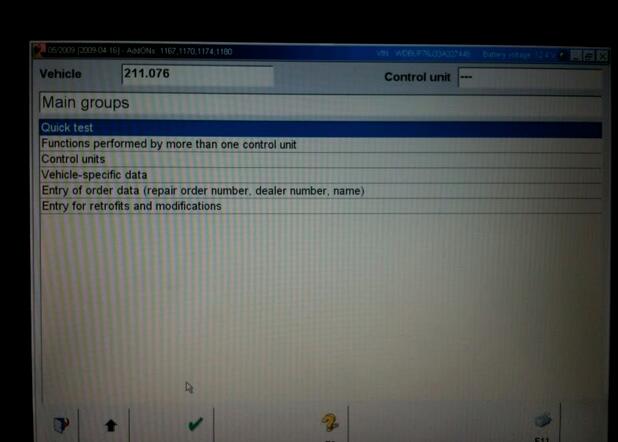
Then go to Functions performed by more than one control unit
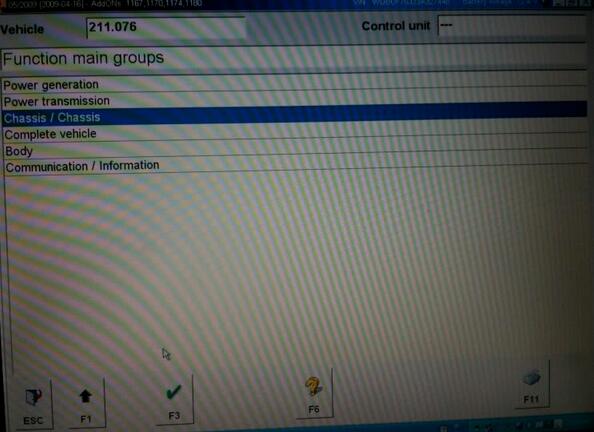
Then Chassis / Chassis
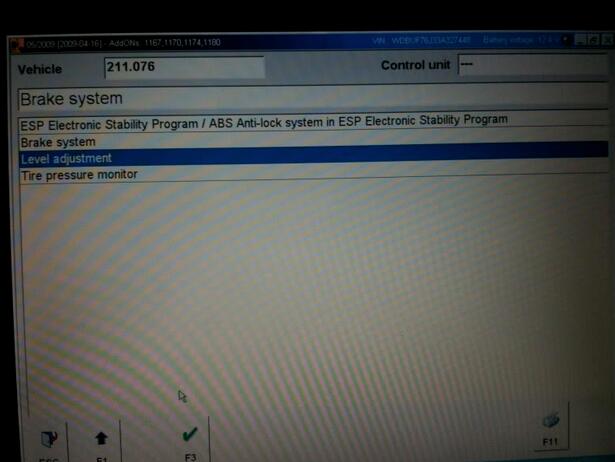
Then Level adjustment
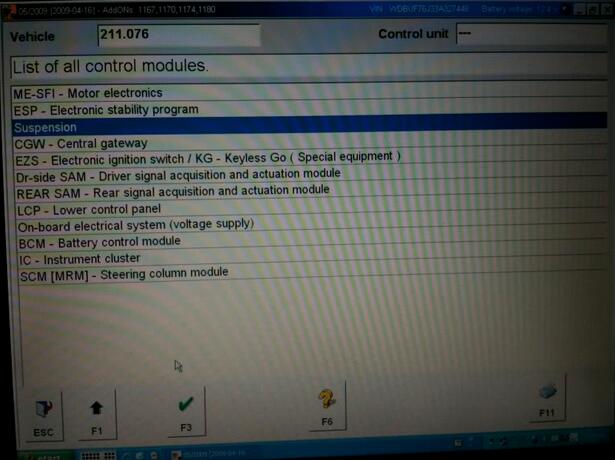
Then Suspension
ATTENTION:
Here is where people have problems, they just go to actuations and then lower it, IT WILL NOT STAY LOWERED this way, you have to go to initial startup
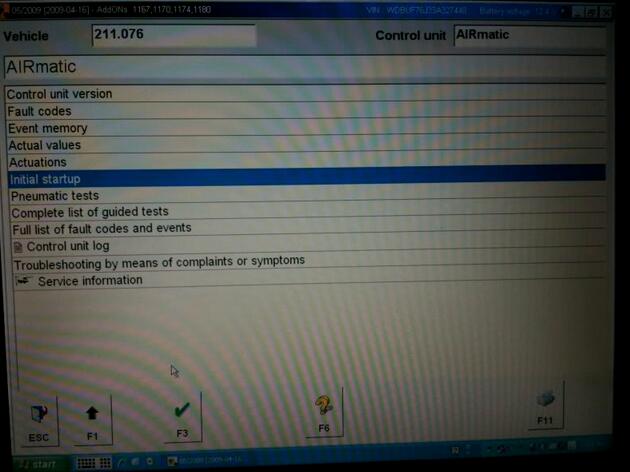
Then Initial startup with manual settings input for new control unit/ Level Calibration
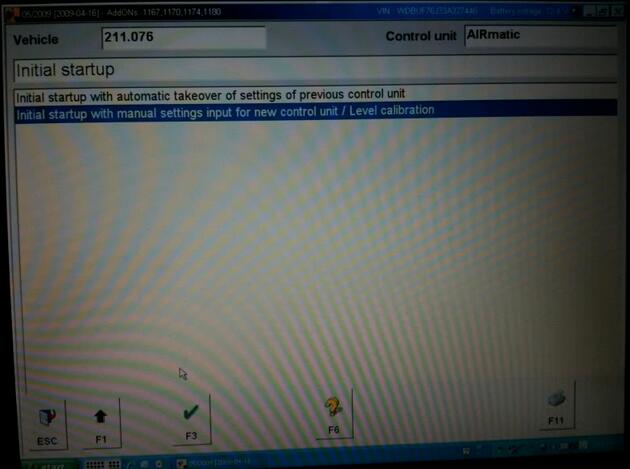
Then F2
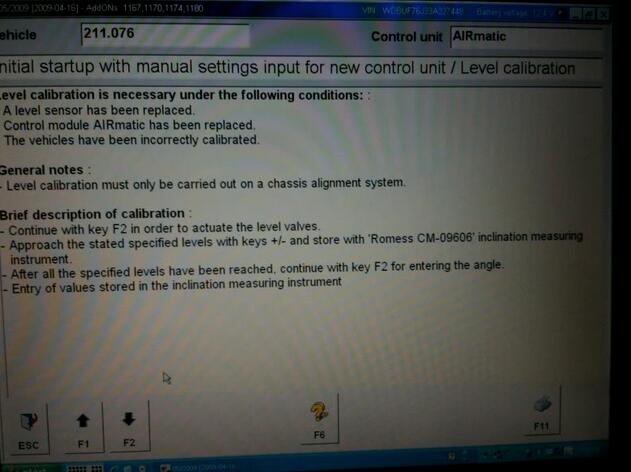
Here you will see a screen that shows the voltages which correspond to the height of the vehicle. they must be within the given ranges in the left hand column. use the + and – buttons to lower the car (In the screenshot I am in the car with a friend in the back seat, so that is why it is at 3.27, it should not exceed 3) Then hit F2
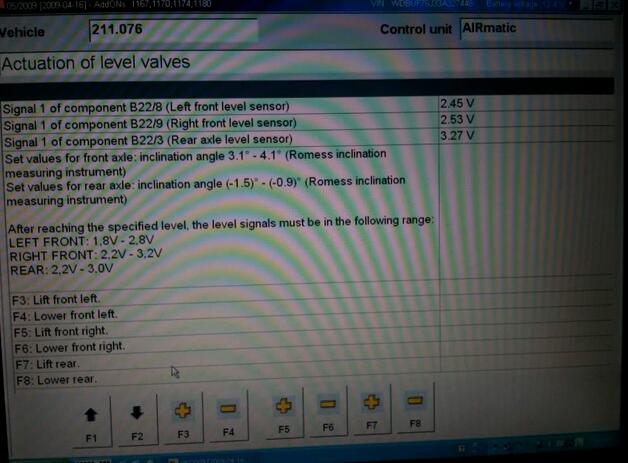
Enter in these inclination angles and if the car is within the voltages supplied in the page before, the car will accept the new lowered setting, if not it will reject it.
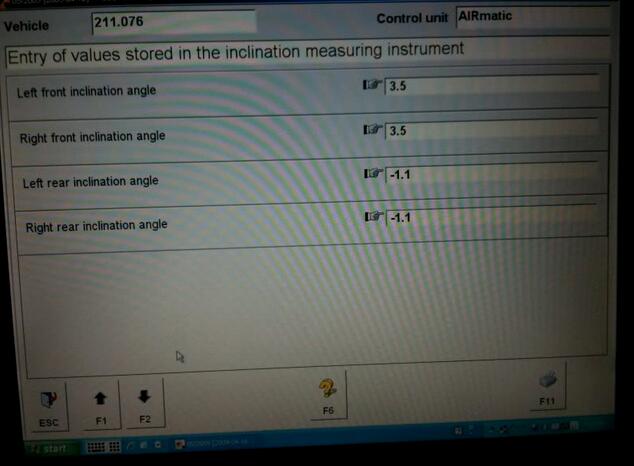
Done!
Posted by: Emily white at
07:39 AM
| No Comments
| Add Comment
Post contains 231 words, total size 5 kb.
December 09, 2018

MS908S Pro is an ideal tool for a truly trouble-free diagnosis of a maintenance plant by quickly, efficiently and effectively diagnosing automotive faults, managing customer data, and standardizing business processes.
One of theMaxisys series devices, the MS908SP Diagnostic Platform bases on the revolutionary Android multitasking operating system, utilizes the powerful Cortex A7+A15 six-core processor, and equips with 9.7-inch LED capacitive touch screen. Supporting J2534 ECU Programming Device is capable of replacing the existing software/firmware in the Electronic Control Units (ECU), programming new ECUs and fixing software-controlled drivability issues and emission issues. MS908S Pro is an ideal tool for a truly trouble-free diagnosis of a maintenance plant by quickly, efficiently and effectively diagnosing automotive faults, managing customer data, and standardizing business processes.
Autel MS908S Pro fromwww.obd2tool.com Specification:
Operating System AndroidTM 4.4.2, KitKat
Processor Samsung Exynos Six-core Processor (1.3GHz Quad-core ARM Cortex-A7 + 1.7GHz Dual-core ARM Cortex-A15)
Memory 2GB RAM & 64GB On-board Memory
Display 9.7 inch LED capacitive touch screen with 1024×768 resolution
Connectivity Wi-Fi (802.11 a/b/g/n/ac)
USB: 2.0
BT v.2.1 + EDR
SD Card (Support up to 32GB)
HDMI
Camera (rear) 8.0 Megapixel, AF with Flashlight
Sensors Gravity Accelerometer, Ambient Light Sensor (ALS)
Audio Input/Output Microphone
Dual Speakers
3-Band 3.5 mm stereo/standard headset jack
Power and Battery 11000 mAh 3.7 V lithium-polymer battery
Charging via 12 V AC/DC power supply with the temperature between 0°C and 45°C
Input Voltage 12 V (9-24 V)
Power Consumption 6.5 W
Operating Temp. 0 to 50°C (32 to 122°F)
Storage Temp. -20 to 60°C (-4 to 140°F)
Dimensions (WxHxD) 300 mm (11.81â€) x 220 mm (8.66â€) x 50 mm (1.97â€)
Weight NW: 1.42 kg (3.13 lb.) GW: 8.052 kg (17.75 lb.)
Protocols ISO 9142-2, ISO 14230-2, ISO 15765-4, K/L-Line, Flashing Code, SAE-J1850 VPW,
SAE-J1850 PWM, CAN ISO 11898, Highspeed, Middlespeed, Lowspeed and Singlewire CAN,
GM UART, UART Echo Byte Protocol, Honda Diag-H Protocol, TP 2.0, TP 1.6, SAE J1939,
SAE J1708, Fault-Tolerant CAN
The Autel universe of tools
The Maxisys MS908SP is compatible with Autel add-ons (sold separately): ADAS, MaxiScope, MaxiVideo MV105/MV108
Autel MS908S Pro Accessaries:
USB Ethernet Adapter
Standard 2.0 USB Cable
BMW Ethernet Cable
Main Cable – 1.5 m in length
Adapter for Chrysler-16 (America Only)
Lighter Fuse
Adapter for GM/Daewoo-12
Adapter for PSA-2
Adapter for Fiat-3
Adapter for BMW-20
Adapter for Benz-38
Adapter for Kia-20
Adapter for Mitsubishi/Hyundai-12+16
Adapter for Nissan-14
Adapter for Honda-3
Cigarette Lighter
AC/DC External Power Adapter
Clipper Cable
Adapter for Benz-14 (for EU only)
Adapter for VW/AUDI-2+2
Mini USB Cable
Ethernet Serial Cable
Posted by: Emily white at
03:40 AM
| Comments (2)
| Add Comment
Post contains 425 words, total size 4 kb.
December 01, 2018
Newest CAT Caterpillar ET Wireless Adapter truck diagnostic tool
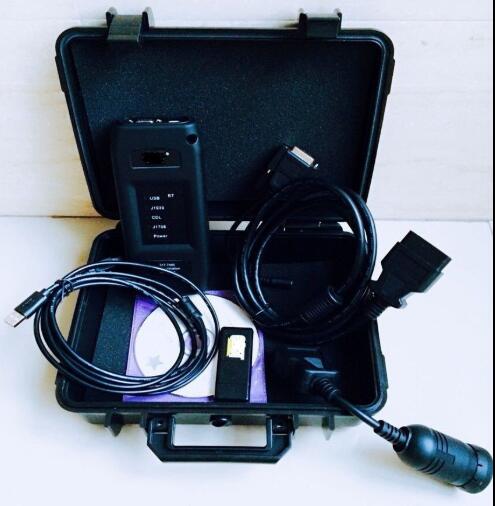
Product Details
Item specifics
Item Width: 15cm
Model Name: ET 3 wifi
Item Length: 20cm
Software Version: ET 3 wifi
Brand Name: Arsmundi
Special Features: wifi
Hardware Version: ET 3 wifi
Item Height: 8cm
Voltage: V
Item Type: Car Diagnostic Cables and Connectors
Power: W
External Testing Certification: CE
Item Weight: 1kg
Electronic: No
Item Type: Code Readers & Scan Tools
Language: Denish,English,French,German,Italian,Polish,Spanish
elm327 interface length: 10 cm
weight: 2kg
Hardware Version: new
Package Size: 10cm x 10cm x 5cm (3.94in x 3.94in x 1.97in
Item Name: ET Adaper 3 With wifi
Warranty: 3 year
Product Description
Communication:
1. Allows communication between service tools and engine controls using various data links such as J1939/11, DeviceNet (future release), CAT DataLink, and J1708 (ATA) vehicle networks
2. Flash program allows adapter firmware upgrades as additional features become available
3. Uses J1939/11, high-speed data link (part of ADEM III controls), substantially reducing flash times
4. Automatically selects J1939/11 when flashing the engine (reduces the flash time approximately 80%, from 14 minutes to 3 minutes).
Heavy Duty Truck diagnostic ScannerSpecification:
1.ECM Summary screen lists every control module on equipment
2.Being tested and gives information on these modules.
3.Fast hookup and real time display of systems status. Displays ,readings such as rpm, boost, pressures, temperatures, etc. for Easy troubleshooting.
4.Identifies faulty sensors, harness connectors, and system parameters which are out of specification. Allows customers
5.To help dealer identify problems without visiting machine.
6.Identifies intermittent sensors and wiring problems during Machine operation and keeps a record of each one. Showswhen problem occurred and how often it happened.
7.Added information to allow customer to assist dealer in diagnosing and repairing problems. (Troubeshooting Help is not built in with in the program, you will still need go back to books in order to follow a repair description and steps in each Fault Code display within the program).English and metric units of measure integrated help file to easy learn the "How To†around the software.
8.Operate System: windows XP/Windows7
Posted by: Emily white at
12:09 PM
| No Comments
| Add Comment
Post contains 352 words, total size 4 kb.
34 queries taking 0.1308 seconds, 199 records returned.
Powered by Minx 1.1.6c-pink.

