


October 17, 2019
This is an instruction on how to program key fob to 2007 Cadillac CTS-V using a GM Tech2 Tech II scanner.
Model: 2007 Cadillac CTS-V
The process…here you go…
The key to be programmed
Insert the key and ignition on
The gm tech 2 scan tool power on
In the main menu, go to Diagnostics
Select model: 2007 Cadillac D (DN) CTS-V passenger car
Then go to Vehicle Control Systems
Read vehicle info
Engine type: (U) 6.0L V8 LS2
Go to Module Setup
Then Remote control door lock receiver
Program key fobs…
Two key fobs to be programmed
Tips of programming key fobs:
All key fobs must be programmed each time any one fob is programmed. To program,press and hold the LOCK and UNLOCK key fob buttons prompted by the TECH 2. Programming takes 15-30 minutes….
Programmed complete and test it’s working.
Done!
Posted by: Emily white at
10:55 AM
| No Comments
| Add Comment
Post contains 154 words, total size 1 kb.
September 28, 2019
Offer the free source of XENTRY Diagnostics OpenShell ( 09-10-11/2019 ).
XDOS (09.2019) MEGA
https://mega.nz/#!8ihngYSQ!IMsb3TQBtFkUDnQJSMMDfJpXKaM3OpRo1Mq9vQoLdpU
XENTRY Diagnostics OpenShell 2019.09-Torrent
https://mega.nz/#!dZhRGA4A!yianrox2nSNSU41Kt7pscIoEZfzmujqVYfUPItWpCks
Torrent Link : No Pass
Works with sd connect C4, ECOM etc.
– System need Special Secure Solution for SCN Account not to Blocked !!!
( Daimler Server checking your HWID + Key + System Info if it is not original than SCN account will be Banned on Server )
Test reports of Benz Xentry.OpenShell.XDOS 2019.09 downloaded from the free source:
Question:
When i run XS i can open 1 time
Right now not open
‘’ no access authorization code. You must contact the user help desk’’
Answer:
You will need to install key again.
Once you have done that. go to "programdata†folder then to "LIc†folder. Copy Lic_.key file and paste it in
"C:\Program Files (x86)\Mercedes-Benz\Xentry\binâ€
if your system is 32bit then location is
"C:\Program Files\Mercedes-Benz\Xentry\binâ€
Then you should be able to run the xentry without any problem . I have tried and tested it. I have been using it for months now. No issue.
This release is much slower than the 07.2019, even using the same computer and SSD HD.
I tried it in Simulation and on cars, it’s very slow.
No Update, Fresh win 7 Ultimate 64bit and Only Fresh Xentry installation no other programs, it works fine but very slow.
Security: 100% safe
No need time to download
No need to install
Need only active by following the quick guide on the desktop.
Software includes:
Xentry 09.2019
DAS 05.2019
EPC 11.2018
WIS 11.2018
SDmedia
Vediamo
Vediamo Database
Star Finder 2008$2016
PL73
DTS

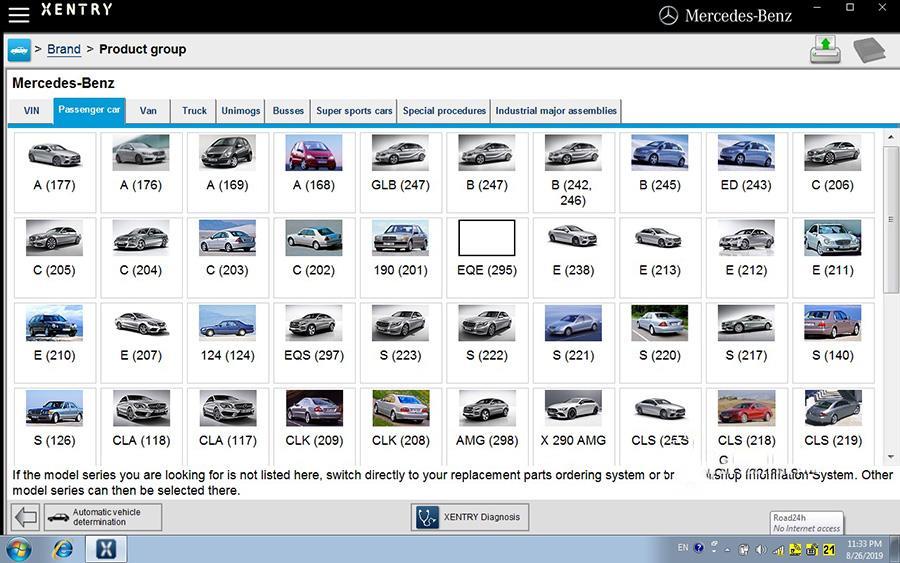
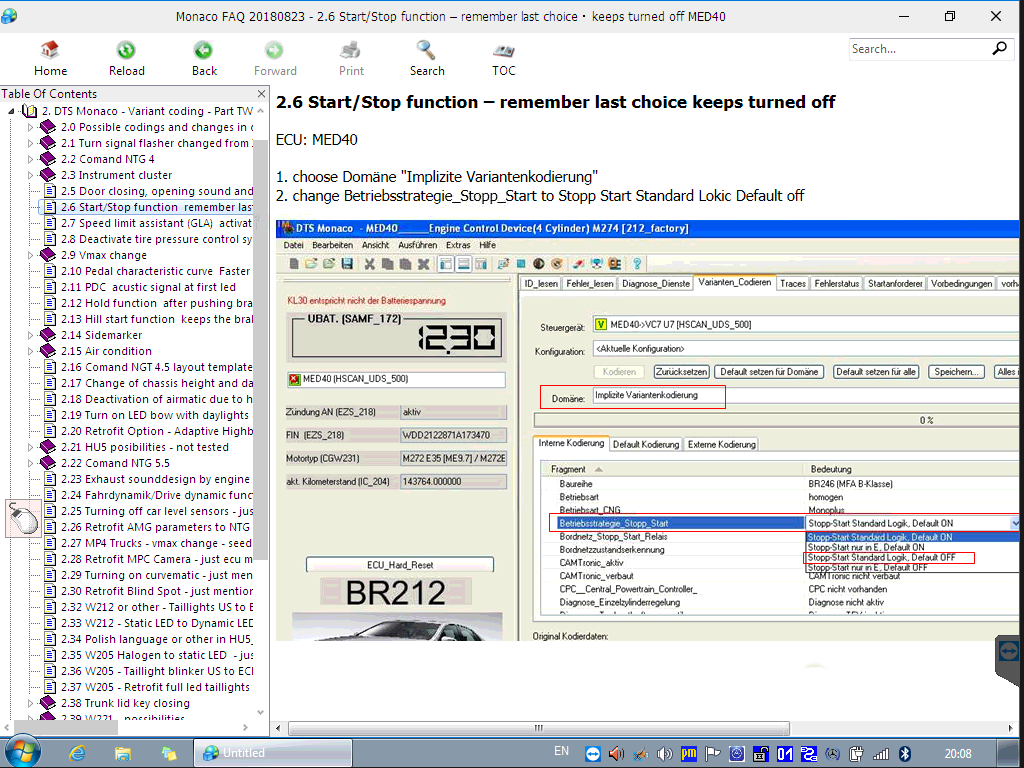
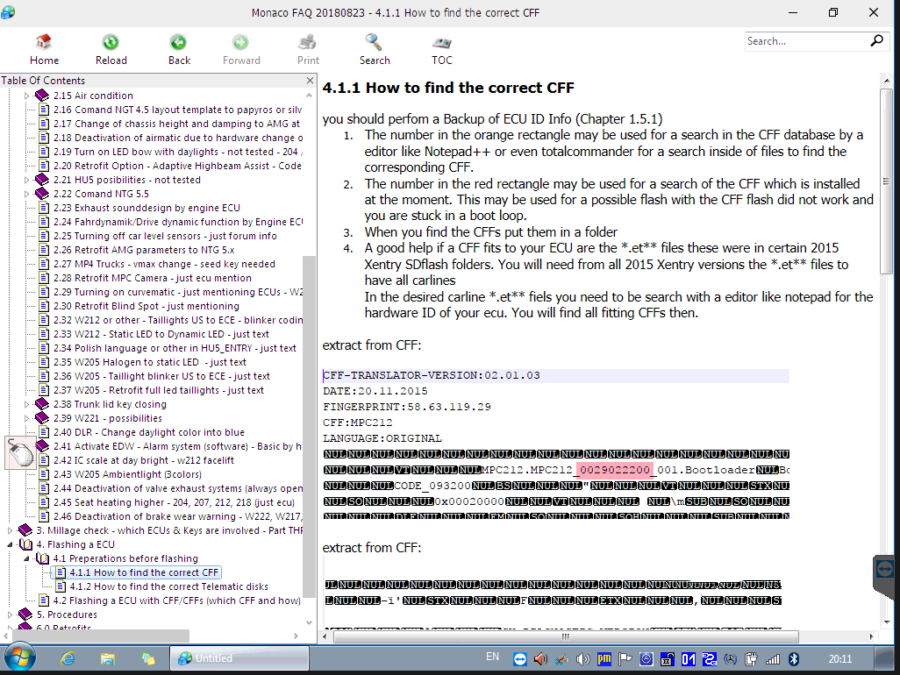
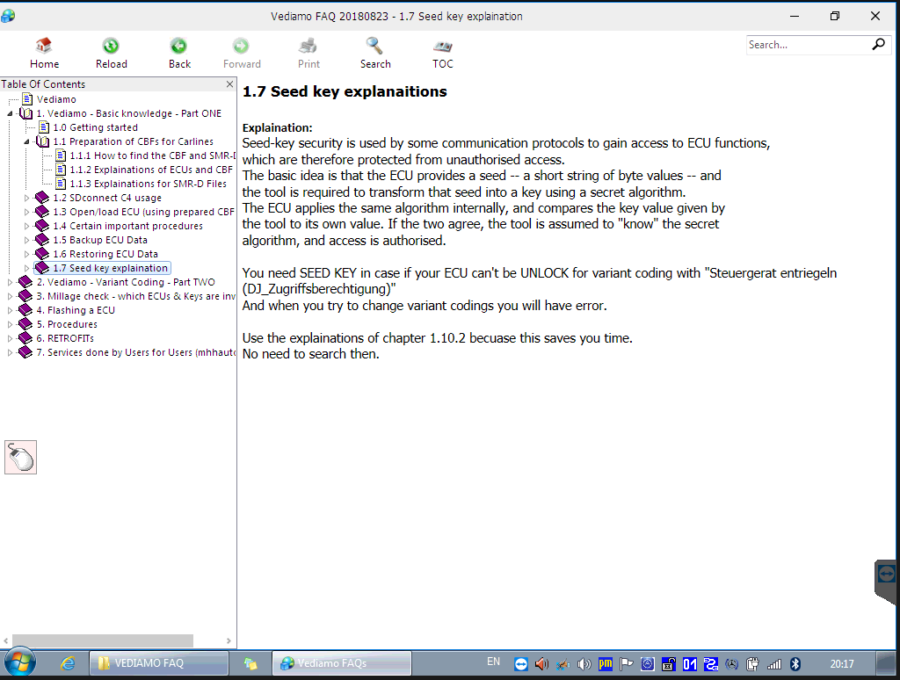
Several images of Monaco:

Several images of Vediamo:


Enjoy.
Posted by: Emily white at
03:04 AM
| No Comments
| Add Comment
Post contains 282 words, total size 6 kb.
September 15, 2019
JOHN DEERE DIAGNOSTICS
John Deere has recently been in the news because of their strict opposition to allowing farmers, equipment owners, and repair shops access to the information they need to repair and maintain their vehicles. If you read the main stream news, you would be left to believe that John Deere diagnostic with a computer is impossible. Well, we are here to help dispel that myth and give some more exposure to tool that actually do perform diagnostics on John Deere.
JOHN DEERE EDL AND SERVICE ADVISOR
The very best solution in the market is what the dealers use. John Deere dealers use a combination of PC-based computer with two critical components – John Deere Service Advisor software and the John Deere EDL v2 Adapter. The EDL v2 adapter looks like the picture shown below. It comes with a hard carry case, the adapter itself, a 9-pin connector, and the USB cable. This tool is available for purchase from our website as well.
The John Deere EDL Adapter also has a variety of "extra†cables you can purchase, almost all of which are for some of the much older equipment. You can see all of the available cables on our website.
The problem comes into the other side of the equation — The diagnostic software.John Deere Service Advisor dealers refuse to sell this software to anyone. This includes owners of
the equipment, repair shops, or anyone else for the matter. The reason
for this is simple: Dealers don’t want anyone besides themselves to
perform John Deere diagnostic tests and commands, since it would in
sense be money leaving their own pockets. If there is no one else that
has the software solutions to perform the advanced diagnostics, the
customer has to go to them. However, we were fortunate enough to have
the opportunity to get our hands on this software, so here are some
screen shots showing what this software looks like.

Posted by: Emily white at
08:05 AM
| No Comments
| Add Comment
Post contains 329 words, total size 3 kb.
August 29, 2019
MB SD Connect C4 Profile:
1. Software Version: 2019.07
2. Hardware Verison: OS:2.3 CSD:2.11
3. Support Wireless/ Lan Cable Connection
4. Work for Benz Car & 24V Trucks
5. Supported Multi-Language: English, Bulgarian, Danish, Greek,
Spanish, French, Italian, Korean, Polish, Romanian, Serbo-Croatian,
Turkish, Czech, German, Finish, Hungarian, Japanese, Dutch, Portuguese,
Russian, Swedish, Chinese
Why Choose VXDAS MB Star C4 SD Connect Multiplexer?
* Serial No.is 100925, work with blacklist path Installed on MB Star C4 software, hardware never block
* Support put into AAA Battery to update the VXDAS SD C4 firmware
* Hardware PCB board with full new Samsung chip layout, work a long lifetime
* With 108Mbps wifi card running more stable & faster than ordinary 54Mbps wifi card inside
* All VXDAS SD Connect will be power on and aging than 12 hours, and
it will be tested 3 times with Ecus before shipping to ensure client get
product working
* VXDAS SD C4 with latest software support SCN online coding, the client need have MB subscription or contact our sales purchase login service
* VXDAS SD C4 offer user manual free, to help the client to use our device, just keep order number contact sale offer.
VXDAS SDConnect Testable systems:
ENGINE
AUTO-SPEED
AIRCONDITIONAL SYSTEM
SRS
ABS
ASR
MPL
GM
Bz ORIGINAL ANTI-THEFT
DASX SYSTEM

VXDAS SD Connect Software Functions:
1) DAS: the automatically Diagnosis Assistance System
2) Xentry: New software released by Benz Company after 04/2009 by diagnosisnew cars.
3) WIS.net: Workshop Information System
4) EPC.net: Electronic Parts Catalog
5) ST Finder: Part location finder
6) STARUTILITIES: the movement management system and self-test
7) SD Media: Video and PDF lessons
![]() PL72: Price List to find out how much price by input the partsnumber
PL72: Price List to find out how much price by input the partsnumber
9) Smart TAN Code: Opened special function in DAS program with Smart cars 450/451/452/454
10) Developer model: Mercedes-Benz engineer mode, remove limitations andopen more functions.
11) Benz Disassembly system: Video lessons to teach you how to remove each
12) part from Benz cars with details order steps.
DTS-monaco special feature:
1.Quick Test: Entire vehicle ECU quick test, and the test can choose to edit more
2.Variant Coding: Coding with variation add VO- delete VO function
3.ID identification: One click to read the whole car and save all modules programmed numbers
4.Complete Variant Coding: One time to read all the ECU coding vehicle
data, can be written to the vehicle again, completely off-line
operation
5.Diagnostic Services: Advanced features can see your choice of internal
and external data module, turn on the computer authorization
(not driving license), Activate ECU, reset ECU, modifying the original chassis number
6.Flash programming: Fully offline programming
7.Diagnostic Trouble Code: Diagnostic module DTC fault code
8.ECU Exchange: Two of the same ECU, by reading data import data exchange
9.Symbolic trace: Record and track the file, after repeated viewing, analysis of fault logic point
VXDAS SD Connect Basic Programming Set Code Function:
1.unit for off-line programming
2.a key to off-set code
3.W166, cancel the programmed number of calculation method of urea, one
perfect canceled all 166 urea system. The new c s-series to the factory
installed conversion:
4.222, 205 installing fragrance systems
5.2015, paragraph 212, changing traffic light permanently lit
6.212, 204, adding electric ear
7.222 205 HU5 traffic solution for DVD video
8.W164 closed recycling system
9.W205, retro atmosphere lamp
10.205, 222 adding electric ear electric trunk, the trunk kicking function
11.166, how to modify the gateway set up codes
12.166 meters finished degrees Fahrenheit to degrees Celsius
13.US standard maintenance mileage be set to the number of miles
14.164 disabled diesel particle filter regeneration system
15.166 canceled urea
16.205 added electric rear vision mirror
17.HU45 regional Chinese resolve lock
18.W204 W166 foldable rear-view mirror
19.change the 166 on board, display in Celsius
20.W212 disable ECO configurations
21.activate the HOLD function ABR2XT
22.open W22 looked up appears
23.the AMG sports package enabled W212
24.the air bag computer reset factory State W166
25.to increase the brightness of the color instrument cluster s W222
26.22.97g to install the steering wheel shift paddles
27.W221 AMG W216 dashboard style
28.airbag ECU unlock W204 212
29.disabled child seat recognition sensors W221
30.opening rear fog lamps as spare brake lights with W222 31.increasing engine power MED177″
Posted by: Emily white at
07:19 AM
| No Comments
| Add Comment
Post contains 715 words, total size 6 kb.
August 17, 2019
This isthe procedure on how to use CGDI Prog Benz Monster to reset/renew Benz ME9.7 ECU.

Procedures:
Build wire connection between ME9.7 ECU,CGDI MB programmer and computer


Open CGDI Benz software,click "Wiring Diagramâ€,then select "ECUâ€Ã â€ME9.7†to check the your connections are correctly.

Select "Auto Computerâ€,then click "Readâ€

After reading process completing,you can see vehicle information on the software.
Click "Get†to get erase password

Wait for process…

Erase password calculated successfully

After then click "Erase†button

Erase successfully

And now you can read the ECU information again to check ME9.7 status.

Done!
Posted by: Emily white at
09:52 AM
| No Comments
| Add Comment
Post contains 104 words, total size 3 kb.
August 01, 2019
This is a research result about "OBD 2 Chrysler Factory Scan Tools †from a fellow professional and what he shared with all on the web. Thanks to Brin who has taken the time to do this.
Here are several parts included:
Part 1: Chrysler and Post OBD 2 and DRB 3
Part 2: Star Scan
Part 3: VCI Pod
Part 4: micropod 2
Then a summary…
In detail…
Part 1: Chrysler and Post OBD 2 and DRB 3

Vehicles on the road today are mobile networks. Each vehicle system needs a computer or control module to manage and monitor that system. Often, these seemingly independent control modules depend on other control modules to function. They must be able to communicate with each other and they do so on a bus, otherwise known as a communication network. This is not a new concept, but every year more systems and modules are making their way onto vehicles. This is increasing the complexity of these vehicle networks. What does this mean for the general Independent, aftermarket, mechanical or collision repair business? It means that we should be considering factory scan tools (scan tools used in dealer franchise service departments) and service information if we truly want to be able to handle our vehicle mix in a thorough, efficient and profitable manner. I’m not suggesting that there isn’t a place for aftermarket scan tools or service information in our businesses. I’ve found that both are needed to increase the likelihood of knocking it out of the park on every job. I realize that there are a lot of different, successful business models out there. Not everyone of these business models can support a journey like this. When considering ROI, you might not think that it makes sense for you and your business. You might consider subletting some of those jobs out to other local businesses that have committed to making these Professional Diagnostic Tool. Often, this means a mobile diagnostics and programming company. In this series, we will cover the most popular vehicle manufacturers one at a time, providing the information that you’ll need to make an educated decision. So, sit back and relax. We’ve got this.
We have a lot of work cut out for us so where do we start first? I’ll give you a hint, this vehicle manufacturer has had 6 different factory scan tool interfaces and 5 different scan tool platforms in the past 14 years?
Yes, we’re going to start with Chrysler.
We’re going to start with Post OBD 2 and the DRB 3. The DRB 3 is a
hand-held Chrysler factory scan tool for non-CAN Chrysler vehicles but
also has non-CAN, Global, OBD 2 Scan Tool capabilities as well as an oscilloscope. Don’t expect much from the
oscilloscope. Compared to modern oscilloscopes, I’d consider the scope
in the DRB 3 more like a graphing voltmeter. The DRB 3 will never time
out meaning that it does not require a subscription to function. You
will, however need a Tech Authority Subscription to access and download
the calibration files needed to program Non-CAN, Chrysler Modules. Super
Cards were needed in early models (pre-9![]() and other special
applications like Chrysler branded Mercedes or Mitsubishi products like
the Mitsubishi based Stratus, the Mercedes based Chrysler Crossfire and
the Mercedes based Dodge Sprinters. There were different Super Cards for
each of these special applications. Super Cards were inserted into the
lower section of the tool. Special adapters called Multiplexers and
cables were needed for certain applications as well.
and other special
applications like Chrysler branded Mercedes or Mitsubishi products like
the Mitsubishi based Stratus, the Mercedes based Chrysler Crossfire and
the Mercedes based Dodge Sprinters. There were different Super Cards for
each of these special applications. Super Cards were inserted into the
lower section of the tool. Special adapters called Multiplexers and
cables were needed for certain applications as well.
Part 2: Star Scan

Next on the list is the Star Scan. The Star Scan is a hand-held Scan tool. It was the first Chrysler factory scan tool used for CAN only vehicles. None of the scan tools used for CAN vehicles were backward compatible, meaning that they would not function on non-CAN vehicles with exception of the DRB 3 Emulator that was included with the first wiTECH application (We will touch on this later). This tool was pretty much obsolete when it hit the Market. It was very slow. It didn’t take long before the Hardware couldn’t keep up with updates. A subscription was not needed for this tool to function, but a subscription was needed for tool updates and a Tech Authority subscription was needed to access and download calibrations needed to program Can Chrysler vehicle modules. The Star Scan is no longer sold or supported.
The Star Mobile was Chrysler’s first Scan Tool Interface that was designed to be used with a laptop. The interface was the hardware that connected to the vehicles DLC (Data Link Connector) but you would need a laptop with the downloaded Star Mobile Desk Top Client software for the scan tool to function. The installation and update software were downloaded from a disc. The Star Mobile could also be used as a functional Interface for the first wiTECH application that would be released later (Discussed later).
Star Mobile Desk Top Client was the software used with the Star Mobile. This software was quickly replaced with the wiTECH Application called the wiTECH Desk Top Client. As mentioned earlier, the Star Mobile Interface could be used for the wiTECH application for most of the existence of wiTECH.
Part 3: VCI Pod
The wiTECH VCI Pod is an interface that came out at the same time as the wiTECH application. At one point, the only way to purchase the wiTECH was with a package that included with the special wiTECH gateway (Basically a router configured to be used with the VCI Pod and to link with Chrysler’s server, the mother ship). When Chrysler first launched the application, franchise new car dealers were told that there was a wiTECH install and support team that would have to set everything up. The franchise dealers were not to set anything up on their own. Often, those teams never came and finally, the franchise dealers installed the system themselves. This was about the time of the bail out and bankruptcy. For aftermarket service facilities, the wiTECH package was around $8,000.00 with a years’ worth of wiTECH licensing, support and programming capabilities. Sometime later, wiTECH decided to offer a more economical option that came with a less expensive router and support limited to email. This package was around $4000.00 and was called wiTech Lite. A DRB 3 emulator was included in the wiTECH application not long after wiTECH was released. This Emulator allowed the user to scan and program non-Can Chrysler’s through the wiTECH application. The DRB 3 Emulator was just that, an emulator and emulators are rarely as good as the real thing. Early on, the emulator was okay but did get better over time with updates.
Part 4: MicroPod 2
The wiTECH MicroPod II was the next generation in Chrysler factory scan tool interfaces. The MicroPod is a pocket-sized dongle that plugged into the vehicles DLC. A wiTECH subscriptions was needed to use the wiTECH application. This tool would time out and be unusable if the subscription lapses. If you had an original VCI Pod and the wiTech software from V13.03.38 or prior, and never updated it, the tool would never time out. You could use it as a stand-alone tool, meaning that you couldn’t get all the benefits from the application, and you couldn’t program. Before this update, the application could be used in an offline mode, allowing it to function without connecting to the wiTECH server and checking the pod for registration and account information. Again, this is stand-alone diagnostics only, you wouldn’t be able to program, you would be limited in application features and you would limit yourself to older models due to the older update.
Tech Authority is the aftermarket portal for accessing subscriptions needed to download Chrysler flash files for programming Chrysler’s modules regardless of what scan tool or programming device that you are using.
The MicroPod 2 was released for compatibility issues with certain models. A while later wiTECH 2 was released to reduce cybersecurity and theft issues with Chrysler vehicles. With the wiTECH 2 release there was news of a sundown or elimination of the original wiTECH application. The other fun fact, your MicroPod 2 had to have a serial number of WPS-31560 or above. Older MicroPods would not be compatible with wiTECH 2, meaning that some users had to buy, yet another scan tool interface for use with witech 2. If you had a Micropod with a serial number that would allow you to register the device for the witech 2 and you did, that device could never again be used with the original wiTech application. The sundowner mentioned above did take place late in 2017 but according to sources, the original wiTECH application is still available to dealer franchises due to wiTECH 2 not being 100% compatible with some older CAN platforms. The new wiTech 2 is a cloud-based application meaning that you will need access to the internet for the scan tool to function.
The DRB 3 emulator is not available in wiTECH 2, so as it stands, the aftermarket needs to buy the separate standalone DRB 3 emulator from Controller Technologies Corporation or find a used DRB 3 if they want Factory non-CAN Chrysler coverage.
DRB 3
* Non-CAN Chrysler vehicles.
* Full factory scan tool functions (Some special Super Cards, adapters
and cables needed for some Chrysler branded Mercedes and Mitsubishi
products).
* No longer sold, supported or serviced by formal vendors. There are
very small companies that offer repairs, but parts are limited to old
stock or parts used from non-functioning DRB 3 units.
* Chrysler module programming with a Tech Authority subscription
DRB 3 Emulator
* Controller Technologies Corporation DRB 3 is a stand-alone PC
based scan tool. We are not referring to the DRB 3 Emulator that was
included with wiTECh. This is the only legitimate option when looking
for Factory coverage on non-CAN Chrysler vehicles. Keep in mind, that
emulators are rarely 100% effective at emulating what they are designed
to emulate. The DRB 3 is no exception, although, according to AE Tools, a
distributor and support company for factory scan tools, the Controller
Technologies Corporation DRB 3 is more capable of handling some of the
oddball early CAN PCI Hybrid vehicles that were released during the
early stages of the CAN protocol. In this way, it might be superior to
the original DRB 3.
* Nearly full factory scan tool coverage. This emulator has the same
exceptions as the DRB 3 regarding Chrysler branded Mercedes and
Mitsubishi products but a PC Based DRB 3 Multiplexer is available for
Crossfire and Sprinter applications.
* The kit comes with non-powertrain ECU calibration files for
programming body and chassis modules without the need for a Tech
Authority Subscription.
* Powertrain programming available with a Tech Authority subscription.
wiTECH 2 and the MicroPod 2
* Full factory scan tool functions with full programming capabilities on CAN compliant Chryslers.
* A wiTECH 2 subscription will be needed for scan tool function.
* wiTECH 2 subscriptions are available in three different terms:
* Cloud/Internet based so an internet access is needed for the application to function.
* A Tech Authority subscription is needed for programming. You will need to have an active wiTECH 2 subscription as well.
* Tech Authority subscriptions are available in eight different terms.
1-day subscription is $24.95, a 3-day subscription is $35.00, a 7-day
subscription is $70.00, a 30 day subscription is $250.00, a 3 month
subscription is $600.00, a 6 month subscription is $1000.00, a 1 year
subscription is $1800.00.
See attached for vehicle to diagnostic tool reference chart
To recap,
If you find that you need Non-Can Chrysler coverage, you might consider buying a Controller Technologies Corporation DRB 3 Emulator. Normally I would say that it would be best to buy the Genuine DRB 3 but they’re only available used at this point and they are very expensive. You can expect to invest $2200-$3000 on a functional used DRB 3. A significant risk on a used tool that might not be repairable if needed.
For full factory diagnostic and programming capabilities on CAN Fiat/Chrysler automobiles, it’s very clear that you’ll need a MicroPod 2 with a serial number WSP-31560 or higher, a wiTECH subscription and a Tech Authority subscription for programming.
If you just look for a decent tool for Chrysler and don’t care it’s original or copy, the lowest cost is to get a decent Micropod 2 china clone with wiTECH 2 subscriptions (DO CONFIRM ITS FUNCTIONALITY!
On a side note, please let me know if I need to add or correct anything.
Posted by: Emily white at
08:24 AM
| No Comments
| Add Comment
Post contains 2114 words, total size 15 kb.
July 24, 2019
Free download Subaru SSM3 SSM4 2018 software:
https://mega.nz/%23!B9wEWa4R!fCiUWWMfFKcZf9bdtCOWP3nl6brU2I8FW_KoYcPIUXM
It’s your own risk!
Where to get Subaru Select Monitor 3 & 4 for use with relief:
https://www.obd2tool.com/goods-4550-ALLSCANNER-SUBARU-SSM-III-SSM3.html
Tested 100% successfully with VXDIAG SUBARU diagnostic tool

SSM III abilities confirmed to work:
1.All System Diagnosis…worked
2.Each System Check…worked
3.Saved Data Display…worked
4.Immobilizer (register key) …worked
5.Reprogram…worked
6.Read CF application measurement data…worked
7.Convert/Save measurement data on driving recorder…worked
8.Oscilloscope…worked
9.Program Subaru smart key…worked
How to install VXDIAG SSM 3 software:
Operating system: Windows XP/Windows 7
Language: English German Spanish French Italian
Vehicle coverage: Subaru 2005 to 2018
Internet connection: Yes
The steps:
Step 1: Install SSM3 setup
Step 2: Install SSM4 setup
Step 3: Install FlashWrite
Step 4: Install VX Manager driver
vxdiag-subaru-ssm3-ssm4-install
10.2018 SSM3 SSM4 Installation video:
VERY VERY VERY IMPORTANT:
You should install SSM4 setup to finish installation.
But VXDIAG cannot be used as a Subaru ssm4 diagnostic tool.
Do always use SSM3 software only.
How do people think of VXDIAG SUBARU:
Look here Subaru SSM 3 review:
Vxdiag and customized settings: handy!
It’s handy for doing stuff like turning off the passenger seat belt warning (my dog rides over there sometimes and doesn’t like wearing his belt) or setting the wiper de-icer to work for as long as I tell it to instead of a 12 minute cycle. Or make the door locks unlock with one press of the remote. All of this is stuff you won’t be able to do (AFAIK) with any other scanner.
I also rebuild wrecks and it’s the only thing that will talk to the airbag systems so I can figure out WTF is making the light stay on after cobbling together a car from 2 or 3 others.
Vxdiag Subaru diagnostics: works!
Complete access to everything with the ability to read and clear codes and manipulate other features. More or less everything that the dealership can do.
It just depends on if you think having complete access to all the systems in the car is worth it. It’s nice to have when I need it. I had a VDC code that was for the steering angle sensor. Rather than go to the dealer, I just busted out the knock off SSM and calibrated it in the driveway.
Vxdiag and new remotes: works!
It should perform "learning control†of TCM after clearing memory2 was done. So, it might be able to program a new remote. if you already know how to useAutomotive diagnostic tool SSM and you know it well enough to tell if this pirate copy is acting up vs. the real thing. It’s not like they give you a license or support, so you’d better already know exactly what you’re doing with it.
Vxdiag Subaru key programming: a bit different!
It is a bit different from most. I make and program keys for a living and for a while the SSM was the only thing that would program the prox fobs. Not true anymore but I still paid less for the VXdiag with software than I would for a single piece of software for my T-code pro. . and there are 3 for Subaru. I have one which only covers the earliest models.
btw, you have to have a NASTF LSID or be very good friends with a Subaru parts manager.
You need an immobilizer code (which is VIN specific) to program keys/fobs. It does not change so once you have it for your car you can go nuts. Odds are your dealer would probably give you YOUR immobilizer code if you shop there somewhat regularly. They may charge you for it as I know they have to pay a couple of bucks to mama subie for them.
There’s also an ‘enabling password’ which is also static and I suppose is a very flimsy extra layer of security to protect the immobilizer features of the SSM. It’s 3781.
Expiry date and additional software: worthy!
Someone says it will stop working after expiry date. Actually, don’t know and don’t care. mine says 2026, that’s like 9 years from now. If I have it that long and nothing better comes along, I got my money’s worth. I will say licenses for additional software titles (toyota, etc.) are only like $20 extra so I’d speculate renewing the license will be cheap if it becomes an issue.
Posted by: Emily white at
09:02 AM
| No Comments
| Add Comment
Post contains 733 words, total size 5 kb.
July 22, 2019
This post show the source ofPorsche Piwis 2 free download,you can try at you own risk to use this software.
What is Porsche PIWIS II ?
Porsche Piwis II software is the latest professional diagnostic software for Porshe,the most poweful diagnose and offline programming software for Porsche.
Porsche PIWIS 2 Functions and Features:
1Read/clear error code, catch data stream, computer programming
match, component test, maintenance information consult, components site
drawing, wiring diagram.
2Piwis Tester II works with the old and latest Porsche cars. It is
equipped with the Panasonic laptop and original software for the
test.Porsche Piwis2 can help you diagnose and program the most new and
old kind of Porsche cars. For example: 911(997)(991), Boxster/Cayman,
(987), Cayenne up to MY 2010, Cayenne from MY 2011 and Panamera.
3New Panamera can only be diagnosed by using Piwis Tester II. Based on
current project planning, all earlier vehicle models will gradually be
changed over to the new Piwis Tester II by the end of 2010. Piwis
Tester I must be used for older models in the Porsche workshop until end
of 2010.
Porsche PIWIS 2 Language:
Russian/ English/ French/ Spanish/ Italian/ German/ Portuguese/ Japanese/ Chinese/ Dutch
Porsche PIWIS 2 Support Systems:
ENGINE automation transmission, air-conditioner, SRS, ABS, ASR, MPL, GM,
Original antitheft System,KEYLESS GO system, OBDII system.
Porsche PIWIS 2 Support Porsche Vehicle Models:
911(997) (991)
Boxster/Cayman (987)
Cayenne up to MY 2010
Cayenne from MY 2011
Panamera
Support Porsche Cars Till 2017
Porsche PIWIS 2 18.150.500 Acronis image with PET7.3 Free Download:
https://mega.nz/#!M0px0KZa!KU7kmbTftZHlRXSOBTBC6CaAo653HALOT6Mmvt79O1I
Porsche PIWIS 2 18.150.500 for Dell D630
https://mega.nz/#!eoZ3XLKC!gmdzsauTGNh_qH4AUtiqAm90Z_Yy2W7-Zc8TMLaw_LA
Piwis Tester II V17.500
https://mega.nz/#F!3k0xmTTD!zrIxQ5AGpe4eAle5bIqBgA
If you to get Best Price Porsche Piwis Tester II,please Connect us: sales@obd2tool.com
Posted by: Emily white at
08:06 AM
| No Comments
| Add Comment
Post contains 286 words, total size 3 kb.
July 04, 2019
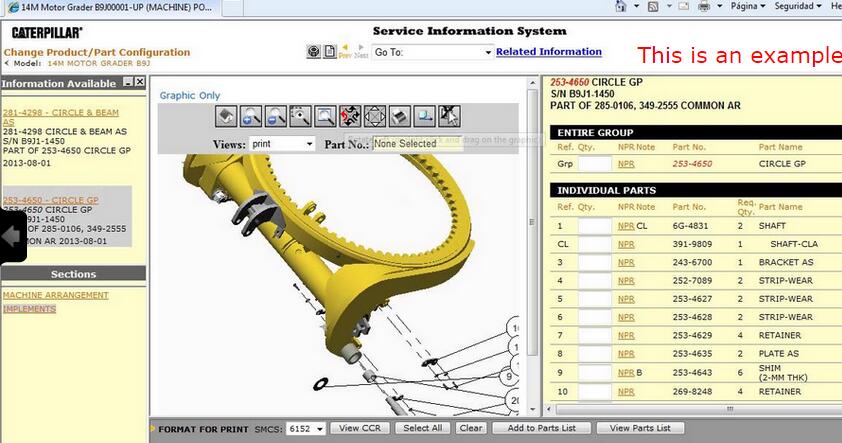
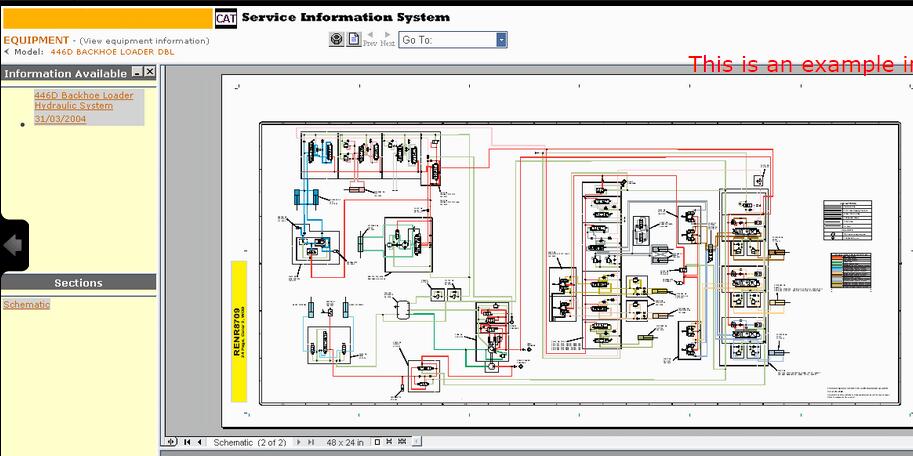
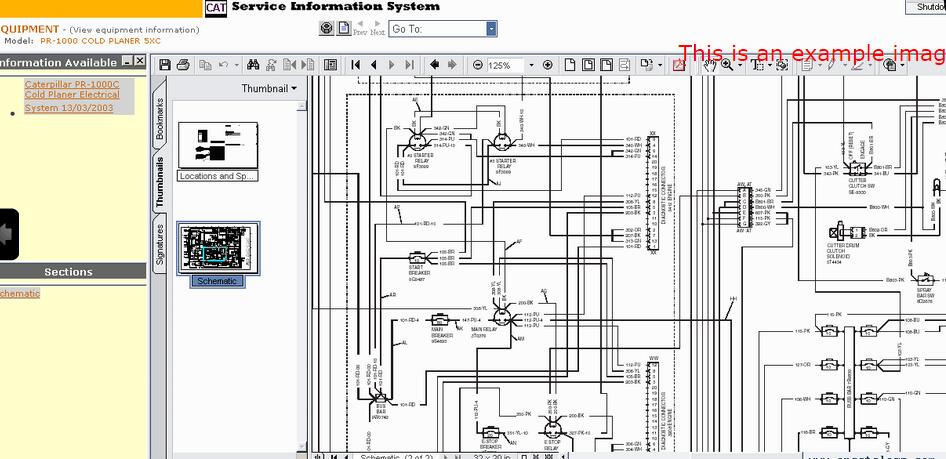
Caterpillar SIS (CAT SIS) 2019 is illustrated a guide to the maintenance and repair of
the full range of cat vehicles, contains guidance on repair equipment
and machinery caterpillar, program help diagnose production caterpillar,
operating instructions spare parts and equipment caterpillar.
Repair manual caterpillar SIS 2019 is intended for engineers and will be useful to all interested in the given direction.
E-program caterpillar SIS 2019 allows the owner of specialized equipment
to quickly and easily find the required information about the machine
because it contains a search function references; helps professionals to
calibrate equipment caterpillar, diagnose it and troubleshoot equipment
to solve any problems.
We’re getting a lot of questions about how to work with the cat SIS
It’s simple and convenient for use. All you need to know is your model name, or serial number, or prefix. Also, you can use Parts search function.
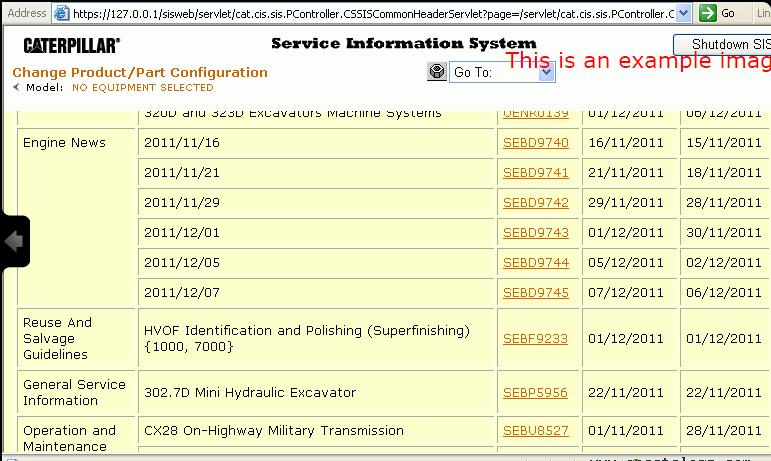
caterpillar Service Information System is a completely offline
product, no matter it works using Internet Explorer Browser (You
connected to the local web server, which is being installed on your own
PC/Laptop). The technical database for all cat machinery stored on 26
DVD-DL discs or (iso images or these DVDs). The total file size of cat
SIS setup + Database files is around 100 Gb.
Download / Setup / Activation of cat SIS 2019
1. Please check that your HDD have enough of free space. We recommend
at least 250 Gb for Download and 50 Gb if you prefer to get cat SIS on
USB HDD or as a set of DVDs
2. The cat SIS works only under Windows 7/8.1/10 operation systems. Mac OS, Linux, etc are not supported.
3. Internet Explorer 9-11 is the only Supported browser because
application using WinDjView image plugin, which works with IE only.
4. Setup process estimated time is 1.5 hours if the download and extraction of the setup files have been finished.
5. We recommend using our Free remote Assistance with Download, Setup,
and activation. However, if you want to set up the app by yourself, we
can send you details instruction guide.
6. If you need to install cat SIS on more then 1 PC/Laptop, please contact us, we have some good news for you!
Caterpillar Service Information System 2019
Data Release Notes
These notes contain changes and enhancements that
have been made to the SIS data library for the SIS DVD LIBRARY – DECEMBER 2018
release as compared to the SIS DVD LIBRARY – OCTOBER 2018 release.
Number of DVDs in library: 26
New products
Families/Models/Prefixes
COLD PLANER, PM820, HN8
ENGINE, 3516E, SW2
ENGINE, 3512E, SY9
MOBILE HYD POWER UNIT, 345D, P5D
MINI HYD EXCAVATOR, 307.5, GW7
MOTOR GRADER, 140, N94
SHEAR, S3035, LNT
WORK TOOL, , PA2
COLD PLANER, PM822, JB7
ENGINE, 3512E, SY7
ENGINE, 3512E, SY5
ENGINE, 3512E, SY3
EXCAVATOR, 315, WKX
MINI HYD EXCAVATOR, 308, GG8
ASPHALT COMPACTOR, CB10, 5B4
COLD PLANER, PC310B, RCF
COLD PLANER, PM825, HC8
ENGINE, 3516E, SW5
ENGINE, 3512E, SY6
EXCAVATOR, 315 GC, LYW
EXCAVATOR, 313 GC, RYT
EXCAVATOR, 313 GC, NFZ
EXCAVATOR, 313, KNL
EXCAVATOR, 313, JHR
MINI HYD EXCAVATOR, 310, GWT
MINI HYD EXCAVATOR, 308.5, GZ8
MINI HYD EXCAVATOR, 308, GX8
TRUCK, 794 AC, HRT
SOIL COMPACTOR, CS11, RK8
SOIL COMPACTOR, CS10, T8F
PETROLEUM ENGINE, 3516C, CG7
COLD PLANER, PC306B, PWZ
ENGINE, 3516E, SWK
ENGINE, 3516E, SWD
ENGINE, 3516E, SW6
ENGINE, 3512E, SY8
ENGINE, 3512C, HZR
LOCOMOTIVE ENGINE, PR20B, SMW
EXCAVATOR, 326, LHY
MARINE ENGINE, CT220-600, HMZ
QUICK COUPLER, , L9A
SHEAR, S3025, LNS
ENGINE, 3516E, SW4
ENGINE, 3516E, SW3
ENGINE, 3512E, SY2
EXCAVATOR, 326, MFJ
MINI HYD EXCAVATOR, 309, GW9
SOIL COMPACTOR, CS12, GCS
SHEAR, S3015, LNP
SHEAR-DEMOLITION/SCRAP, S3015, SX2
GENERATOR SET, 3516C, PXY
MINI HYD EXCAVATOR, 309, GG9
MINI HYD EXCAVATOR, 308, GK8
MOTOR GRADER, 140, N95
SHEAR-DEMOLITION/SCRAP, S3025, SX3
ENGINE, C175-16, P6P
ENGINE, 3512E, SY4
ENGINE – MACHINE, C18, TYW
EXCAVATOR, 340, TYH
EXCAVATOR, 326, KCK
EXCAVATOR, 313, SZY
EXCAVATOR, 313, MKJ
MINI HYD EXCAVATOR, 308, GW8
ASPHALT COMPACTOR, CB7, G44
UTILITY VEHICLE, CUV105D, GD5
SHEAR-DEMOLITION/SCRAP, S3035, SX4
UTILITY VEHICLE, CUV85, K85
Information added
Parts Manuals: 50
Tech Docs: 2096
Service Information System
Data Release Notes
These notes contain changes and enhancements that
have been made to the SIS data library for the SIS DVD LIBRARY – AUGUST 2018
release as compared to the SIS DVD LIBRARY – JUNE 2018 release.
Number of DVDs in library: 22
New products
Families/Models/Prefixes
ARTICULATED TRUCK, 730, 3T4
LANDFILL COMPACTOR, 816K, LT6
SOIL COMPACTOR, 825K, 2L9
GENERATOR SET, C32, TZJ
EXCAVATOR, 320, ZBT
BUCKET, BD121, RSW
WORK TOOL, MP345, M4W
TELEHANDLER, TH414C, LYN
TRACK-TYPE TRACTOR, D8T, AW4
BUCKET, BD118, PKS
WORK TOOL, MP365, MYB
ARTICULATED TRUCK, 730, 3F3
SOIL COMPACTOR, 825K, 2T9
UTILITY VEHICLE, CUV82, M82
WHEEL DOZER, 824K, 2L4
WORK TOOL, GSH520, Z2W
LANDFILL COMPACTOR, 826K, 2L3
INDUSTRIAL ENGINE, C13, SK2
BUCKET, BD121, MFP
BUCKET, BD118, BND
WORK TOOL, MP332, JGE
ARTICULATED TRUCK, 735, 3T5
ARTICULATED TRUCK, 730, 3F4
GENERATOR SET, C32, TZK
EXCAVATOR, 320, YBP
SKID STEER LOADER, 262D, AJ7
TELEHANDLER, TH414C, KRF
SOIL COMPACTOR, 815K, T1Y
WHEEL LOADER, 986K, NL8
WORK TOOL, MP365, JGT
WORK TOOL, GSH420, L9D
ARTICULATED TRUCK, 730, 3T3
LANDFILL COMPACTOR, 816K, SLL
SOIL COMPACTOR, 815K, SL9
COMMAND, -, AT6
ELECTRIC MOTOR, CN9999, RJB
UTILITY VEHICLE, CUV102D, PD2
WHEEL DOZER, 824K, 2T2
WORK TOOL, MP332, MW2
ARTICULATED TRUCK, 735, 3F5
LANDFILL COMPACTOR, 826K, 2T6
WORK TOOL, MP345, JZD
Information added
Parts Manuals: 31
Tech Docs: 988
Program covers:
Hint: Click show all
ARTICULATED DUMP TRUCK
ASPHALT PAVER
BACKHOE LOADER
CHALLENGER
COLD PLANER
COMBINE
BULLDOZER
ENGINE – GENERATOR SET
ENGINE – INDUSTRIAL
ENGINE – MACHINE
ENGINE – MARINE
ENGINEER SUPPORT TRACTOR
EXCAVATOR
EXPANDED MINING PRODUCTS
FOREST PRODUCTS
GENERATOR
INTEGRATED TOOLCARRIER
LOAD, HAUL, DUMP
MACHINE CONTROL AND GUIDANCE PRODUCTS
MATERIAL HANDLER
OEM SOLUTIONS
OFF-HIGHWAY TRUCK
ON HIGHWAY TRUCK
PAVING COMPACTOR
PETROLEUM PRODUCTS
PIPELAYER
RETROFIT AFTERTREATMENT
ROAD RECLAIMER
SKID STEER LOADER
TRACK-TYPE LOADER
TRACK-TYPE SKIDDER
TRACK-TYPE TRACTOR
UNDERGROUND ARTICULATED TRUCK
WHEEL DOZER
WHEEL TRACTOR-SCRAPER
WHEEL-TYPE LOADER
WHEEL-TYPE SKIDDER
WORK TOOL
Company caterpillar – the world leader in construction and mining equipment, diesel and natural gas engines and gas turbines.
The company also is a leading provider of services provided through the
company’s caterpillar Financial Services, caterpillar Remanufacturing
Services, caterpillar Logistics Services and Progress Rail Services.
For more than 80 years, caterpillar Inc. promotes progress possible and
driving positive and sustainable change on every continent.
Screenshots for Caterpillar SIS | Cat SIS 2019/01 FULL WITH 3D IMAGES:
Posted by: Emily white at
09:21 AM
| No Comments
| Add Comment
Post contains 1071 words, total size 10 kb.
June 30, 2019
Important Notice. Installation and activation are possible only with remote assistance using Teamviewer.
You are buying John Deere Service Advisor v5.2 for Construction and Forestry equipment online on USB HDD with international delivery or easy digital download! If you want to download the program. The download link along with PDF instruction file emailed to your email address within 2 hours (up to 12 hours in a weekend) of your purchase. If you would like the same software shipped to you on a USB HDD please select appropriate delivery method during checkout.
The John Deere Service Advisor combines several versions of the program. As well as a number of related programs and diagnostic equipment
For Agriculture division please check theHeavy Duty Scanner John Deere Service Advisor 5.2 2018 Agriculture Equipment Division product link
Before you proceed, please check the product requirements below.
John Deere Service Advisor 5.2 System requirements:
– O.S.: Windows 7 Pro/Ultimate; Windows 8 Pro, Windows 8.1 Pro, Windows 10 Pro/Home
– CPU: Any CPU for Windows platform
– RAM: 8 GB of system memory (Recommended), 4 GB is the Minimum required amount.
– Hard Drive: 150 GB of available space + ~110 Gb for the setup files if you want to Download the software.
JD Service Advisor v5.2 support only Genuine JD EDL V3/V2 DLA Adapter kit (The previous version V2 USB and BT is also supported). If you’re using any other diagnostics tool we do not make any warranties
The new version of Service Advisor comes as a complete solution for those who do a repair, diagnostics, and maintenance of all John Deere construction and forestry equipment. It’s completely different from its previous version 4.2. JD Service Advisor functions are available from Internet Explorer Web browser. At this moment this is only one officially supported browser version. To start work with any model, you need to enter the model name or its PIN.
Available program futures divided into a few main sections: – Manuals – Reprogramming – Diagnostics
Manuals Section. First of all, most of the manuals now have a more convenient web interface and you can read/print all you want using Internet Explorer. A part of the manual is still available as pdf files only. So you need Adobe Reader installed.
Reprogramming section requires dealer credentials to access the payload database. At this moment this future is not available.
Diagnostics section. The avaiable menus are
– Codes – Readings – Controllers – Observed Symptoms – Tests – Calibrations
John Deere Service Advisor 5.2 covers:
Hint: Click show all
4WD Loader
ADT
AG
Apollo Series
Axles
Backhoe
Boom Harvester
CF Management Solutions
Communication
Compact Excavator
Compact Loader
Crawler
Excavators
Feller Buncher
Felling Head
Forestry Swing Machine
Forwarder Wheeled
Harvester
Harvester Head
Landscape Loader
Log Loader
Logger
Mate. Hand Cut. and Shredders
Measuring System
Motor Grader
OEM Engines
OEM Winch
Other
PTO
Planetary Drive
Pump Drive
Scraper
Skid Steer
Skidder
Slasher
Software
Telematics
Tractor Loader
Tractors
Transmission
Truck
Utility Vehicles
Winch
Worksite Pro Attachment
Models on History DVDs:
Hint: Click show all
4WD Loader
Backhoe
Compact Excavator
Compact Loader
Compactor
Crawler
Excavators
Feller Buncher
Forklift
Forwarder Wheeled
Harvester
Harvester Head
Log Loader
Logger
Motor Grader
Scraper
Skidder
Tractors
Tree Harvester
Truck

Posted by: Emily white at
03:32 AM
| No Comments
| Add Comment
Post contains 543 words, total size 6 kb.
June 28, 2019
I bought my Tech 2 from obd2tool.com and it works great. Cannot really compare software with a Tech2 as that
is comparing hardware to a program. That being said, there is a
software side of things that work alongside the Tech2 which is the
TIS2000 software. Getting that working is a bit of a project in and of
itself as the software is old and seems to work best on Windows XP. The
TIS2000software is really not needed to use the Tech2 though – that is
needed if you want to update the firmware in the various modules in your
vehicle like the ECU, BCM, DDM, etc.
Simply put though. There is no other tool that can do everything on your
H2 that the Tech2 can do. It is the only tool with things that are very
specific like calibrating the rear air suspension module. Other tools
can be very powerful but that are mostly just have features that are
common to many vehicles and will not have things that are specific to
just one or two vehicles.
cannot speak for any on Aliexpress. I’ve seen both good and bad reviews on the ones from there. Also the link you gave just takes me to the Aliexpress home page. Regardless it would not matter as again, I have no way of knowing if one from some seller on there will be a good one or not.
It is also worth spending the extra to get the case which does cost a good bit more. These come with a lot of different adapters and parts and the case makes it very nice and easy to keep it all together.
This is the kit that I ordered. It also includes the Candi module which is needed for many newer model GM vehicles.
loading..
Posted by: Emily white at
11:30 AM
| No Comments
| Add Comment
Post contains 311 words, total size 2 kb.
June 20, 2019
A brand new version of John Deere Service Advisor 5.2 for AG equipment is an offline application, that use Internet Explorer browser to communicate with the user.
JOHN DEERE SERVICE ADVISOR AG 5.2 SPANISH (ESPA?OL) 02/2018 version is also available. Please indicate the preferred language in the comment field during the checkout process.
Important Notice. Installation and activation are possible only with remote assistance using Teamviewer.
Unlike the previous version (John Deere Service Advisor 4.2) to work with the application you need:
Internet Explorer 11 (The shell)
Last version of Adobe PDF reader (you will be asked to download the last version before the installation process begin)
Last version of Java runtime environment (you will be asked to download the last version before the installation process begin)
John Deere Service Advisor 5.2 System requirements:
– O.S.: Windows 7 Pro/Ultimate; Windows 8 Pro, Windows 8.1 Pro, Windows 10 Home/Pro
– CPU: Any CPU for Windows platform
– RAM: 8 GB of system memory
– Hard Drive: 150 GB of available space
JD Service Advisor v5.2 support only Genuine JD EDL V3 DLA Adapter kit (The previous version V2 USB and BT is also supported). If you’re using any other diagnostics tool we do not make any warranties
The represented version of SA 5.2 allows you:
to start the offline version with an active internet connection
The license lasts for 3 years instead of 3 months
Windows 10 is fully supported by EDL v2/v3 kit
Here is the list of the models included in Service Advisor 5.2 AG and Turf Equipment. If your model is not listed, please contact us, as some models might be missing in the product description.
TheHeavy Duty Truck Scanner John Deere Service Advisor combines several versions of the program. As well as a number of related programs and diagnostic equipment
BELLTruck
Articulated Dump
B35C
Frontier
Combines and Headers
Header Transports
HT1124
HT1128
HT1132
HT1138
HT1142
HT1224
HT1228
HT1232
HT1238
HT1242
HT1248
Platforms
620VS
622VS
625VS
630VS
SH1206
SH1208
SH1210
SH1212
SH1216
SH1306
SH1308
Wide-Row Cornhead PIN Prefix XF
CH2112
CH2208
Cotton Harvesting
Module Handler
CM1100
Cutting and Mowing
Flex-Wing Grooming Mower
Rear Discharge Rotary Mower
Rotary Cutters
Side Discharge Rotary Mower
Golf and Turf Products
Grinders
BG1000
BG1500
RG5000
RG5500
Hay and Forage
Bale Carrier
BC1104
BC1108
BC1110
Bale Mover Feeders
BU1060
Bale Spear
HS1001
HS1002
HS2001
HS2002
HS2003
HS2004
Bale Wrapper
LW1166
LW1266
Carted Wheel Rakes
WR0008
WR0010
WR0012
WR1008
WR1010
WR1012
WR1108
WR1112
WR1116
WR3008
WR3010
WR3012
WR3108
WR3110
WR3112
WR6008
WR6010
WR6012
Disc Mower Caddy
DC1000
Hay Merger
HM1109
HM1209
HM1212
Mowers
DM1130
DM1140
DM1150
DM1160
DM1270
DM5050
DM5060
DM5070
SB1106
SB1107
SB3106
SB3107
SB3108
Processor
BP1166
Pull-Type Wheel Rakes
WR1212
WR1214
WR1216
WR1218
WR1417
WR2010E
WR2012E
WR2014E
WR2110
WR2112
WR2114
WR2212
WR2214
WR2316
WR2318
WR3310
WR3312
WR3313
WR3315
WR3414
WR3416
WR3417
WR3419
WR4106
WR4109
WR4313
WR5417
Rotary Rake
RR1012E
RR2109
RR2211
RR2313
RR2324
Tedders
TD1010E
TD1123
TD1316
TD2418
TD2427
TD3418
TD3427
Hydraulic Power Pack
Hydraulic Power Pack
HP2025
HP2134
Landscaping
Aerator
CA1048
CA1060
CA1072
CA2048E
CA2060
CA2060E
CA2072
CA2072E
Arena Rake
RA1084
RA1108
RA1110
Blade
BB1048
BB1048L
BB1060
BB1065
BB1072
BB1160
BB1165
BB1172
BB1184
BB1284
BB1354
BB1360
BB1365
BB1372
BB1472
BB1484
BB2048
BB2048L
BB2060
BB2065
BB2072
BB2172
BB2184
BB2272
BB2284
BB3272
BB3284
BB3296
BB3384
BB4160
BB4166
BB4172
BB4178
BB4184
BB4196
BB4278
BB4278C
BB4284
BB4296
BB5048L
BB5060
BB5060L
BB5072
BB5084
BB5096
Blower
BL1130
BL2130
Chipper_Shredder
WC1103
WC1105
WC1205
WC1208
Land Plane
LP1048
LP1060
LP1160
LP1172
LP1184
LP1184C
LP1196
LP1196C
LP1207
LP1208
LP1210
Landscape Rake
LR1060L
LR1072
LR1172
LR1184
LR1196
LR2060L
LR2072
LR2084
LR2172
LR2184
LR2196
LR5048L
LR5060
LR5060L
LR5072
LR5084
LR5096
Post Hole Auger
PHA006
PHA009
PHA012
PHA106
PHA109
PHA112
PHA118
PHA124
Post Hole Digger
PHD100
PHD200
PHD300
PHD400
Power Rake
PR1148
PR1160
PR1172
PR1184
PR1184F
ROTARY BROOM
SW2160
SW2172
SW2184
Rear Mounted Blades
RB1060
RB1060L
RB1072
RB1084
RB1172
RB1184
RB1196
RB2060
RB2060L
RB2072
RB2084
RB2160
RB2160H
RB2172
RB2172H
RB2184
RB2184H
RB2196
RB2196H
RB2272
RB2284
RB2296
RB2307
RB2307C
RB2308
RB2308C
RB2309
RB2309C
RB2310
RB2310C
RB2408
RB2408C
RB2409
RB2409C
RB2410
RB2410C
RB5048L
RB5060
RB5060L
RB5072
RB5084
RB5096
Rotary Tiller
RT1060E
RT1070E
RT1080E
RT1140
RT1142
RT1149
RT1150
RT1157
RT1160
RT1165
RT1170
RT1173
RT1180
RT1181
RT1207
RT1208
RT1240
RT1250
RT1260
RT1265
RT1270
RT1273
RT1280
RT1280C
RT1307
RT1307R
RT1308
RT1308R
RT1310
RT1310R
RT1360
RT1370
RT1370R
RT1380
RT1380R
RT2210
RT2283
RT2293
RT2308
RT2310
RT2383
Scrapers
LL1117
LL1160
LL1172
LL1208
LL1210
LL1212
LL1227
LL1327
LL1372
LL1372C
LL1384
LL1384C
LL1396
LL1396C
LL2317
LL2327
LL4137
LL4237
LL4337
LL5237
LL5337
LL9247
LL9347
Soil Pulverizor
SP1048
SP1060
SP1272
SP1272B
SP1284
SP1284B
SP2048B
SP2060B
SP2072B
SP2272B
SP2284B
Spreader
SS1022B
SS1023B
SS1035B
SS1036B
SS1067B
SS1079P
SS1116P
SS1180P
SS1220P
SS2036B
SS2067B
SS3067B
Trencher
DT1136
seeders
TR1048
TR1060
TR1072
TR2058
Mate. Hand Cut. and Shredders
Attachment
MJ4058
MJ4084
MJ4085
MJ4090
MJ4091
QC1072
Bale Carrier
AB17K
Bale Hugger
AH11A
AH11D
AH11G
MJ4099
Bale Spear
AB11D
AB11E
AB11G
AB12A
AB12D
AB12E
AB12G
AB13D
AB13E
AB13G
AB13K
AB14A
AB14D
AB14G
AB14K
AB15A
AB15K
AB16A
AB16D
AB16G
AB18K
BF1102S
MJ4037
MJ4060A
MJ4074
MJ4081
Bucket
AD11E
AD11H
AD12D
AD12G
AT2016G
AT2016U
AY11E
AY11H
AY12D
AY12G
MJ4059A
MJ4061A
MJ4062
MJ4063A
MJ4079A
MJ4118
Free Stall Scraper
AE11E
Front Blade
AF10F
AF11D
AF11E
AF11G
AF12D
AF12G
Grapple
AT1096G
AV20D
AV20E
AV20G
AV20H
BG1096
Grinder Mixers
GX1117
Manure Fork & Grapple
AM11D
AM11E
AM11G
AM11H
MJ4076
MJ4077
Pallet Fork
AP12A
AP12D
AP12F
AP12G
AP12K
AP13D
AP13F
AP13G
AP13K
Rock Bucket
AR10D
AR10E
AR10G
AR10H
AR12A
AR12D
AR12G
Roller
CR1448
CR1448C
CR1460
CR1460C
Scrapers
LL1410
LL1410C
LL1412
LL1412C
LL1414
LL1414C
LL1416
LL1416C
Silage Defacer
AG10A
AG10D
AG10G
AG11S
AG12S
SD1096
Snow Push
AS10H
AS11E
Spreader
MS1102G
MS1105G
MS1108
MS1108G
MS1112
MS1117
MS1223
MS1227
MS1231
MS1237
MS1243
MS1256
MS1266
MS1337
MS1354
MS1368
MS1442
MS1455
MS2320
MS2326
MS2334
MS2342
Planting and Seeding
Drills
BD1307
seeders
CS1360
CS1384
FP1204
FP1204P
FP1206
FP1208
FP2204
FP2204L
FP2204P
FP2206
FP2208
Snow Products
Snowblowers Loader Mounted
SB2164
SB2176
Snowblowers Rear Mounted
SB1148
SB1154
SB1164
SB1174
SB1184
SB1194
SB1274
SB1280
SB1308
SB1308R
SB1309R
SB1388
SB1388R
SB1392
SB1392R
Sprayers
Fertilizer Spreader
FS1124
FS1128
Orchard & Vineyard Sprayers
AB1010
AB1015
AB1020
AB1110
AB1115
AB1120
AB1130
AB1210
AB1215
AB1220
AB1230
AB2020
AB2030
AB2120
AB2130
AB2220
AB2230
AB5010
AB5015
AB5020
AB5110
AB5115
AB5120
AB5210
AB5215
AB5220
AB7020
AB7030
AB7120
AB7130
CN4106
CN4108
CN4110
MB3110
MB3115
MB3120
MB3210
MB3215
MB3220
MB6010
MB6015
MB6020
MB6110
MB6115
MB6120
MB6210
MB6215
MB6220
ab5130
ab5230
Sprayer
LS1125
LS1130
LS1130BL
LS1140
Tillage
Cultivator
PC1001
Disks
DH1048
DH1066
DH1166
DH1176
DH1180
DH1276
DH1280
DH1296
DH1376
DH1380
DH1396
DH1508
DH1509
DH1510
DH1512
DH1610
DH1612
DH1613
DH1615
DH3263
DH3272
DH3280
DH3290
DH3299
DH3409
DH3409C
DH3474
DH3474C
DH3480
DH3480C
DH3490
DH3490C
DH3499
DH3499C
DH4108
DH4110
DH4112
DH4114
DH4115
DH4116
DH4117
DH4119
DH4119R
DH4121
DH4122
DH4125
DH4218
DH4221
DH4307
DH4309
DH4311
DH4315
DH4317
DH4320
DH4411
DH4413
DH4413C
DH4414
DH4414C
DH4415
DH4415C
DH4420
DH4420C
DH5108
DH5110
DH5112
DH5114
DH5116
DH5210
DH5212
DH5214
DH5216
DH5217
DH5219
DH5221
DH5221F
DH5222F
DH5224F
DH5308
DH5310
DH5312
DH5314
DH5316
DH5410
DH5410C
DH5411
DH5411C
DH5412
DH5412C
DH5413
DH5413C
DH5414
DH5414C
DH5510
DH5510C
DH5511
DH5511C
DH5513
DH5513C
DH5514
DH5514C
DH5610
DH5610C
DH5612
DH5612C
DH5613
DH5613C
DH5615
DH5615C
TM4124
TM4125
TM4130
TM5118
TM5120
TM5121
TM5124
TM5129
TM5132
Field Cultivators
PC1072
Mulch Finishers
MF1204
MF1204P
MF1206
MF1208
MF2204
MF2206
MF2208
Plows
CP1104
CP1106
PB1001
PB1002
Rippers
PM1001
PS1001
Rotary Tiller
RC1208
RC1208R
RC1210
RC1210R
RC1310
RC1310R
RC1313
RC1313R
Vertical Tillage
Disk
VT1710
VT1712
VT1713
VT1715
GreenSystem
Field and Crop Solutions
Moldboard Plows
MB3102H
mb3103H
Harvester
Row-Crop Harvesting Units
PH1101B
PH1101T
PH1102T
Harvester Head
Attachment
CK5018
CK5024
CK7024
Corn Heads
MH1006
Mate. Hand Cut. and Shredders
Attachment
BH1112G
Flail Shredders
SS1001
Front Blade
AF2196G
FB1018
FB1021
FB1024
FB1121
fb1016
Pallet Fork
AP2142G
Wagons
FT1006
FT1010
TT1005
TT1006
tt1003
Planting and Seeding
Drills
RS1220
SD1009
SD1009G
SD1011
SD1011G
SD1013
SD1013G
Planters
PP1102
VP1014
seeders
DC1102
Sprayers
Fertilizer Spreader
FS1003B
FS1005B
Mounted Sprayers
MS1004
MS1006
MS2104
MS2106
MS2108
MS2110
Trailed Sprayers
DS1120
Sugar Cane Planter
PIN Prefix 1XG
SP3030
SP3040
SP3130
SP3140
Tillage
Cultivator
RC1009
RC1011
RC1013
RC1209
RC1211
RC1213
SC1009
SC1011
SC1013
SC1209
SC1211
SC1213
Disc Ridger
DR1002
DR1004
Disk
DH6016
DH6022
Disk Plows
DP1002
DP1003
DP1004
DP3203
DP4205
DP4206
DP5203
DP5204
DP5303
DP5304
DP5403
DP5404
DP5503
DP5504
dh4105
dh4106
Disks
DH7105
DH7106
DH7205
DH7206
DH7207
DH7305
DH7406
DH7407
DH7508
Moldboard Plows
MB2002H
RP1105
Rippers
TS1001
TS1002
Rotary Tiller
RT1004
RT1005
RT1006
RT1007
RT1014
RT1015
RT1016
RT1017
RT1024
RT1025
RT1026
RT1027
RT1028
RT1204
RT1205
RT1206
RT1207
RT1214
RT1215
RT1216
RT1225
RT1226
RT1227
RT1228
RT1229
RT2225
RT2225R
RT2330
RT3016
RT3018
RT3220
RT3223
RT4019
RT5224
RT5225
RT5226
RT6220C
RT6220R
RT6323C
RT6323R
rt6220S
Row-Crop Cultivators
CR2220
CR2222
CR2231
CR2232
CR2240
CR2251
CR2260
CR2280
HITACHI
Compact Excavator
HCMABC60__0225005
Zaxis17u-5N
HCMACB60__0260005
Zaxis26u-5N
HCMADG60P00270001 – (FT4)
Zaxis35u-5N
HCMAED60L00280001 – (FT4)
Zaxis50u-5N
HCMAFC60T00285001 – (FT4)
Zaxis60USB-5N
None
EX17u
EX27u
EX35u
EX50u
Zaxis17u-2
Zaxis27u
Zaxis27u-2
Zaxis27u-3
Zaxis35u
Zaxis35u-2
Zaxis35u-3
Zaxis50u
Zaxis50u-2
Zaxis50u-3
Zaxis60USB-3
Hagie
Attachment
Attachment
Boom
CCI
DTB
HSTB
NTB
Detasseler
Detasseler
204
Sprayers
None
284
Self-Propelled Sprayers
2101
284XP
DTS 10
DTS 8
Hagie Custom
STS 10
STS 12
STS 12i
STS 14
STS 16
John Deere
4WD Loader
1YNWL53_ _ _D100008в?â€
WL53
1YNWL56_ _ _C000010в?â€
WL56
1YNWL56_ _ _D000326в?â€
WL56
AG
ISOBUS
ISOBUS Implement
None
F441R
AG and CCE
Large Square Balers
L1524
Apollo Series
None
Transaxle
Attachment
Feed Mixers
110
110A
114A
Grapple
4048
4552
None
24
26
Tool Carrier
201
23A
23B
Axles
None
AR15MTL
TM 2
1200
1400
1600
TM 3
1200
1400
TM 4
1200
1400
TM 5
1400
1500
1600
1700
Backhoe
Loader
JD300-A
JD310
JD400-A
JD410
None
50
51
9505A
9510A
9511
9605
Boom
Wheeled
CH8
Com Attachments
Corn Heads PIN prefix KM
608FC
Combines and Headers
Attachments
10
205
210
234
235
244
313
334
335
343
410
434
435
634
K
N
Auger Platforms
890
Combines
1032
105
1052
1055
106
1065
1068H
1072
1075
1085
111
1133
1144
1155
1157
1158
1165
1166
1169H
1170
1174
1175
1177
1185
1188
12A
1450
1550
200
2054
2056
2058
2064
2066
2254
2256
2258
2264
2266
2266EXTRA
25
277
30
330
3300
360
40
42
430
44
4400
4420
4425
4435
45
483
530
55
583
630
65
6600
6601
6602
6620
6622
683
730
7700
7701
7720
7721
7722
8820
925
930
932
935
940
9400
9410
945
95
950
9500
9500SH
9510
952
955
9560
9560SH
95H
96
960
9600
9610
965
965H
9660
9660CTS
9660WTS
968H
970
975
9780iCTS
985
9880STS
9880iSTS
C670
CTS
CTS II
CTS Region II
S560
T550
T560
T660
T670
W540
W550
W650
W660
Combines 072800 – XXXXXX
9780CTS
Combines 1H0 745100-764999
S550
S650
S685
S690 Hillmaster
Combines 1H0 765000 – 784999
S650
Combines 1H0 785000 – XXXXXX
S650
S660
S670
S680
S690
Combines 1H0S660 745100 -765171
S660
Combines 1H0S660 765172 в?" 784999
S660
Combines 1H0S670 745100 в?" 765252
S670
Combines 1H0S670 765253 в?" 784999
S670
Combines 1H0S680 745100 в?" 766006
S680
Combines 1H0S680 766007 в?" 784999
S680
Combines 1H0S690 745100 в?" 765249
S690
Combines 1H0S690 765250 в?" 784999
S690
Combines 1JZ 105000 – 109999
S660
S670
W540
W650
Combines 1JZ 745100-XXXXXX
S550
S660
S670
S680
S690
Combines 1YC 785000 – XXXXXX
S660
Combines 1YH 745100-764999
S550
S660
S670
S680
S690
Combines 1YH 765000 – 784999
S660
Combines 1Z0 100000 – 104999
S660
S670
S680
S685
S690
Combines 1Z0 102000 – XXXXXX
T550
T560
T660
T670
W540
W550
W650
W660
Combines 1Z0 105000 – 109999
S660
S670
S680
S685
S690
T550
T560
T660
T670
W540
W550
W650
W660
Combines 695101 – XXXXXX
9450
9550
9550SH
9650
9650CTS
Combines H0 or 1H0 XXXXXX-745099
S690
S690 Hillmaster
Combines MY12 and 13 Wide Cab PIN Prefix 1Z0
T550
T560
T660
T670
W540
W550
W650
W660
Combines MY14 PIN Prefix 1JZ
S660
S670
Combines MY14 PIN Prefix 1Z0
S660
S670
S680
S685
S690
Combines MY14 Wide Cab PIN Prefix 1Z0
T550
T560
T660
T670
W540
W550
W650
W660
Combines PIN Prefix 1CQ – Brazil
1175
9470STS
9570STS
9650STS
9670STS
9750STS
9770STS
S430
S440
S540
S550
S660
S670
S680
Combines PIN Prefix 1CQ 120100 – XXXXXX
S540
S550
S660
S670
S680
S690
Combines PIN Prefix 1CQ 90000-XXXXXX
1470
S540
S550
S660
S670
S680
S690
Combines PIN Prefix 1J0
S540
S550
S660
S670
S680
Combines PIN Prefix 1XG
W330
W440
Combines PIN Prefix 1YC 015000 – XXXXXX
C240
R230
W230
Combines PIN Prefix 1YC 020000 в?" XXXXXX
C440
Combines PIN Prefix 1YC 020000-099999
C120
Combines PIN Prefix 1YC в?" 000001 в?" 009999
1042
3316
C110
C230
L70
W210
Y215
Combines PIN Prefix 1YC в?" 010000 в?" XXXXXX
C100
C230
L60
W210
W80
Y110
Y115
Y210
Y215
Combines PIN Prefix CQ – Brazil
1175
1470
1570
1650CTS
9470STS
9570STS
9670STS
9770STS
S540
S690
Combines PIN Prefix CQ – Brazil – 047354 – 48750
1450
1450CWS
1550
1550CWS
Combines PIN Prefix CQ – Brazil – XXXXXX – 047353
1450
1450CWS
1550
1550CWS
Combines PIN Prefix CQ – Brazil – XXXXXX – 48750
1450WTS
1550WTS
Combines PIN Prefix H0 – 695101 – XXXXXX
9650STS
9750STS
Combines PIN Prefix H0 – North American
9560STS
9570STS
9660STS
9670STS
9760STS
9770STS
9860STS
9870STS
Combines PIN Prefix H0 – XXXXXX – 695100
9650STS
9750STS
Combines PIN Prefix MY – India
W70
Combines PIN Prefix N4
R40-STC
Combines PIN Prefix Z0 – European
9540
9540i
9560
9560i
9580
9580i
9640
9640i
9660
9660i
9680
Combines Pin Prefix 1JZ
W330
W540
Combines Pin Prefix 1MY
Posted by: Emily white at
09:47 AM
| No Comments
| Add Comment
Post contains 2196 words, total size 25 kb.
June 17, 2019
General Notice
The Bluetooth Diagnostic Interface has been carefully designed and tested to comply with OBDII protocols. However, some vehicle models are not in full compliance with these protocols for various reasons. In addition, the computer control systems or sensors on any given vehicle may be malfunctioning. While Autel’s testing and the experiences of the users have shown the unit to be safe and reliable, there is an inherent risk in using any product that may potentially affect the operation or drive-ability of your vehicle.
If you are concerned about the operation of your vehicle at any time while using the Bluetooth Diagnostic Interface: ? Pull off the roadway immediately or as soon as it is safe to do so. ? Disconnect the device from the OBDII port. ? Consult a licensed mechanic or automobile service center. Contact your local distributor, or visit www.auteltech.com for issues or concerns about the product. We maintain an active database of the feedback we receive, and your comments can help us continuously improve the product.
Introduction
The Bluetooth Diagnostic Interface is a multi-brand device which comes with the Autel Maxisys kit. It is designed to connect wirelessly with the MaxiSys Display Tablet, as well as standalone PCs, as a vehicle communication interface (VCI) for vehicle data transmission. Thanks to the wireless Bluetooth technology, with which you are allowed to work freely around the vehicle. This interface device can communicate with vehicles’ electronic control units (ECUs), guaranteeing performance and speed that redefine multi-brand diagnostics. The development of this interface has been focused on reducing the communication time, and ensuring the tool is practical to use.
Autel Bluetooth
The MaxiSys diagnostic platform combines the VCI device and the display tablet with technical information into a single program, ensuring quick and simple access to the vehicle to perform comprehensive diagnostics applications.
Wireless Communication
The Bluetooth Diagnostic Interface supports Bluetooth communication. It can transmit vehicle data to the MaxiSys Display Tablet without a physical connection. The working range of the transmitter through Bluetooth communication is about 755 feet (about 230 m). A signal lost due to moving out of range automatically restores itself when the display unit is brought closer to the VCI unit. For detailed information about VCI connection with the MaxiSys display tablet, please refer to the MaxiSys User Manual.
USB Connectivity
The VCI device also provides a direct connection to the MaxiSys display tablet or a PC via a USB 2.0 full-speed connection. All of the electronics are contained in the device shell, making it a compact and rugged vehicle communication tool.
Power Source
The Bluetooth Diagnostic Interface operates on 12-volt vehicle power, which it receives through the vehicle data connection port. The unit powers on whenever it is connected to an OBD II/EOBD compliant data link connector (DLC). It can also be powered through connection with a PC via the USB cable, so there’s no need to connect the device to the vehicle when performing firmware update through the PC.
Functional Description
The Bluetooth Diagnostic Interface device package, which includes the unit, user manual, and a CD with driver program and update agent, comes along with the MaxiSysTM/MaxiSys MiniTM tool kit. Please refer to the MaxiSys User Manual for additional information.
1. Vehicle Data Connector (DB15-Pin)
2. Power LED
3. Vehicle LED
4. Error LED
5. Bluetooth LED
6. USB LED
7. USB Port
Vehicle Data Connector
The vehicle connector connects the device to the vehicle’s DLC via a standard DB15 – Pin OBD II cable.
Status LEDs
There are 5 status LEDs on the front panel of the VCI device, which indicates its working status as well as the hardware conditions, and are very useful for troubleshooting the device’s communication or connection to the Vehicle, display tablet and/or the PC. See Table 1 for detailed description of the status LEDs.
Table 1 – Status LEDs on the Front Panel
USB Port
The USB port provides the easiest connection between the device and the display tablet or the PC via a USB cable, and is used to control the device from the software application running on the PC.
Technical Specifications
Capabilities
When used in conjunction with the display table or the OEM softwares from the PC, the Bluetooth Diagnostic Interface device is able to perform the following functions: ? Auto diagnostics to read and clear the error memory, to display system parameters and the status of the ECU; ? Activation, adjustments and configurations that are essential for ensuring a complete repair; ? Resetting the service lights or the airbag systems; ? Configuration of the ECUs, keys and remote controls, etc
Product Troubleshooting
This part describes problems that you may encounter while using the VCI device.
Vehicle Linking Error
A communication error occurs if the interface device fails to communicate with the vehicle’s control module when performing diagnostic procedures. You need to do the following check-ups: ? Verify that the ignition is ON. ? Check if the interface device’s OBD II connector is securely connected to the vehicle’s DLC. ? Turn the ignition off and wait for about 10 seconds. Turn the ignition back to on and continue the operation. ? Verify the control module is not defective.
PC Communication Error
Verify the interface device is powered, and the green power LED is illuminated. ? Check if there is any firewall software interfering with the connection port. ? Check if the green status light is illuminated for USB communication. If these issues have been addressed, verified, and you are still having trouble, please contact technical supports for assistance. Refer to the MaxiSys User Manual for additional information.
Driver Setup
In order for the Bluetooth Diagnostic Interface device to operate correctly with the diagnostic applications on the PC, you will need to first install the device’s driver onto the PC that controls the device. The program package requires Windows XP, Windows Vista (32 or 64 bit), or Windows 7 (32 or 64 bit).
IMPORTANT: Do not plug the interface device onto the PC until you have installed the driver program.
The following steps may vary depending on the operating system or components that are installed on your computer, but in general this is the standard installation process. 1 Insert the CD that came with the MaxiSys tool kit into the CD/DVD slot of the PC. The driver installation wizard will load momentarily. Follow the Setup Wizard instructions to complete the whole installation process.
2 Click on "Next†on the welcome page.
3 Select "Next†on the installation location and installation name. It is recommended not to change the default settings; otherwise the computer may have a hard time recognizing the driver.
4 Click on "Install†and the driver program will be installed onto your PC. NOTE: During this part of the process a MS-DOS style window will pop up and may remain on your screen for a short while, which is perfectly normal. Do not attempt to close the MS-DOS style window manually as this will prevent the device driver being installed successfully. It will close automatically when the device driver installation is complete.
5 When the driver is successfully installed, a confirm window will appear.
6 Click on "Finishâ€, and connect the interface device to the PC’s USB port.
8 Select "Install the software automatically (Recommended)â€, and click on "Nextâ€. After the progress bar finishes, click on "Finishâ€. Users have finished installing at this point and can run the software working with the interface device.
Firmware Update
Autel periodically releases updates to the device’s drivers. Updates are necessary to solve specific problems and to ensure the VCI device is working properly with the OEM software. If you are experiencing any problems during use, always make sure that you have the latest device software and drivers.
Update Online
This function allows you to update the driver software for the device through the PC. Make sure the PC is connected to the Internet before using this function.
1 Power up the interface device and connect to the PC via the USB cable.
2 Verify the Power and USB LEDs on the front panel are illuminated.
3 Click on "All Programs†from Windows Start Menu, find the "MaxiFlash
Bluetooth†entry under "Autelâ€, click on "UpGradeâ€, and wait for the
program interface to pop up.
Autel Maxisys Bluetooth
4 Select the "Update†tab and the update agent will automatically check for the available update online.
5 Press the "Next†button to install the newest firmware.
6 Press the "Cancel†button to exit.
Warranty and Service
Limited One Year Warranty
Autel warrants to its customers that this product will be free from all defects in materials and workmanship for a period of one (1) year from the date of the original purchase, subject to the following terms and conditions: 1) The sole responsibility of Autel under the Warranty is limited to either the repair or, at the option of Autel, replacement of the device at no charge with Proof of Purchase. 2) This warranty does not apply to damage due directly or indirectly, to misuse, abuse, negligence or accidents, repairs or alterations outside our Service Center or facilities, criminal activity, improper installation, normal wear and tear, or to lack of maintenance. 3) Autel shall not be liable for any incidental or consequential damages arising from the use, misuse, or mounting of the device. Some states do not allow limitations on how long an implied warranty lasts, so the above limitations may not apply to you. 4) All information in this manual is based on the latest information available at the time of publication and no warranty can be made for its accuracy or completeness. Autel reserves the right to make changes at any time without notice.
Service Information
If you have any questions, please contact your local distributor or visit our website at www.auteltech.com. If it becomes necessary to return the tool for repair, contact your local distributor for more information.
Posted by: Emily white at
01:07 AM
| No Comments
| Add Comment
Post contains 1658 words, total size 12 kb.
June 16, 2019
Renault (ESpace, Megane, Scenic, Talisman) key programming has solution now, that isobdstar dp plus + one OBD2 convertor of the packed P001 adapter. It can program keys for these Renault cars via OBD.
A nice feature is the DP plus system comes with key info, pictures, tips and remote etc which can help the user easily use the machine.
OBDSTAR DP plus Renault Coverage:
1.Renault ESpace
2015-
Blade key
Card Key
2002-2015
2 KEY
3 KEY
2.Renault Megane
2015-
Blade key
Card Key
2008-2015
2002-2008
3.Renault SCENIC
2016-
Blade key
Card Key
-2016
4.Renault Talisman
2015-
Blade key
Card Key
To be specific, you need:
1.One OBDSTAR X300 DP plus
2.One additional OBD2 convertor to connect P001 adapter.
Tip: The machine will prompt "Please connect the [OBDII-16] and
[Convertor] at the same time, otherwise make the dealer key failed.â€

3.Network connection.
How-to’s of OBDSTAR DP PLus on Renault ESpace Megane Scenic Talisman key program:
Tap "DPâ€.
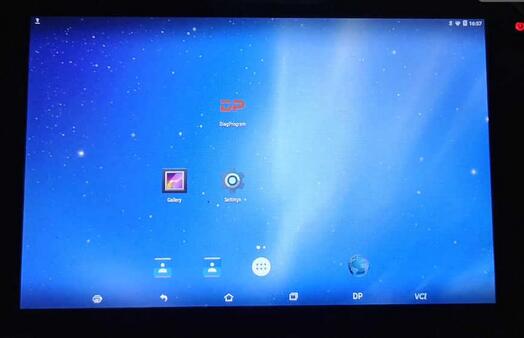
Choose "Diag Programâ€.
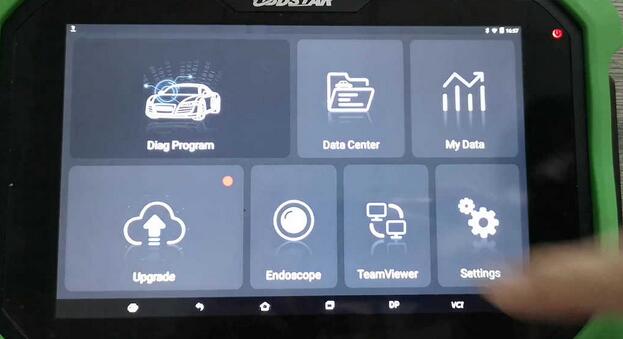
Renault V30.57
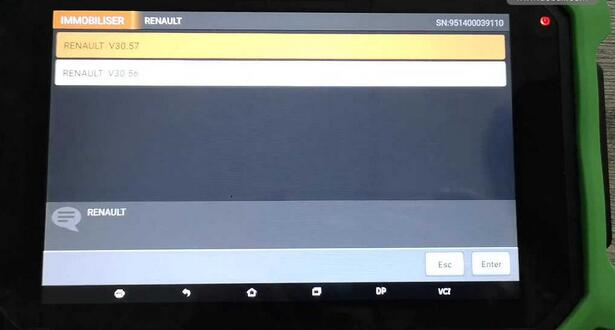
Tap "Programs keysâ€.
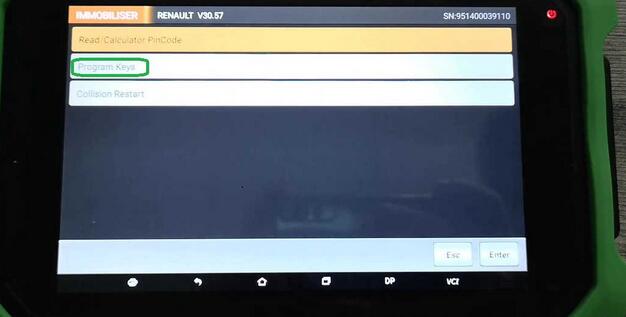
Tap "Espaceâ€.
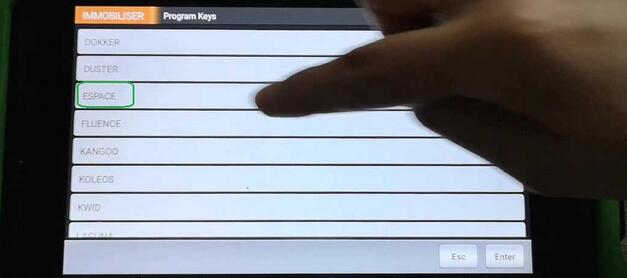
Tap "2015 -".
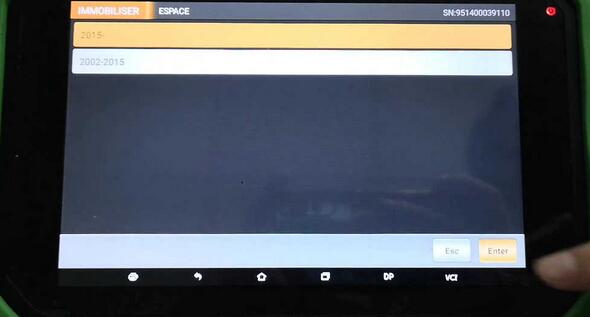
DP plus will prompt "Please connect the [OBDII-16] and [Convertor] at the same time, otherwise make the dealer key failed.â€
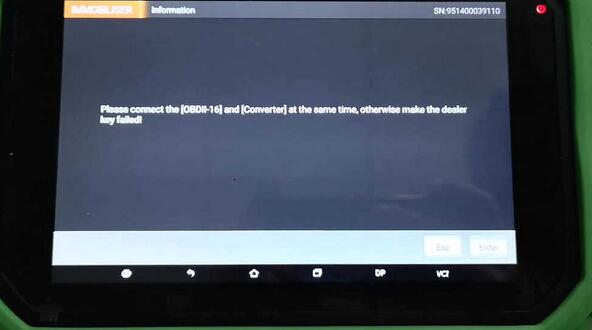
You see, obdstar DP plus allows the user to read Renault Espace 2015- info, pictures, tips and Remote.
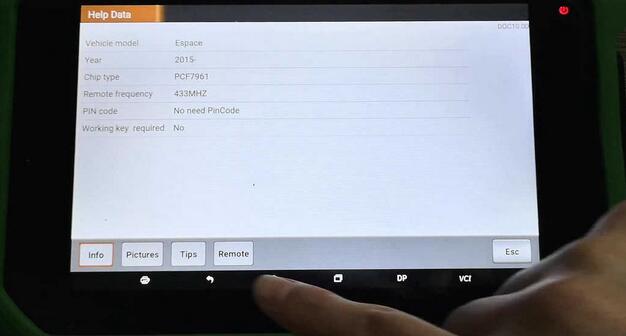
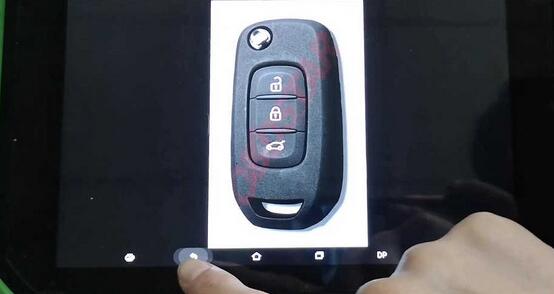
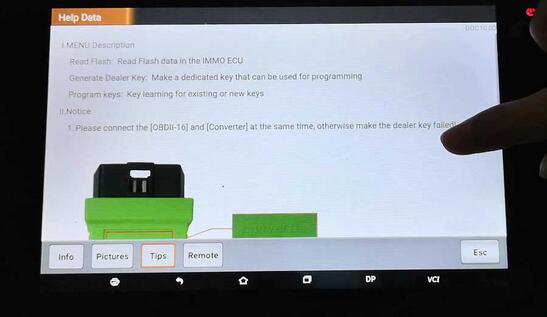
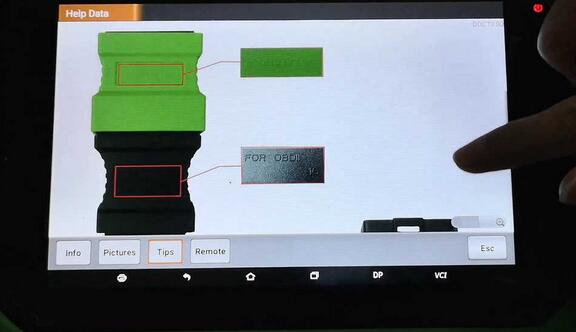
Back to choose "Card key".
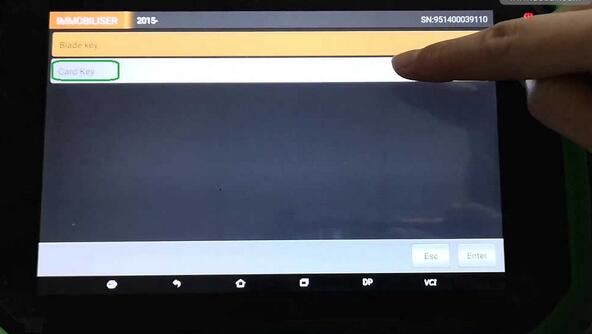
Again get message "Please connect the [OBDII-16] and [Convertor] at the same time, otherwise make the dealer key failed.â€
And then †The function is available by connecting the server, please ensure the internet connection is normal.â€
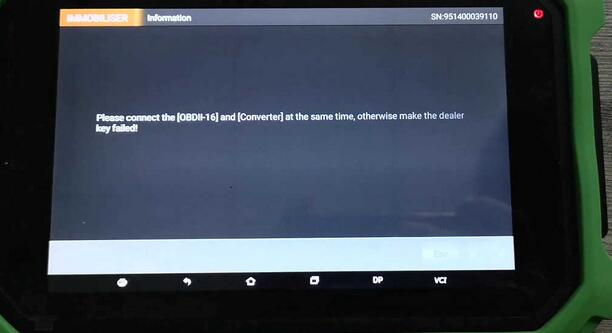
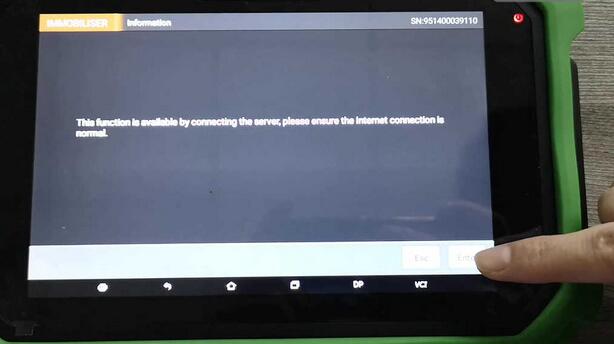
PS: For Renault Megane, Scenic, Talisman key programming, just do in the same method.
Here comes their info, pictures, tips, remote that the machine will have.
Renault Megane info, pictures, tips, remote.
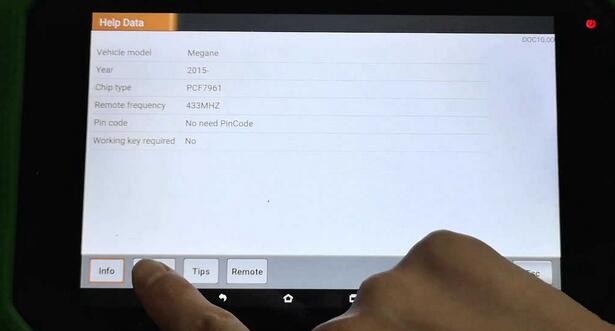
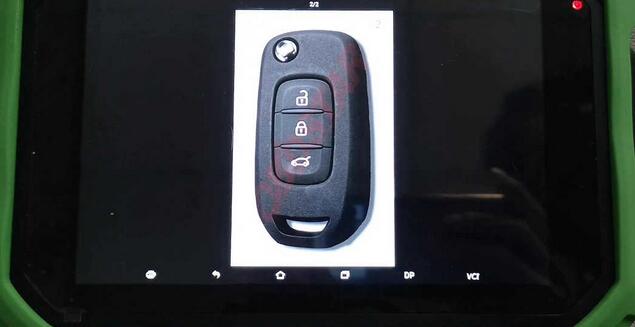

Renault Scenic info, pictures, tips and remote.
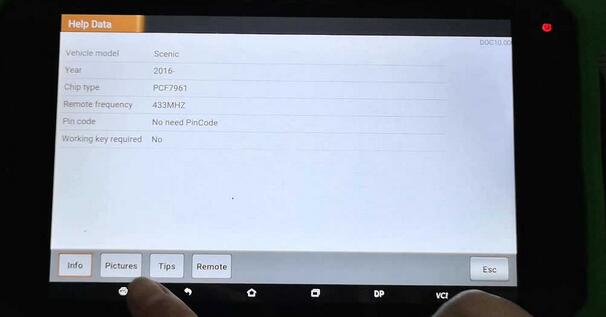
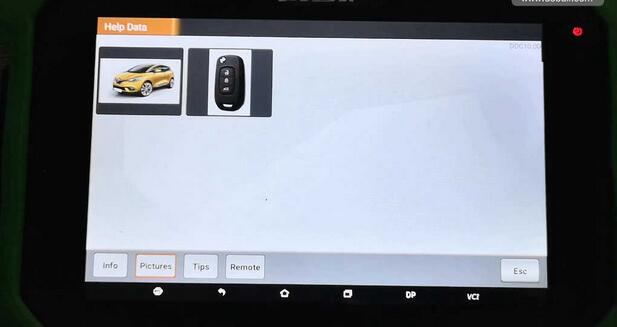
Renault Talisman info, pictures, tips and remote.
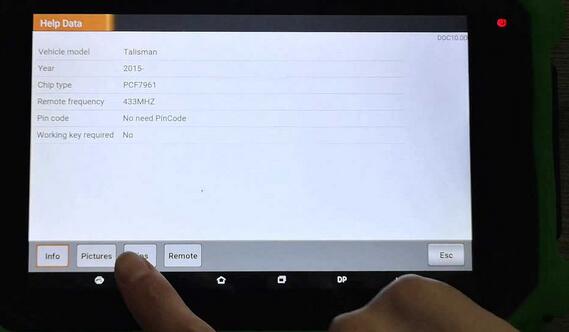
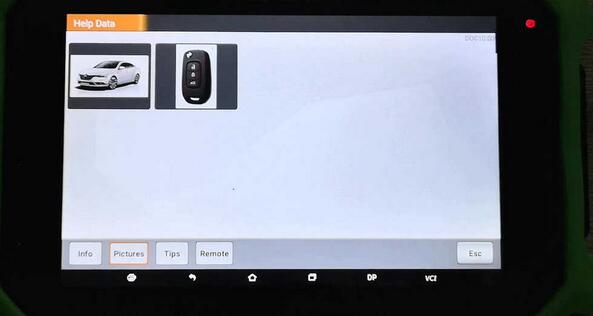
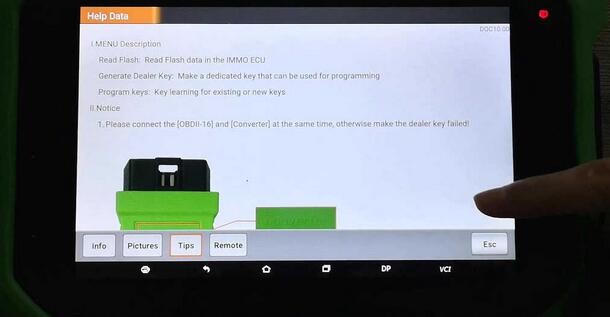
Good luck.
Posted by: Emily white at
02:34 AM
| No Comments
| Add Comment
Post contains 304 words, total size 11 kb.
June 07, 2019
CGDI Prog MB is possible to program Mercedes Benz W164 2009-/W221 2009- in 2 ways: via OBD and on bench.
OBD mode takes about 2 hours.
Bench reading shorten the online calculation time to less than 4 minutes. (This requires CGDI MB AC adapter).
Here’s the how-to guide to program W221 all keys lost with MB Key Programmer CGDI MB on bench.
Step 1: Calculate Password
Open CGDI MB software
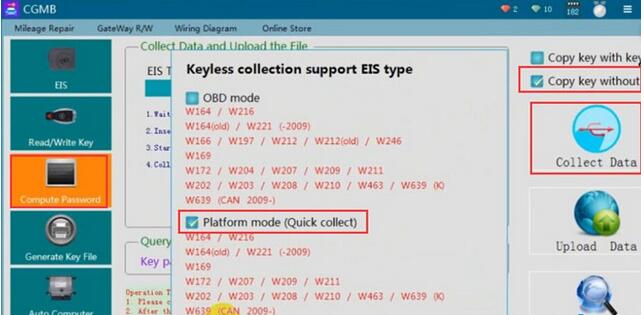
Go to Compute Password->Copy key without key->Collect data
Select collect data via Platform mode (quick collection)
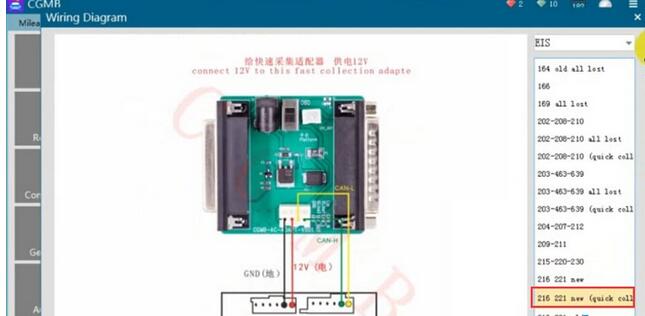
Connect the AC Adapter with cgdi follow the wiring diagram
Insert the simulation key within 1 minute, if you have inserted, pull it out and try again
Turn the quick collect adapter switch to the Platform position
Turn ignition switch to ON position
Collection is done.Very fast.
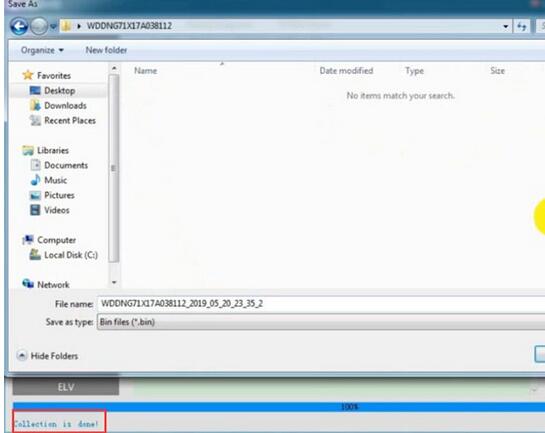
Save file.

Save the file successfully. Upload the data to calculate password.
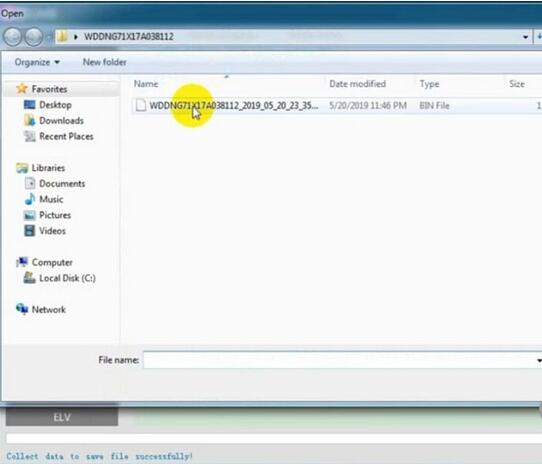
Upload data just saved
Press Query Result to calculate pass

CGDI MB calculates password success.
Copy the password
Step 2: Save new EIS data
Go to EIS->Read EIS data
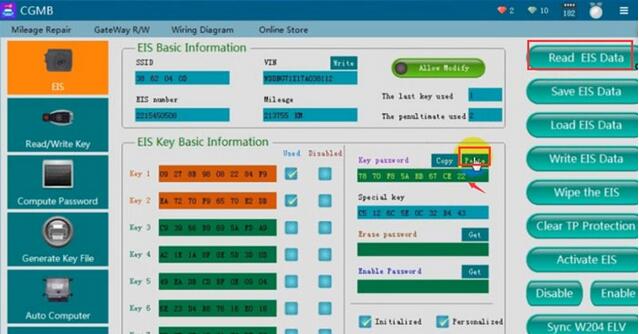
Paste the password to corresponding area
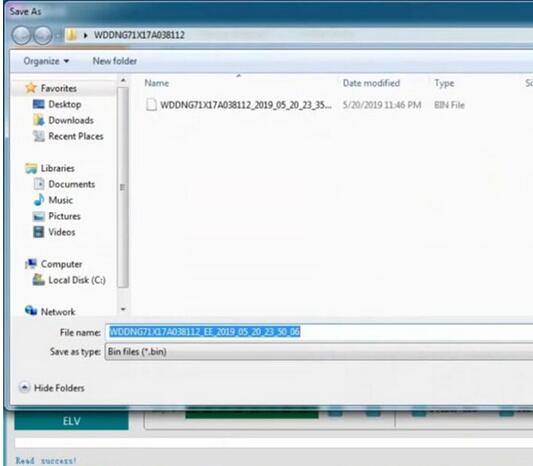
Save EIS data
Step 3: Generate Key File
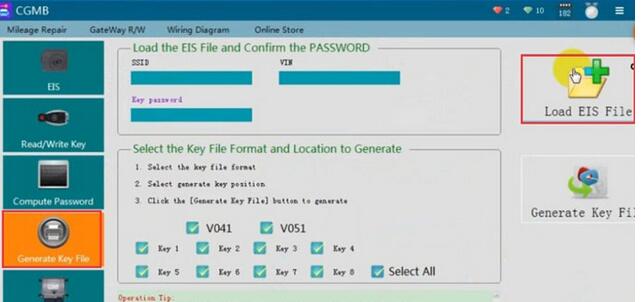
Select Generate Key File function

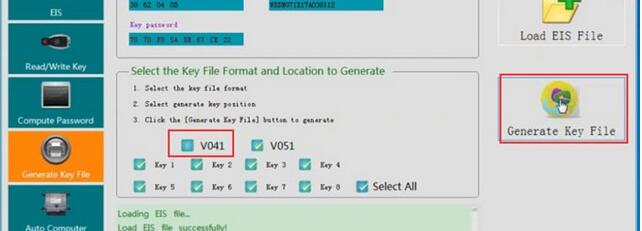
Select key file format and press Generate Key File
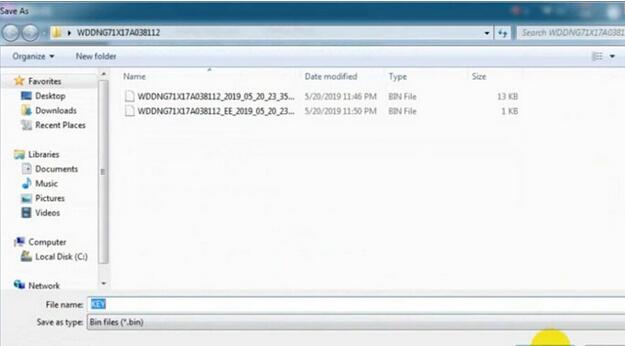
Save key file

Step 4: Write Key
Go to Read/Write Key->Read Key/Chip
Then Reset
Reset operation success
Read key again, check key information
Press Open/Write
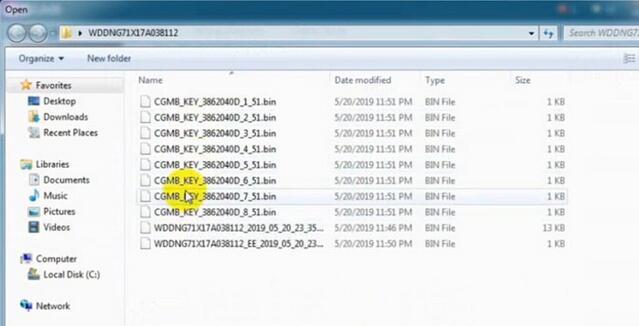
Choose a key file (common BE key choose v51 format)
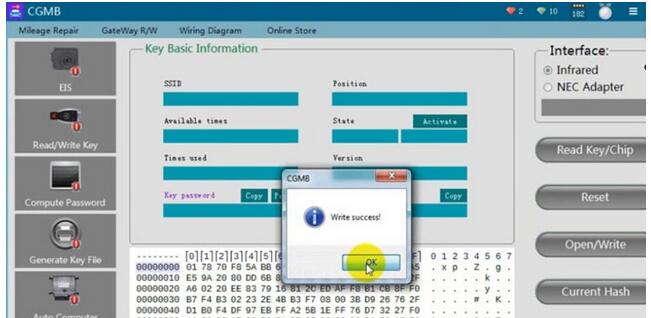
Write key success
Posted by: Emily white at
02:59 AM
| No Comments
| Add Comment
Post contains 252 words, total size 7 kb.
May 30, 2019
1. KESS V4.036 only supports car, KESS V5.017 can support car/truck/tractor/Bike !
And V4 support cars only untill 2014, but V5 supports vehicle accroding to Engine.
So V5.017 can support newer vehicle !
2. KESS V4.036 no token limited for some car, has token limited for some other car.
KESS V5.017 has no token limited for all vehicles ! So V5.017 is for lifelong use!
3. KESS V4.036 some protocols are grey, KESS V5.017 is fully open for all software protocols.
Kess V5.017 works well for EDC17/k-line/DSG/DQ200 DQ250 DQ500 Gearbox/ST10…. !
4. KESS V4.036 can not connect internet, KESS V5.017 can connect internet ! Online Operation !!!
Newest Kess V5.017 Online Version KESS 5.017 No Token Limit V2.23 Kess V2 OBD2 Manager Tuning Kit Car Truck ECU Programmer
Top 7 Reasons To Choose Our KESS V2 V5.017:
1. KESS V5.017 can support car/truck/tractor/Bike ! KESS V5 supports vehicle accroding to Engine. So V5.017 can support newer vehicle !
2.KESS V5.017 is 100% no token limited for all vehicles ! So V5.017 is for lifelong use!
3.KESS V5.017 is fully open to all protocols such as EDC17/k-line/DSG/DQ200 DQ250 DQ500 Gearbox/ST10…., No Grey protocols anymore !
4. KESS V5.017 software is very easy to install, just click: Next Step, then it can works well!!!
5.KESS V5.017 can connect internet ! Support Online Operation !
6. KESS V5.017 can do more 140 kinds vehicle types or protocols than KESS V4.036

Kess V2 V5.017 can Read and write ECU via OBD2 port directly, no need disassemble ECU from the car, easy to use.
With coverage of all major brands and protocols including Line, CAN, EDC17 and MED17 and for Ford J1850.
Kess V2 is everyt hing you need to work as a successful tuner at a very affordable price.
Posted by: Emily white at
06:45 AM
| No Comments
| Add Comment
Post contains 306 words, total size 3 kb.
May 29, 2019
In this post, I want to share a successful experience from a customer. He updated his Opel/Vauxhall CD30/CD30 MP3 to CDC40 with the Tech 2 Scanner which bought from obd2tool. The following is his guide and help Opel owners to have advanced Audio display.
Tools you will need:
GM Tech2 Diagnostic Tool Opel 32MB card or OP-COM CAN OBD diagnostic interface
Blaupunkt car CDC40
How to:
Turn on the dashboard
Connect Car Diagnostic Tool Tech2 scanner to Opel/ Vauxhall OBD port by using the OBD2 cable
Turn ignition ON
Disable below anti-theft protection modules with Tech2 scanner by following steps
EHU -> Code Index -> 001_02
Enable the anti-theft protection:
GID / CID
UHP
EHU
Turn off the dash and disconnect Tech2 scanner
Remove the CD30 / CD30 mp3 using the appropriate accessories. You will need to disconnect the antenna wire and the connector big loosening the locking device that engages in the lower part of the connector
Replace the original antenna with the appropriate terminal for receiving digital signals:
Unscrew the existing antenna
Disconnect the sky (just ask for details)
Unscrew the nut holding the antenna base
To avoid replacing the entire cable I suggest you remove it from the antenna and then connect the old to the new
Connect to your CDC40 connecting the connector and the antenna wire.
Enter the CDC40 in his quarters, making sure that the connector wire remains free.
Turn the ignition on.
The CDC40 will turn on and begin to "bipâ€, the display will alternate "Display SAFEâ€, "Radio SAFE†and "UHP SAFEâ€.
Program with the Tech2 scan tool EHU and set all the values to "Not Presentâ€
GID Present
UHP Present
ECC Present
DAB Present
EHU Present
Program with the Tech2:
EHU -> Code Index -> 001_02
Enable the protection (anti-theft) of:
GID / CID
UHP
EHU
The radio will reboot and the screen will show "head unit protectionâ€.
Press and hold the Eject button on the CD until you hear a ratcheting noise. This step serves to unlock the transport lock.
Done.
Posted by: Emily white at
02:55 AM
| No Comments
| Add Comment
Post contains 351 words, total size 4 kb.
May 19, 2019
[Done] 2014 Audi A3 MQB odometer correction via OBD with OBDSTAR X300 DP PLUS. This post comes with the step by step procedure.
2014 Audi A3 with MQB.

Current value: 48728KM on the dashboard.

Plug OBDSTAR key master DP Plus to the OBD port of Audi A3, boot the machine, tap †Immobilizerâ€, then "Audiâ€, newest "Audi V31.74â€.
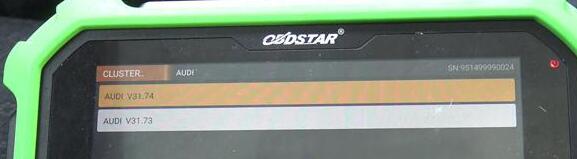
Initializing…
Initializing diagnostic data…
Authorizing…
Tap "A3â€.
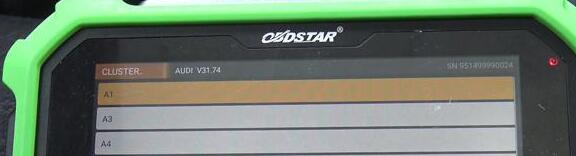
Tap †MQB 2014.06 -â€
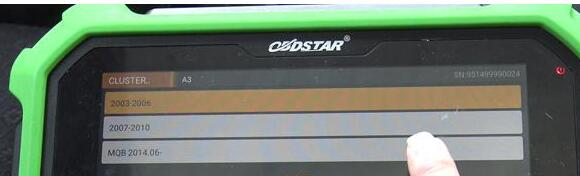
Read the message "Only MQB dashboard of Continental and VDO supportedâ€.
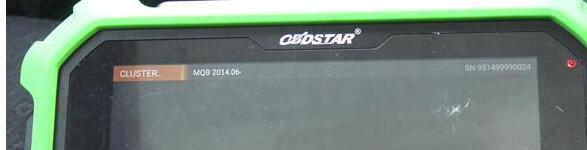
Switch ignition on.
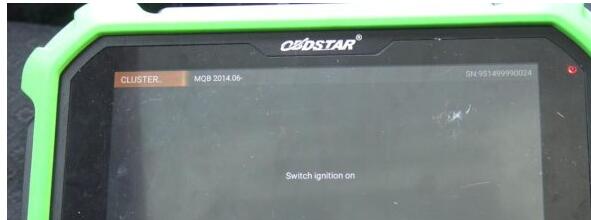
Mileage adjustment.
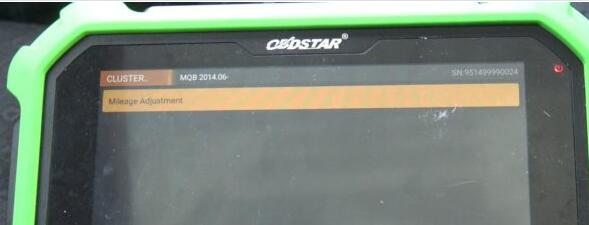
Confirm the current mileage is 48728KM.
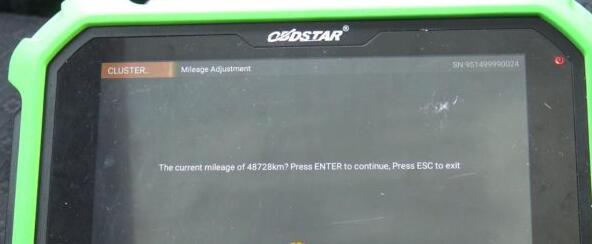
Input 50000.
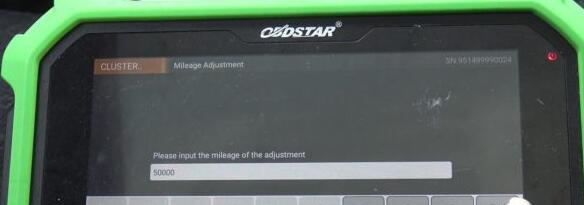
Communicating…
Logging in system…
Data backup…
Adjust Success…
Have 50000KM on the dashboard.

Done.
Don’t you think it is so easy to adjust mileage for 2014 Audi A3 with OBDSTAR DP Plus.
FYI, OBDSTAR DP Plus (in orange color) = OBDSTAR Key master DP (in green color)
Posted by: Emily white at
05:20 AM
| No Comments
| Add Comment
Post contains 150 words, total size 5 kb.
May 11, 2019
PCM Flash clone is confirmed to work for 3 types of Bosch Infineon ECU:
1) The Infineon ECU before TPROT8.
2) TPROT 8-10
3) The Infineon ECU after TPROT10 which is what we call GPT encrypted.
Today, we’ll talk about how to read TPROT 8-10 with PCMFlash
For TPROT8-10, he Bosch Company sets the anti-debugging mode, reading EEPROM needs no password and reading Flash needs password.
Therefore, during the reading process, there is an extra CNF1, Boot outputs low level and CNF1 outputs high level. When reading, Boot needs to add one small resistor and ground it. CNF1 to connect one 470ohm-2K resistance, then connect 3.3V, it’s very important, otherwise theAuto ECU Programmer will be burnout.
2 Tips on reading the data:
1) BOOT and CNF1 must be connected when reading data.
2) Only connect BOOT not CNF1 When reading the password, otherwise the password can’t be read out. Also you can follow the Ktag wiring diagram because Ktag controls the CNF1 turn on and off, so it can’t be disconnected. When reading the password, you turn the two switches to the automatic mode, and to the On mode when reading the data, when the software prompts, you choose †Manually†then follow the message to turn on or off.
KTAGwiring diagram help file:
https://mega.nz/#!QNhBCRKR!36B3zt2mu89-gjnh4r9HThNcd2e2WRiBDK4NpL3Jqho
PCM Flash crack software download:
https://share.weiyun.com/5B6iC3q (password: t6dijv)
Tested 100% with PCM Flash china clone
pcmflash-clone
PCMFlahs TPROT8+ vehicle list:
Bosch: BMW TPROT8+
Bosch: VAG TPROT8+
Bosch: Kia/Hyundai/Honda TPROT8+
Bosch: Chrysler/Jeep/Dodge/Fiat TPROT8+ [Test]
…..
Read the encrypted ECU password
Good to know:
The Infineon ECU before TPROT8 is not encrypted, you directly uses the BOOT point
grounding, then follow the Ktag user manual to wire the cable and read the data.
Posted by: Emily white at
02:32 AM
| No Comments
| Add Comment
Post contains 296 words, total size 2 kb.
April 29, 2019
This is how to decode & cut a key and program or add a new key to Nissan Altima year 2006.
If you have all remotes available:
Here, you must have all remotes on hand when performing this procedure. Any remotes not used during this procedure will become inactive.
1. Close and lock all doors with the driver’s side power lock switch located on drivers door panel.
2. Insert key into ignition (DON’T TURN) and remove it from the
ignition key cylinder at least 6 times within 10 seconds (this will need
to be done at approximately one second intervals). You may need to
insert and remove the key up to 10 or 12 times until your hazard lamps
flash. PLEASE NOTE: Withdraw key completely from ignition cylinder each
time. If this procedure is performed too fast or too slow the system
will not enter programming mode.
3. Insert key into ignition and turn to the ACC position.
4. Within 5 seconds, push the LOCK button on the keyless remote. Your
hazard lamps will flash. PLEASE NOTE: Do not press the button on the
remote more than one time or the programming will not be successful.
5. If there are any remaining remotes (including working ones), Unlock
then Lock all doors using the switch on drivers door panel. Within 5
seconds of locking and unlocking doors press LOCK button on the next
remote. Your hazard lamps will flash. Repeat this step for each remote
(including any working remotes).
6. When all remotes have been programmed turn the key to the OFF
position, remove keys from the ignition, unlock doors using the driver’s
side power lock/unlock switch and open the driver side door. Test all
remotes.
If you have a decent key only or lose all keys:
You need:
a Nissan NSPC001 pin code reader
a decent auto programming tool for the car: Nissan Consult 3 or Nissan Consult III Plus
a security immobilizer card used to make keys to Nissan
a good automatic key cutter, such as SEC-E9 Key Cutting Machine
and good new keys/remotes to add
The steps:
read pin – program key – decode and cut keys
in detail…
Step 1: NSPC001 reads pin codes
Connect the code reader into the OBD diagnostic socket
Read the 5-digit BCM code and transfer it to 4-digit pin code
Write down the pin code
Disconnect the pin code reader
Step 2: Nissan Consult 3 plus adds new keys
Connect Consult III plus to the computer and the vehicle
Connection method: via the USB cable or Bluetooth
Insert key into the key hole, turn ignition ON with engine OFF
Start Consult-III plus software
Click on "Connect†button on VIMI selection screen to connect with VI
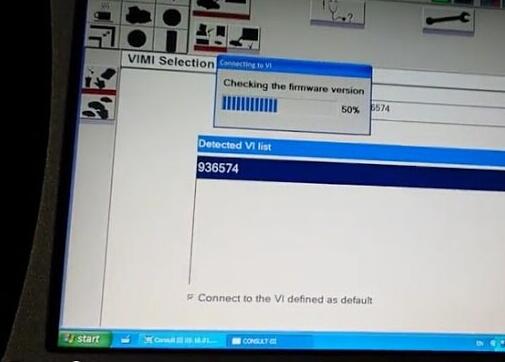
the computer and vehicle establish good communication
then Consult3 plus software will display VIN info
Choose Nissan model and year, and confirm vehicle information
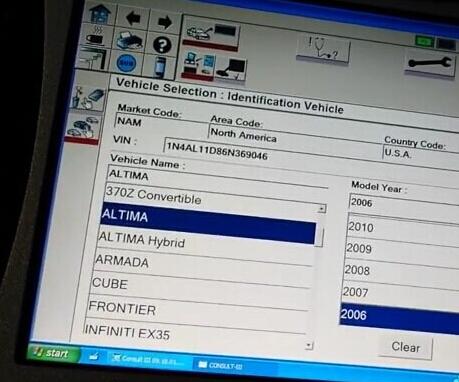
Wait until the Nissan Consult module to access all control modules, Engine, BCM, Transmission, Airbag etc.
The car dashboard will illuminate and the indicator lights on Consult 3 will flash
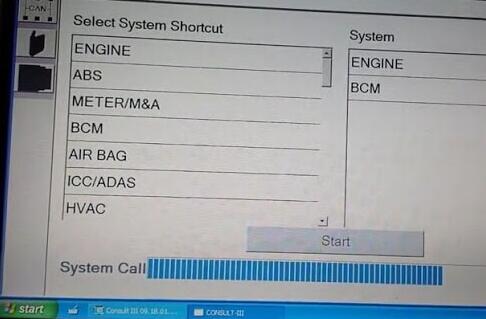
Diagnostic: Direct Diagnostic Mode program
Tick Key programming icon (NATS SELECT DIAG MODE) on the left menu, plug the security card and press START
(There are two options under NATS SELECT DIAG MODE. Select C/U INITIALIZATION.
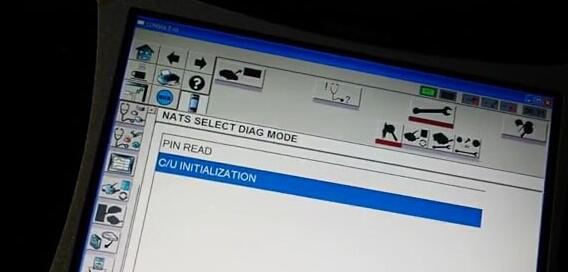
Push START BUTTON after enter password
Manually enter the pin code
Initialization completed
Follow the guide in the sw to finish key programming
Step 3: SEC-E9 machine decodes and cuts Nissan keys
First decoding…then cutting….
SEC-E9 key cutting machine Nissan car list:
Car Brand Model Year IC Card
Nissan Juke 2010-0 9022
Nissan X-Trail 2007-0 6132
Nissan X-Trail 2007-0 6133
Nissan Versa 2007-0 6135
Nissan Versa 2007-0 6136
Nissan TidaLatio 2004-0 6137
Nissan Tida 2004-2012 6138
Nissan Skyline 1999-2006 6139
Nissan Sentra 2007-2009 6140
Nissan Sentra 2007-2009 6141
Nissan Rogue 2007-0 6142
Nissan Rogue 2007-0 6143
Nissan Qashqai 2007-0 6144
Nissan Qashqai 2007-0 6145
Nissan Pixo 2008-0 6146
Nissan Patrol 2007-0 6147
Nissan Pathfinder 2005-0 6148
Nissan Note 2006-0 6149
Nissan Note 2006-0 6150
Nissan Navara 2005-0 6151
Nissan Navara 2005-0 6152
Nissan Murano 2009-0 6153
Nissan Murano 2009-0 6154
Nissan Micra 2007-0 6155
Nissan Micra 2007-0 6156
Nissan Maxima 2007-0 6157
Nissan March 2003-2007 6158
Nissan March 2003-2007 6159
Nissan GTR 2007-0 6160
Nissan Elgrand 1997-2002 6161
Nissan Elgrand 2002-2010 6162
Nissan Cube 2002-2008 6163
Nissan Cube 2009-0 6164
Nissan Cabstar 2000-0 6165
Nissan Atlas Truck 2007-0 6166
Nissan Armada 2008-0 6167
Nissan Armada 2008-0 6168
Nissan 140Y 1973-1978 4770
Nissan 140Y 1973-1978 4771
Nissan 140Y 1978-1982 4772
Nissan 140Y 1978-1982 4773
Nissan 160J 1978-1982 4774
Nissan 160J 1978-1982 4775
Nissan 180B 1971-1976 4776
Nissan 180B 1971-1976 4777
Nissan 180SX 1989-1994 4778
Nissan 180SX 1995-1999 4779
Nissan 200B 1976-1980 4780
Nissan 200B 1976-1980 4781
Nissan 200SX 1984-1988 4782
Nissan 200SX 1995-1998 4783
Nissan 200SX (North America) 1984-1988 4784
Nissan 200SX (North America) 1995-1998 4785
Nissan 200ZR 1983-1989 4786
Nissan 210 1978-1982 4787
Nissan 210 1978-1982 4788
Nissan 240C 1975-1979 4789
Nissan 240C 1975-1979 4790
Nissan 240C 1979-1984 4791
Nissan 240C 1979-1984 4792
Nissan 240K 1977-1981 4793
Nissan 240K 1977-1981 4794
Nissan 240SX 1989-1994 4795
Nissan 240SX 1995-1998 4796
Nissan 240SX (North America) 1989-1994 4797
Nissan 240SX (North America) 1995-1998 4798
Nissan 240Z 1970-1976 4799
Nissan 240Z 1970-1976 4800
Nissan 260C 1975-1979 4801
Nissan 260C 1975-1979 4802
Nissan 260C 1979-1984 4803
Nissan 260C 1979-1984 4804
Nissan 260Z 1970-1976 4805
Nissan 260Z 1970-1976 4806
Nissan 280C 1975-1979 4807
Nissan 280C 1975-1979 4808
Nissan 280C 1979-1984 4809
Nissan 280C 1979-1984 4810
Nissan 280Z 1976-1978 4811
Nissan 280Z 1976-1978 4812
Nissan 280ZX 1979-1983 4813
Nissan 280ZX 1984-1996 4814
Nissan 300C 1983-1987 4815
Nissan 300ZX 1979-1983 4816
Nissan 300ZX 1983-1989 4817
Nissan 300ZX 1990-1996 4818
Nissan 300ZX 1997-1999 4819
Nissan 310 1979-1983 4820
Nissan 310 1979-1983 4821
Nissan 350Z 2003-0 4822
Nissan 510 1970-1973 4823
Nissan 510 1970-1973 4824
Nissan 510 1978-1982 4825
Nissan 510 1978-1982 4826
Nissan 610 1971-1976 4827
Nissan 610 1971-1976 4828
Nissan 620 1970-1979 4829
Nissan 710 1973-1977 4830
Nissan 710 1973-1977 4831
Nissan 720 1980-1982 4832
Nissan 720 1983-1986 4833
Nissan 810 1976-1980 4834
Nissan 810 1976-1980 4835
Nissan 810 1980-1982 4836
Nissan 810 1980-1982 4837
Nissan 810 1982-1984 4838
Nissan 810 1999-2003 4839
Nissan AD Resort 0-0 4840
Nissan AD Wagon 0-0 4841
Nissan Almera 2000-2004 4842
Nissan Almera Tino 2000-2006 4843
Nissan Altima 1992-1997 4844
Nissan Altima 1998-2000 4845
Nissan Altima 2000-2004 4846
Nissan Altima 2005-0 4847
Nissan Armada 2004-0 4848
Nissan Auster 1986-1989 4849
Nissan Auster 1989-1992 4850
Nissan Axxess 1990-1995 4851
Nissan B110 1970-1973 4852
Nissan B110 1970-1973 4853
Nissan B210 1973-1978 4854
Nissan B210 1973-1978 4855
Nissan Bluebird 1971-1976 4856
Nissan Bluebird 1971-1976 4857
Nissan Bluebird 1976-1980 4858
Nissan Bluebird 1976-1980 4859
Nissan Bluebird 1980-1982 4860
Nissan Bluebird 1980-1982 4861
Nissan Bluebird 1982-1984 4862
Nissan Bluebird 1985-1988 4863
Nissan Bluebird 1989-1992 4864
Nissan Bluebird 1992-1997 4865
Nissan Bolero 1997-0 4866
Nissan Cabstar 0-1982 4867
Nissan Cabstar 0-1982 4868
Nissan Cabstar Truck 0-1982 4869
Nissan Cabstar Truck 0-1982 4870
Nissan Caravan 0-0 4871
Nissan Caravan 0-0 4872
Nissan Caravan 0-0 4873
Nissan Caravan 0-0 4874
Nissan Cedric 1975-1979 4875
Nissan Cedric 1975-1979 4876
Nissan Cedric 1979-1984 4877
Nissan Cedric 1979-1984 4878
Nissan Cedric 1983-1987 4879
Nissan Cefiro 1990-1993 4880
Nissan Cefiro 1995-1999 4881
Nissan Cherry 0-0 4882
Nissan Cherry Europe 0-0 4883
Nissan Cima 1997-2000 4884
Nissan Cube 1998-2001 4885
Nissan EXA 1987-1990 4886
Nissan F10 1976-1978 4887
Nissan F10 1976-1978 4888
Nissan Fairlady Z 1970-1976 4889
Nissan Fairlady Z 1970-1976 4890
Nissan Fairlady Z 1976-1978 4891
Nissan Fairlady Z 1976-1978 4892
Nissan Fairlady Z 1979-1983 4893
Nissan Florida 1989-1991 4894
Nissan Frontier 1998-2004 4895
Nissan Frontier 2004-0 4896
Nissan Gazelle 1975-1979 4897
Nissan Gazelle 1975-1979 4898
Nissan Gazelle 1980-1983 4899
Nissan Gazelle 1980-1983 4900
Nissan Gazelle 1984-1988 4901
Nissan Gazelle 1989-1994 4902
Nissan Gazelle 1995-1999 4903
Nissan Gloria 1975-1979 4904
Nissan Gloria 1975-1979 4905
Nissan Gloria 1979-1984 4906
Nissan Gloria 1979-1984 4907
Nissan Gloria 1983-1987 4908
Nissan Hardbody 1985-1997 4909
Nissan Hardbody 1997-2000 4910
Nissan Homy 0-0 4911
Nissan Homy 0-0 4912
Nissan Homy 0-0 4913
Nissan King Cab 1985-1997 4914
Nissan King Cab 1997-2000 4915
Nissan Langley 1976-1978 4916
Nissan Langley 1976-1978 4917
Nissan Langley 1979-1983 4918
Nissan Langley 1979-1983 4919
Nissan Langley 1983-1986 4920
Nissan Langley 1987-1991 4921
Nissan Largo 1993-1994 4922
Nissan Largo 1996-2002 4923
Nissan Laurel 1983-1986 4924
Nissan Laurel Spirit 1983-1986 4925
Nissan Leopard Coupe 1984-1993 4926
Nissan Lucino 1995-1998 4927
Nissan March 1983-1992 4928
Nissan March 1992-1999 4929
Nissan March 2000-2003 4930
Nissan Maxima 1980-1982 4931
Nissan Maxima 1980-1982 4932
Nissan Maxima 1982-1984 4933
Nissan Maxima 1985-1988 4934
Nissan Maxima 1989-1992 4935
Nissan Maxima 1993-1995 4936
Nissan Maxima 1995-1999 4937
Nissan Maxima 1999-2000 4938
Nissan Maxima 2000-2003 4939
Nissan Maxima 2004-0 4940
Nissan Maxima (North America) 1980-1982 4941
Nissan Maxima (North America) 1980-1982 4942
Nissan Maxima (North America) 1982-1984 4943
Nissan Maxima (North America) 1985-1988 4944
Nissan Maxima (North America) 1989-1992 4945
Nissan Maxima (North America) 1993-1995 4946
Nissan Maxima (North America) 1995-1999 4947
Nissan Maxima (North America) 1999-2000 4948
Nissan Maxima (North America) 2000-2003 4949
Nissan Maxima (North America) 2004-0 4950
Nissan Micra 2000-2003 4951
Nissan Micra 2003-0 4952
Nissan Micra Van 2000-2003 4953
Nissan Micra Van 2003-0 4954
Nissan Mistral 1992-1995 4955
Nissan Mistral 1995-1996 4956
Nissan Mistral 1997-1998 4957
Nissan Multi 1986-1990 4958
Nissan Murano 2003-2005 4959
Nissan Murano 2005-0 4960
Nissan Navara 1985-1991 4961
Nissan Navara 1992-1997 4962
Nissan Navara 1997-2002 4963
Nissan Navara 2002-2003 4964
Nissan Navara 2003-0 4965
Nissan Nomad 1986-1989 4966
Nissan NX 1991-1993 4967
Nissan NX (North America) 1991-1993 4968
Nissan Pathfinder 1987-1995 4969
Nissan Pathfinder 1996-1999 4970
Nissan Pathfinder 2000-0 4971
Nissan Patrol 1981-1997 4972
Nissan Patrol 1997-1999 4973
Nissan Patrol 2000-2003 4974
Nissan Patrol 2004-0 4975
Nissan Pickup 1974-1980 4976
Nissan Pickup 1982-1986 4977
Nissan Pickup 1986-1997 4978
Nissan Pickup 1998-2003 4979
Nissan Pickup (North American) 1974-1980 4980
Nissan Pickup (North American) 1982-1986 4981
Nissan Pickup (North American) 1986-1997 4982
Nissan Pickup (North American) 1998-2003 4983
Nissan Pickup 620 1970-1979 4984
Nissan Pickup 720 1980-1982 4985
Nissan Pickup 720 1983-1986 4986
Nissan Pickup Roadstar 1978-1984 4987
Nissan Pickup Roadstar 1978-1984 4988
Nissan Pintara 1986-1989 4989
Nissan Pintara 1989-1991 4990
Nissan Pintara 1992-1999 4991
Nissan Prairie 1982-1990 4992
Nissan Prairie 1990-1995 4993
Nissan President 1990-1996 4994
Nissan President 1997-2001 4995
Nissan Primera 1990-1994 4996
Nissan Primera 1995-1996 4997
Nissan Primera 1997-1998 4998
Nissan Primera 1998-2000 4999
Nissan Primera 2000-2002 5000
Nissan Primera 2003-0 5001
Nissan Pulsar 1983-1986 5002
Nissan Pulsar 1987-1990 5003
Nissan Pulsar (North America) 1983-1986 5004
Nissan Pulsar (North America) 1987-1990 5005
Nissan Pulsar LX 2005-0 5006
Nissan Pulsar NX 1987-1990 5007
Nissan Quest 1993-1995 5008
Nissan Quest 1996-2002 5009
Nissan Quest 2004-0 5010
Nissan Roadstar 1978-1984 5011
Nissan Roadstar 1978-1984 5012
Nissan Rumba 1998-0 5013
Nissan Safari 1997-2000 5014
Nissan Sakura 1980-1983 5015
Nissan Sakura 1980-1983 5016
Nissan Samurai 1980-1983 5017
Nissan Samurai 1980-1983 5018
Nissan S-Cargo 0-0 5019
Nissan Sentra 1982-1986 5020
Nissan Sentra 1987-1990 5021
Nissan Sentra 1991-1994 5022
Nissan Sentra 1995-1999 5023
Nissan Sentra 2000-2003 5024
Nissan Sentra 2004-0 5025
Nissan Sentra (North America) 1982-1986 5026
Nissan Sentra (North America) 1987-1990 5027
Nissan Sentra (North America) 1991-1994 5028
Nissan Sentra (North America) 1995-1999 5029
Nissan Sentra (North America) 2000-2003 5030
Nissan Sentra (North America) 2004-0 5031
Nissan Sentra (Sedan & Hatch) 1987-1991 5032
Nissan Serena 1993-1994 5033
Nissan Serena 1996-0 5034
Nissan Silvia 1975-1979 5035
Nissan Silvia 1975-1979 5036
Nissan Silvia 1980-1983 5037
Nissan Silvia 1980-1983 5038
Nissan Silvia 1984-1988 5039
Nissan Silvia 1989-1994 5040
Nissan Silvia 1995-1999 5041
Nissan Skyline 1977-1981 5042
Nissan Skyline 1977-1981 5043
Nissan Skyline 1982-1986 5044
Nissan Skyline 1986-1991 5045
Nissan Sportstar 1978-1984 5046
Nissan Sportstar 1978-1984 5047
Nissan Stanza 1982-1986 5048
Nissan Stanza 1987-1989 5049
Nissan Stanza 1990-1992 5050
Nissan Stanza (North America) 1982-1986 5051
Nissan Stanza (North America) 1987-1989 5052
Nissan Stanza (North America) 1990-1992 5053
Nissan Stanza Wagon (North America) 1986-1990 5054
Nissan Sunny 1978-1984 5055
Nissan Sunny 1978-1984 5056
Nissan Sunny Pickup 1978-1984 5057
Nissan Sunny Pickup 1978-1984 5058
Nissan Terrano 1992-1995 5059
Nissan Terrano 1995-1996 5060
Nissan Terrano 1997-1998 5061
Nissan Terrano 1998-1999 5062
Nissan Terrano 2000-2001 5063
Nissan Terrano 2002-2003 5064
Nissan Terrano 2004-0 5065
Nissan Terrano II 1992-1995 5066
Nissan Terrano II 1995-1996 5067
Nissan Terrano II 1997-1998 5068
Nissan Terrano II 1998-1999 5069
Nissan Terrano II 2000-2001 5070
Nissan Terrano II 2002-2003 5071
Nissan Terrano II 2004-0 5072
Nissan Tino 2000-2004 5073
Nissan Titan 2004-0 5074
Nissan Trade Europe 0-0 5075
Nissan Tsubame 0-0 5076
Nissan Tsuru 1986-1990 5077
Nissan Tsuru II 1986-1990 5078
Nissan Urvan 0-0 5079
Nissan Urvan 0-0 5080
Nissan Urvan 0-0 5081
Nissan Van 1986-1989 5082
Nissan Vanette 0-0 5083
Nissan Vanette Europe 0-0 5084
Nissan Vector 1987-1991 5085
Nissan Violet 1973-1977 5086
Nissan Violet 1973-1977 5087
Nissan Violet 1978-1982 5088
Nissan Violet 1978-1982 5089
Nissan Xterra 1998-2003 5090
Nissan Xterra 2004-0 5091
Nissan X-Trail 1998-2000 5092
Nissan X-Trail 2001-0 5093
Nissan X-Trail 2001-0 5094
Nissan 100NX 1991-1999 4757
Nissan 1200 1970-1973 4758
Nissan 1200 1970-1973 4759
Nissan 120Y 1973-1978 4760
Nissan 120Y 1973-1978 4761
Nissan 120Y 1978-1982 4762
Nissan 120Y 1978-1982 4763
Nissan 140J 1978-1982 4764
Nissan 140J 1978-1982 4765
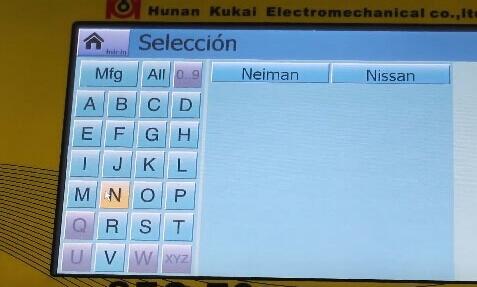

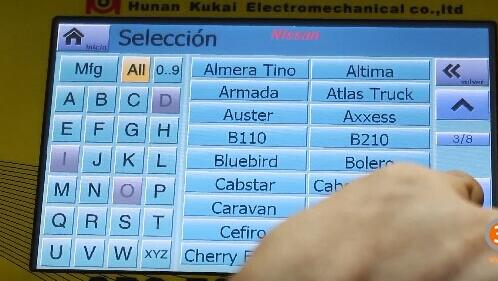
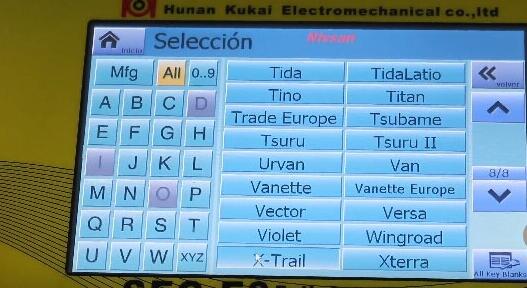
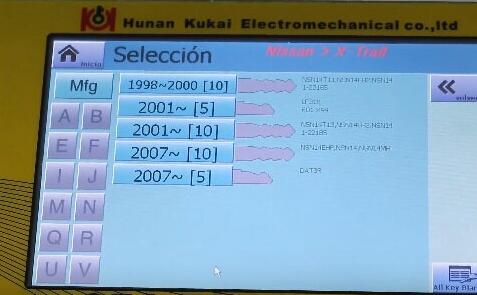
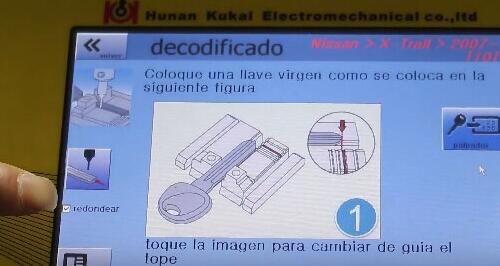
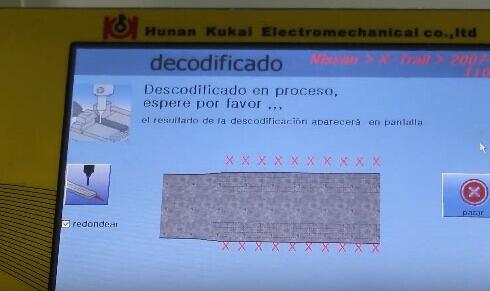
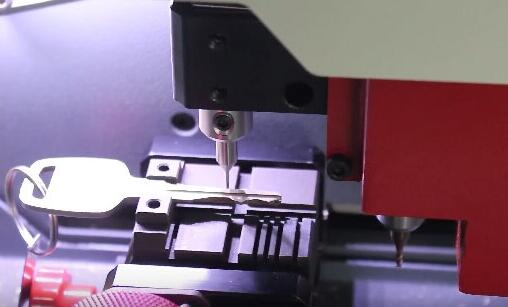
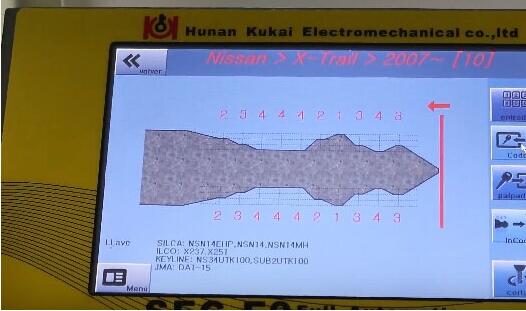

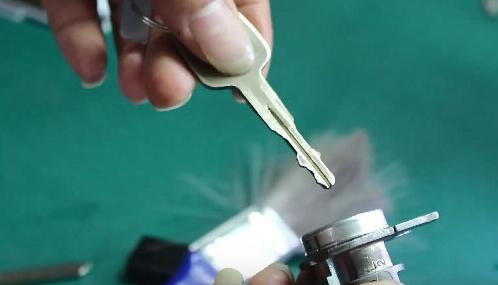

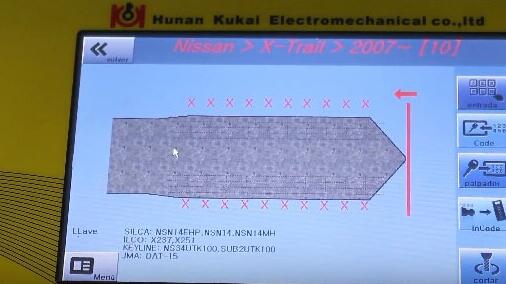
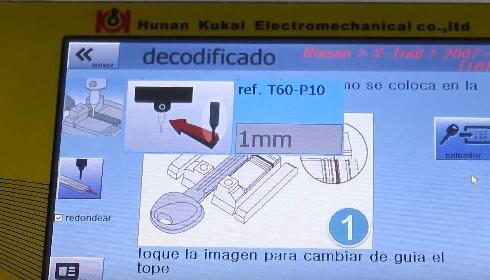
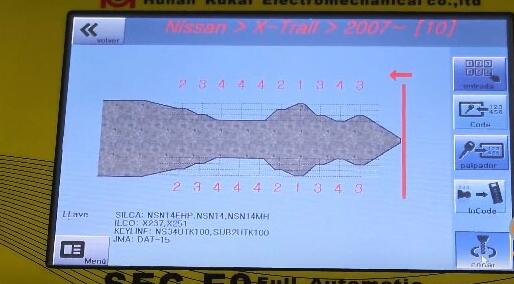
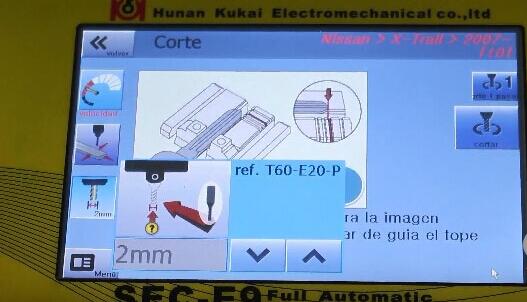
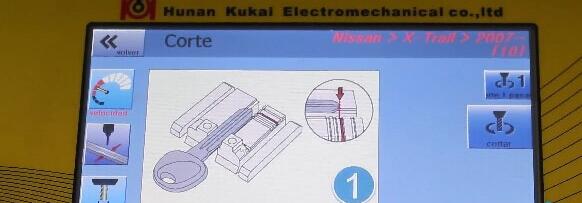
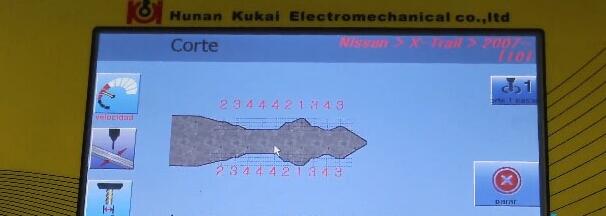
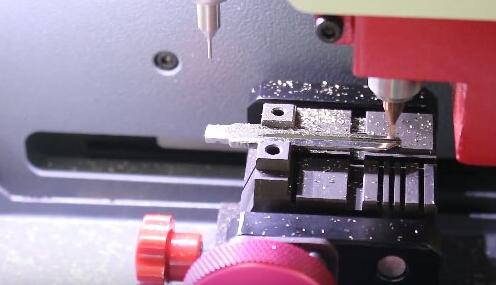
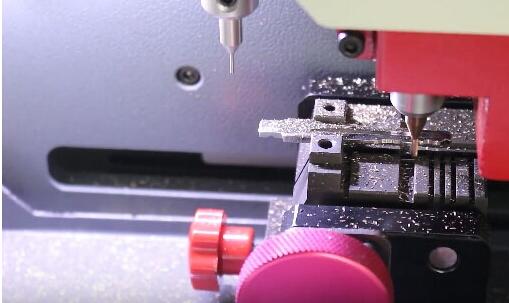
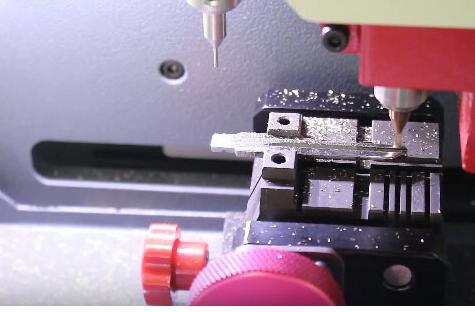
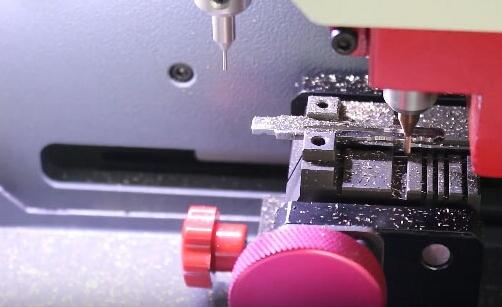


Posted by: Emily white at
10:17 AM
| No Comments
| Add Comment
Post contains 2188 words, total size 30 kb.
32 queries taking 0.0529 seconds, 196 records returned.
Powered by Minx 1.1.6c-pink.

